4. Familiarization Exercises
This section gives step-by-step instructions for using the Vortex OpenSplice Tester to perform many typical tasks to help you become familiar with the way it operates.
The exercises in this section assume that OpenSplice and the Tester have been succesfully installed. These illustrations make use of the example data supplied with the product.
4.1. Starting the Tester
OpenSplice must already be running before you start the Tester.
Step 1: Start Vortex OpenSplice
Step 2: Start the Tester:
On Linux, run
ospltest.On Windows, choose Launcher from the Start menu. In the Launcher Tools tab, click on the Tester button. Or run
ospltestfrom a command prompt.
Starting Tester
4.2. Connection management
When it starts, the Tester will automatically try to establish a connection to a running instance of OpenSplice using the default URI. You can also make or break connections from the main window by following the steps given below.
The command line option -nac stops Tester from making a connection at startup,
and with the -uri command line option a connection to an alternative URI can be
made at startup.
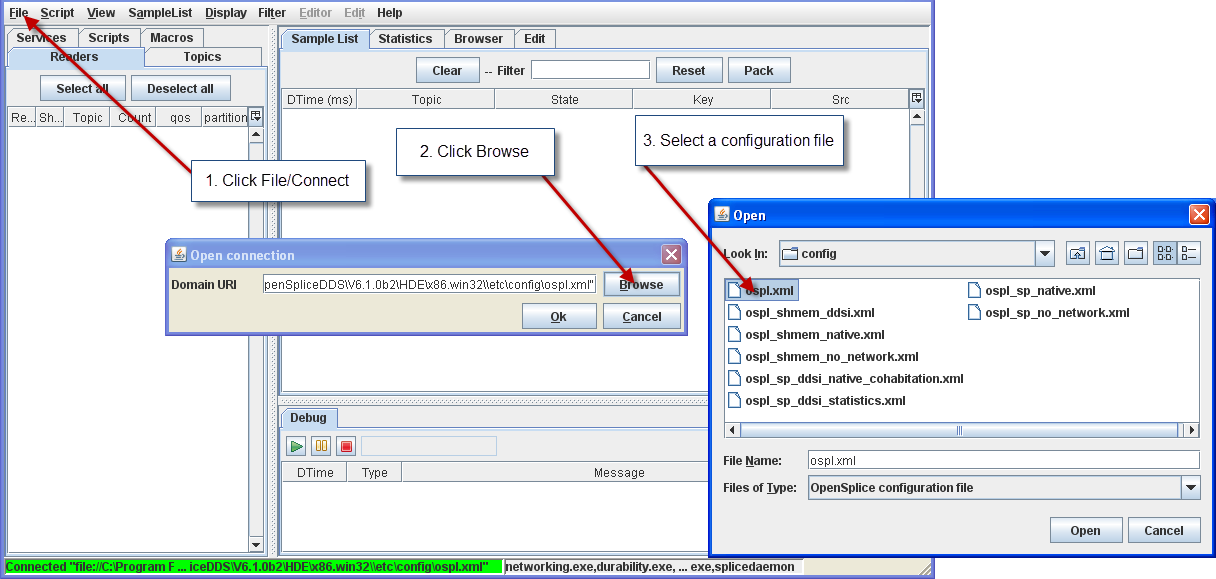
4.2.1. To Connect to a local OpenSplice instance
Step 1: Choose File > Connect.
Step 2: Set the path or Browse to the configuration file
(e.g., file://<OpenSplice install dir>/etc/config/ospl.xml).
Step 3: Click the OK button.
Connecting to a local OpenSplice instance
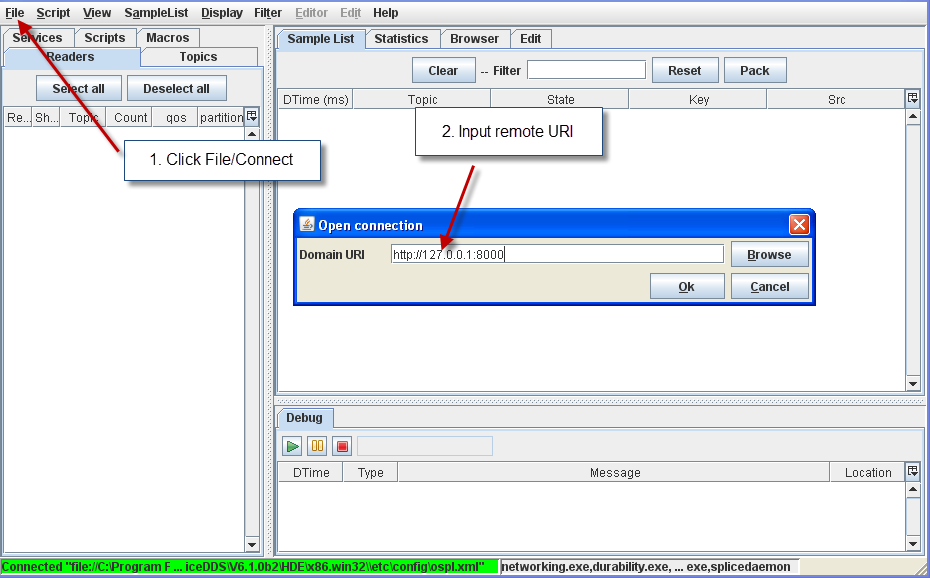
4.2.2. To Connect to a remote OpenSplice instance
Step 1: Choose File > Connect.
Step 2: Enter the URI for the remote OpenSplice system
(e.g., http://127.0.0.1:8000).
Note: The port number must be set to the port number as configured for the SOAP service of the remote OpenSplice instance.
Step 3: Click the OK button.
Connecting to a remote OpenSplice instance
4.2.3. To Disconnect
Step 1: Choose File > Disconnect.
4.2.4. To Exit Tester
Step 1: Choose File > Exit or click the Close button ![]() on
the Tester main window.
on
the Tester main window.
4.3. Topics and Readers
Tester can subscribe to multiple topics. These Readers will comprise a timeline for testing. Samples of those topics are automatically read and displayed in the Sample List. Tester readers can also be used to write or edit samples.
4.3.1. The Topic list
Check the Topic list. Make sure that the Tester is connected to the default URI.
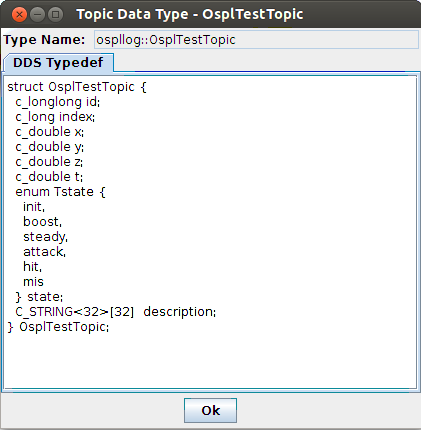
4.3.2. To View a Topic’s Type definition
Step 1: Select the Topics tab.
Step 2: Right-click OsplTestTopic.
Step 3: Choose View Topic Type from the pop-up menu. The View Topic Type window will appear, displaying the type name and type description for the chosen topic.
Viewing a topic’s type
4.3.3. To Add a Reader from the Topic list
Step 1: Select the Topics tab.
Step 2: Right-click OsplTestTopic.
Create Readers from the Topics list
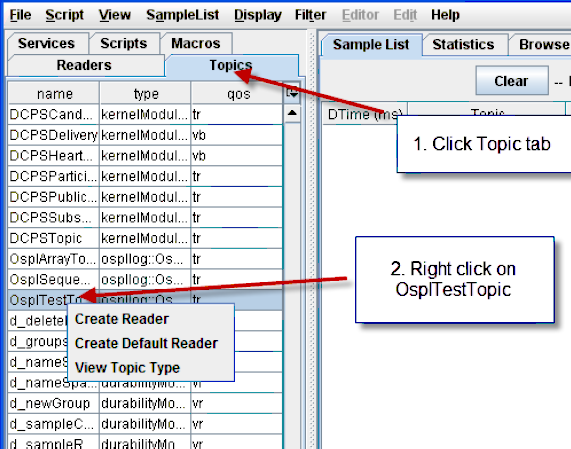
Step 3: Choose Create Default Reader from the pop-up menu. The reader will automatically be named the same as the topic.
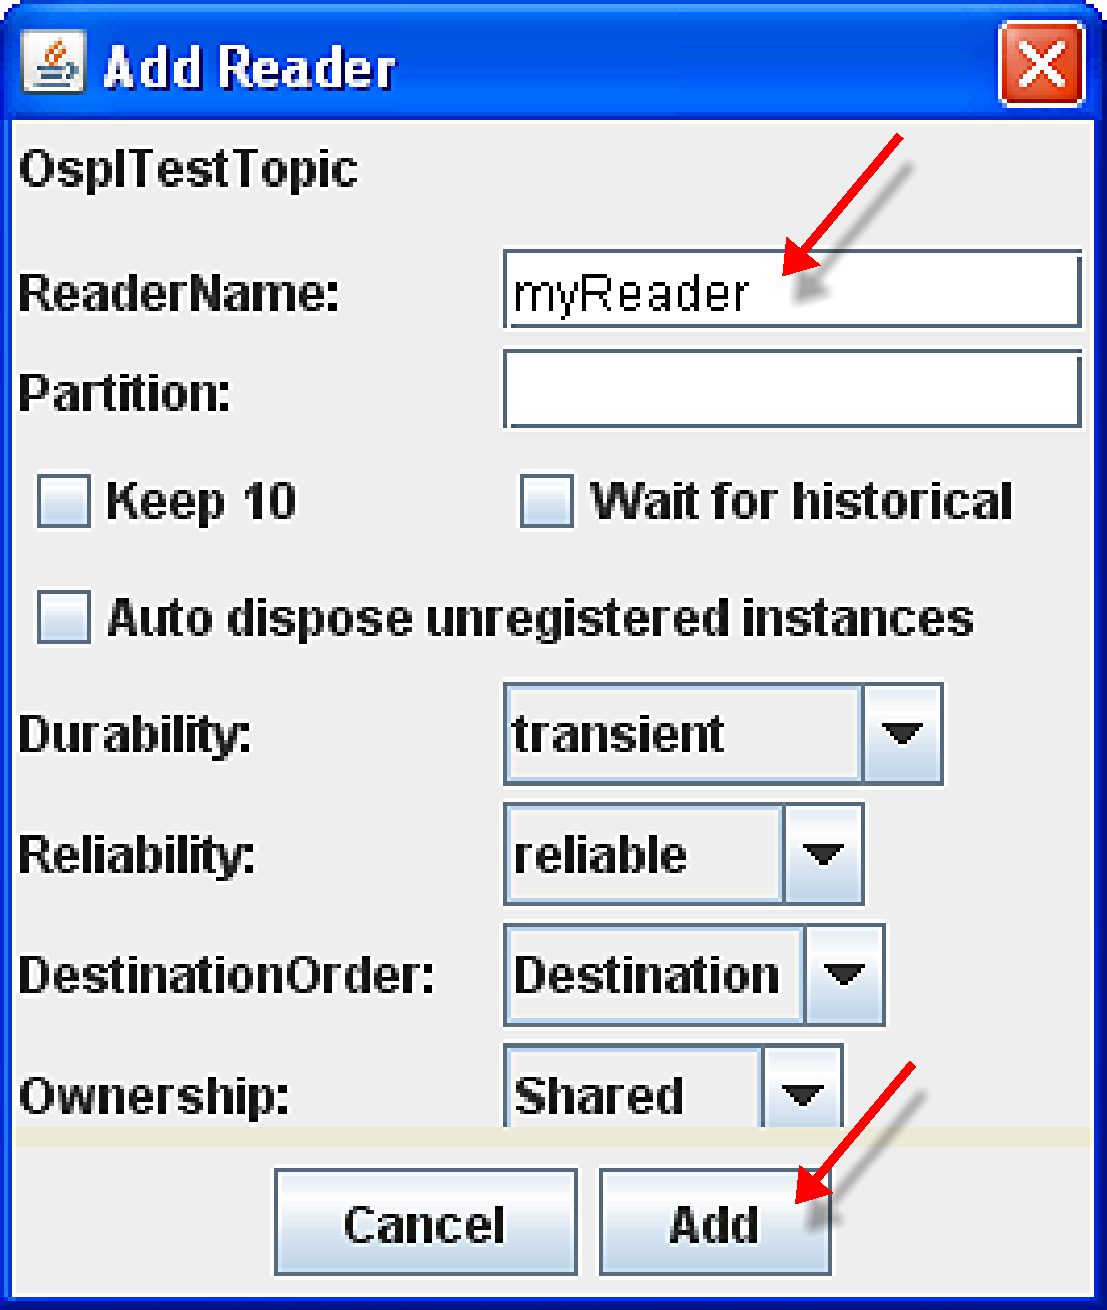
Step 4: Choose Create Reader and modify the (writer) QoS or reader name if desired.
Step 5: Click Add.
Create myReader
Step 6: Open the Readers tab and you will see the readers you just created.
4.3.4. To Add a Reader from the File menu
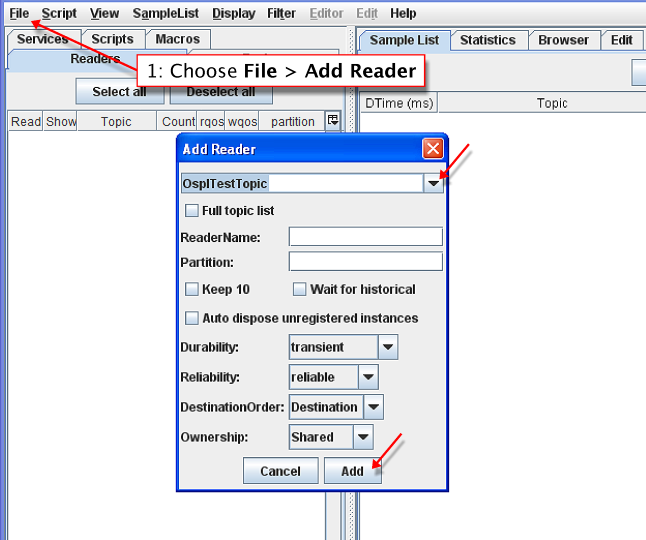
Step 1: Select the Readers tab.
Step 2: Choose File > Add Reader.
Step 3: Select OsplTestTopic from the drop-down list.
Step 4: Click Add.
4.3.5. To Add multiple Readers to the Tester timeline
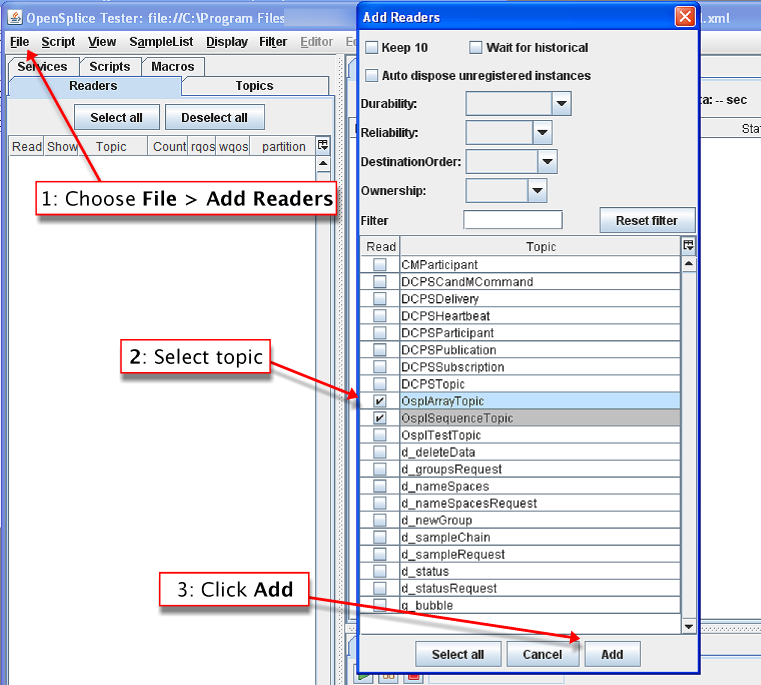
Step 1: Choose File > Add Readers.
Step 2: Type ospl in the filter field to limit the list of topics.
Select OsplArrayTopic and OsplSequenceTopic.
Step 3: Click Add.
Adding multiple Readers
4.3.6. To Save the current Readers to a file
If you need to preserve the Readers for a timeline, you can save the current Readers list.
Step 1: Choose File > Save Readers List.
Step 2: Enter a name for the new file.
Step 3: Click Save.
4.3.7. To Remove all Readers
Step 1: Choose File > Remove all Readers.
4.3.8. To Load Readers from a saved file
Step 1: Choose File > Load Readers List.
Step 2: Select the name of the saved file.
Step 3: Click Load.
4.3.9. To Delete a Reader
Step 1: Select OsplTestTopic reader from the list.
Step 2: Press the [Delete] key or right-click on OsplTestTopic and choose Delete Reader from the pop-up menu.
4.3.10. Notes on Reader Behavior Upon Creation
When creating a Tester “reader” (which comprises of a DDS reader and writer), there are two distinct initialization behaviors to be aware of.
First is the QoS setting that the DDS reader will inherit. When creating a reader with implicit default settings, such as the “Create Default Reader” action from the topics table, the DDS writer will take on the same QoS as the topic, while the DDS reader will always use “vbD” for the durability, reliability, and order-by policies. Also, wait for historical data is not enabled for these default readers, which means that no historical data will be delivered to these volatile readers.
On the other hand, when a Tester reader is created via a method that prompts for custom QoS settings, such as the “Create Reader” action from the topics table, then the DDS writer and reader will both take on the same QoS settings, as well as the wait for historical data option specified by the user.
4.4. Samples
4.4.1. Writing and Editing Samples
4.4.1.1. To Write Sample Topic data
Step 1: Select OsplTestTopic reader from the list.
Step 2: Press [F4] or choose Edit Sample from the pop-up menu.
Step 3: Enter following values for the fields in the list:
id:
0, t:1, x:1, y:1, z:1
Entering sample topic data
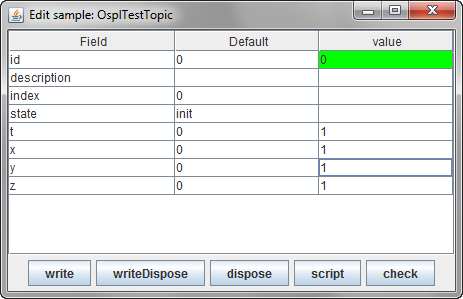
Step 4: Click the write button.
Step 5: Close the Edit Sample window.
4.4.1.2. To display detailed information on sample data
Step 1: Double-click on the first OsplTestTopic sample in the Sample List window.
Display detailed sample data information
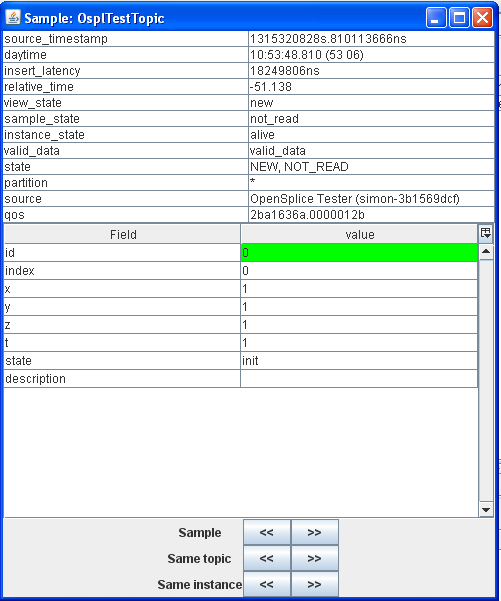
4.4.1.3. More information on sample info
The detailed sample data table displays sample info data of a given sample. Some fields are derived from middleware sample info data, while others are not. What follows is a description of some of those fields.
The insert_latency is a calculated value representing the difference between the sample’s insert timestamp, and its write timestamp, as it is received in the sample info.
The relative_time is a Tester specific time measurement, in seconds. It does not represent any actual timestamps from the middleware. Its main use is determining the time elapsed between a Tester scenario script execution start and the sample receipt. It’s mainly meant as a loose measurement of time tracking since start of sample reading or start of a script scenario, and not as a strict real-time middleware timing.
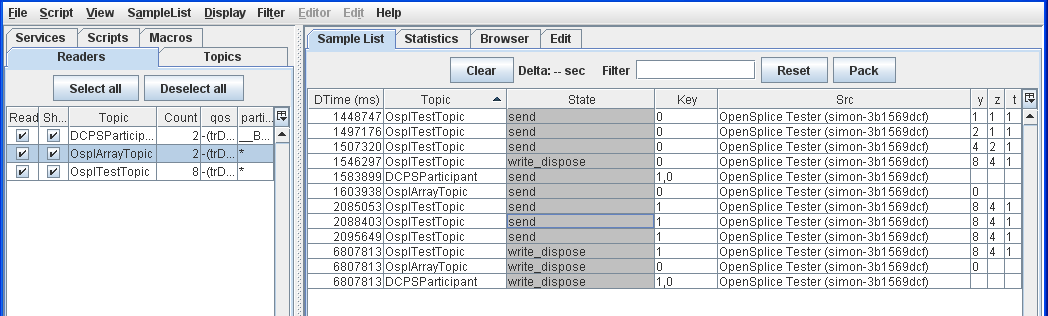
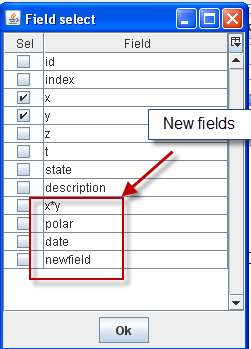
4.4.1.4. To Display extra fields
By default the Sample List displays topic-independent fields. You can add topic-specific fields as follows:
Step 1: Select any sample.
Step 2: Press [F9] or right-click and choose Select Extra Fields from the pop-up menu.
Step 3: Click to select (‘check’) x, y, z and t.
Selecting extra fields to display
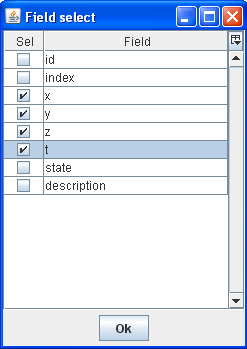
Step 4: Click OK.
The selected fields will be added to the Sample List.
New fields added

4.4.1.5. To Edit a sample
Step 1: Select the first sample.
Step 2: Press [F4] or choose Edit Sample from the pop-up menu.
Step 3: Enter following values in the fields:
id:
0, x:1, y:2, z:1, t:1
Step 4: Click Write.
Step 5: Enter following values in the fields:
id:
0, x:1, y:4, z:2, t:1
Step 6: Click Write.
Step 7: Enter following values in the fields:
id:
0, x:1, y:8, z:3, t:1
Step 8: Click Write.
- Step 9: Enter following values in the fields:
id:
1, x:1, y:8, z:4, t:1
Step 10: Click WriteDispose.
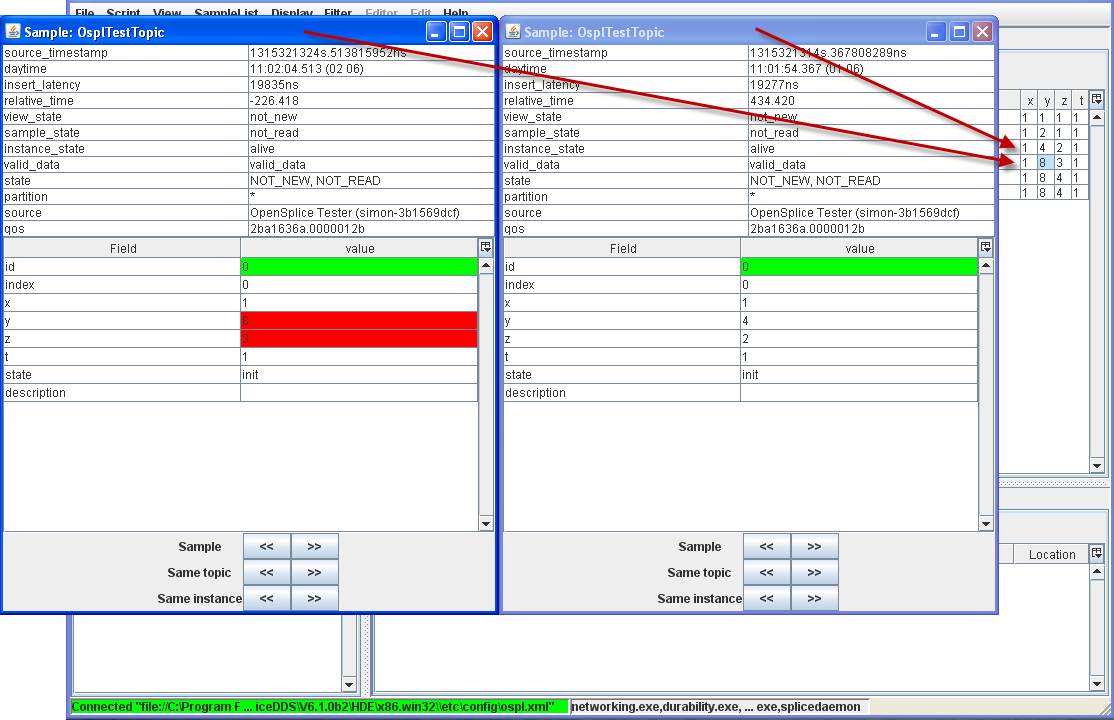
4.4.1.6. To Compare two samples
Step 1: Double-click the sample with the values
id: 0, x: 1, y: 4, z: 2, t: 1.
Step 2: Select the sample with the values
id: 0, x: 1, y: 8, z: 3, t: 1.
Step 3: Press [F2] or choose Compare Samples from the pop-up menu.
Comparing samples
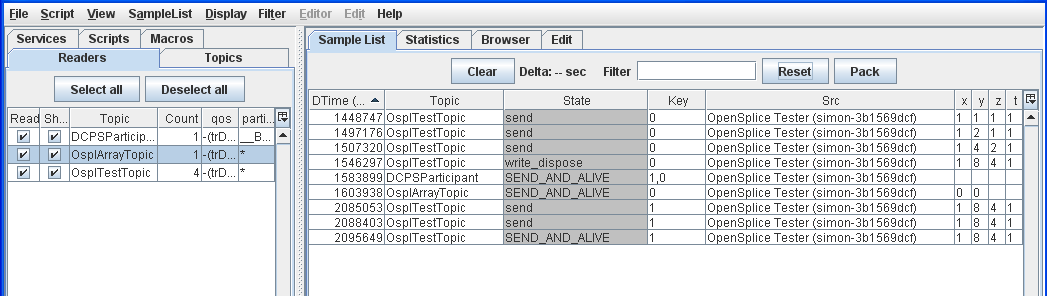
4.5. Filtering
Filtering: un-filtered Topic list
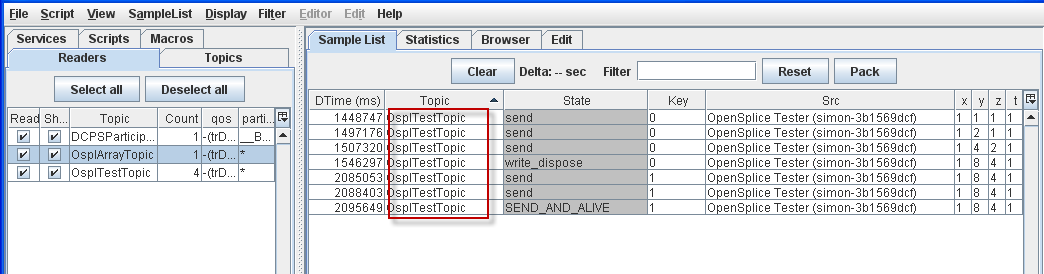
4.5.1. To Filter the Sample List on a Topic
Step 1: Select the OsplTestTopic sample.
Step 2: Press [F5] or choose Filter on Topic from the pop-up menu.
Sample List filtered by Topic
4.5.2. To Reset Filters and display all samples
Step 1: Press [F7] or choose Reset filter from the pop-up menu or click the Reset button on the Sample List window.
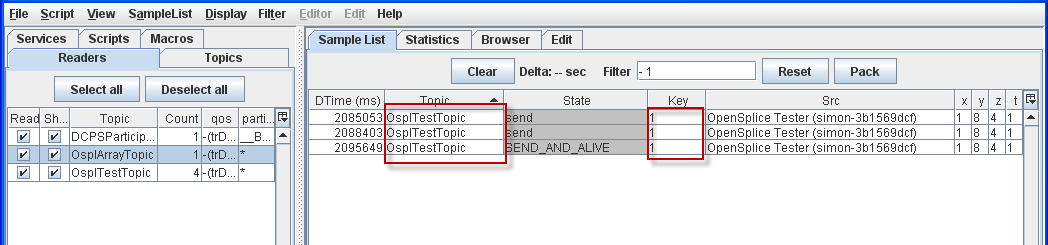
4.5.3. To Filter on both Topic and Key
Step 1: Select OsplTestTopic with id(key): 1.
Step 2: Press [F5] or choose Filter on topic and key from the pop-up menu.
Sample List filtered by Topic and Key
4.5.4. Filter samples on State
Step 1: Select a sample with a State of SEND_AND_ALIVE.
Step 2: Choose Filter on State from the pop-up menu.
Sample List filtered by State

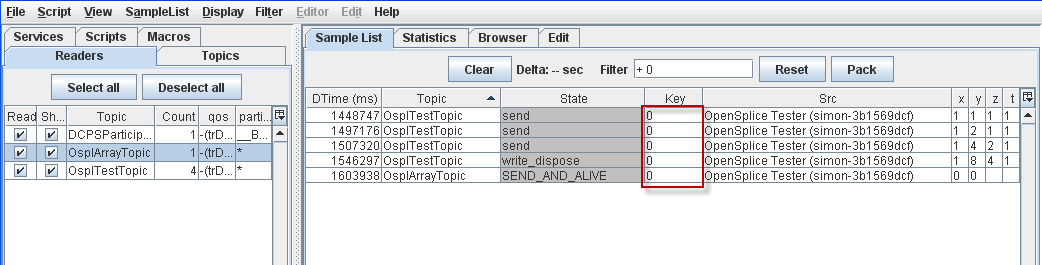
4.5.5. To Filter Samples on Key value
Step 1: Select OsplTestTopic with id(key): 0.
Step 2: Choose Filter on key from the pop-up menu.
Sample List filtered by Key value
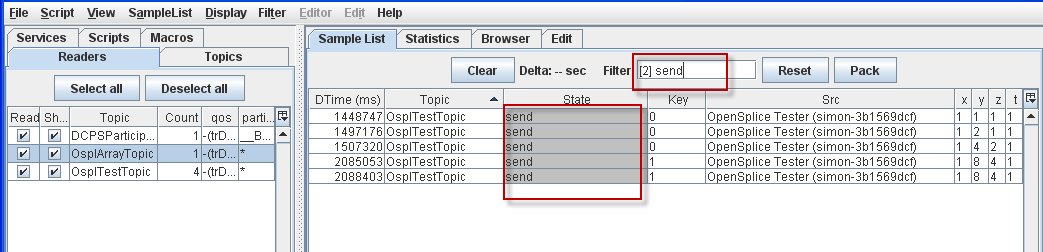
4.5.6. Filter on column text
Step 1: Select the State column of any sample.
Step 2: Choose Filter on column text from the pop-up menu.
Step 3: Type in send.
Step 4: Press the [Enter] key.
Sample List filtered by column text
4.5.7. Find specific text
Step 1: Press [Ctrl+F] to open the Find dialog.
The Find dialog
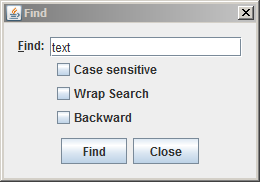
Step 2: Type in the text to search for, and select any of the options if required.
Step 3: Click Find. The first occurrence of the search text is highlighted.
Step 4: Click Find again to find the next occurrence of the search text.
4.5.8. Global Topic filters
Topic filters
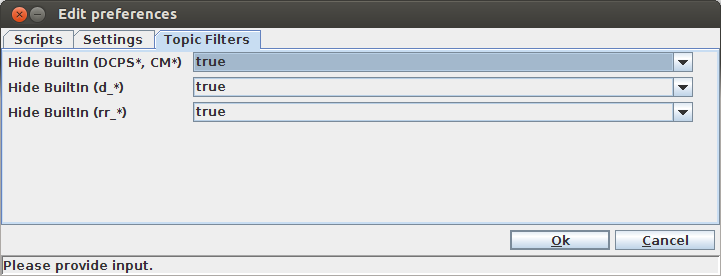
It is possible to completely hide certain topics from all views in the tool. These
are global topic filter preferences, which can be enabled (true) or disabled (false).
They are accessed from the preferences window in File > Preferences > Topic Filters.
Enabling a given filter will hide the matching topics from the Topics table and from
the system browser view.
4.6. Working with Samples
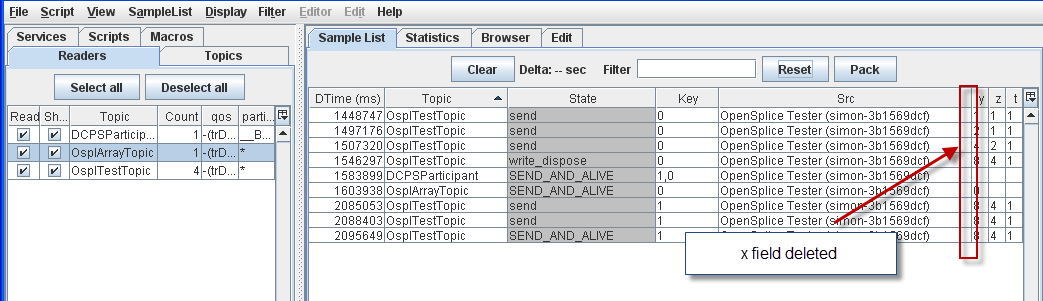
4.6.1. To Delete a column from the Sample List table
Step 1: Select the x column of any sample.
Step 2: Press the [Delete] key.
Column deleted from Sample List display
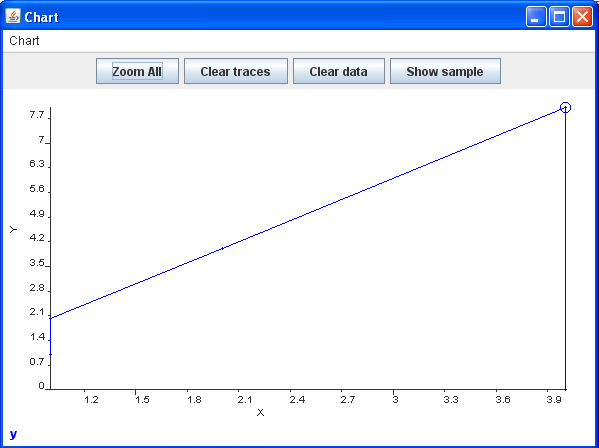
4.6.2. To Chart Sample Data
Using any list of samples:
Step 1: Select the z column of any sample and press the [X] key.
Step 2: Select the y column of any sample and press the [Y] key.
Step 3: Choose SampleList > Show Chart or press [Alt+Shift+C] to display the chart.
Chart of Sample data
4.6.3. To Dump a sample list to a file
Step 1: Choose SampleList > Dump.
Step 2: Enter a name for the file to save.
Step 3: Click Save.
4.6.4. To Dump selected Samples only
Step 1: Select OsplTestTopic with key: 1.
Step 2: Choose SampleList > Dump Selection.
Step 3: Enter a name for the file to save.
Step 4: Click Save.
4.6.5. To Dump to a CSV format file
Step 1: Choose SampleList > Dump to CSV.
Step 2: Enter a name for the file to save.
Step 3: Click Save.
4.6.6. To Dispose data with Alive state
Step 1: Choose SampleList > Dispose Alive.
Disposing data with ‘Alive’ state
4.6.7. To Translate Sample data to test script
Step 1: Choose SampleList > Diff Script.
The Scripting commands to replicate all of the sample data will be inserted into the current scenario in the Edit window.
4.6.8. Translate selected sample to test script
Step 1: Select a set of samples.
Step 2: Choose SampleList > DiffScript Selection.
The Scripting commands to replicate this subset of the sample data will be inserted into the current scenario in the Edit window.
4.6.9. To display samples with not_alive_no_writers state
There is a setting to control whether Tester’s active data readers
ignore samples whose state is NOT_ALIVE_NO_WRITERS.
If an application data writer has a QoS of
autodispose_unregistered_instances set to false and then
unregister_instance is called on a data writer for some instance, a sample
reaches matching data readers with the no_writers state.
The default setting is true, which means that these samples are ignored and not
displayed.
‘Max samples’ and ‘not_alive’ options
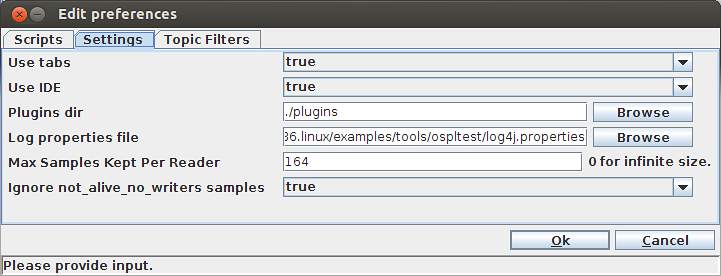
4.6.10. To control the number of samples kept per reader
It is possible to limit the number of samples kept per reader. This setting, Max Samples kept per reader, is accessed by choosing File > Preferences > Settings.
This setting accepts integer values. The default value is 0, which means
that there is no limit imposed on the number of samples that will be stored.
4.7. Groups
4.7.1. Definition of a Group in Tester
Vortex OpenSplice supports setting of the Presentation policy of publishers and subscribers. As a result, Tester can set these policies on its own created publishers and subscribers and be able to write/read coherent sets of data into/from the system.
Just as in Tester where data reader and data writer are aggregated into a Reader and listed in the Readers list, a custom created publisher and subscriber pair are aggregated into a Group and are listed in the Groups list. A Group has a defined Partition and Presentation QoS policy that is set on creation and is set to its contained publisher and subscriber.
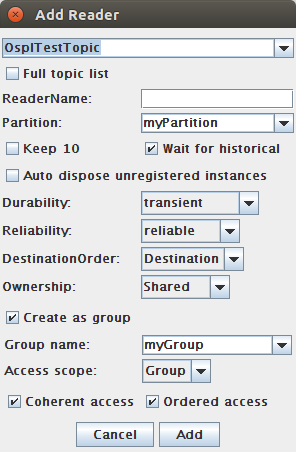
4.7.2. To Add a Reader under a Group
Step 1: Choose File > Add Reader.
Step 2: Select OsplTestTopic from the drop-down topics list.
Step 3: Check the box labeled Create as group.
Step 4a: Choose a name for the Group (Group name must be unique and non empty).
Step 4b: Fill in desired Partition, and Presentation policy settings (Access scope, Coherent access and Ordered access).
OR
Step 4c: Select an already existing Group from the drop-down Groups list. Partition and Presentation form elements will populate to existing values for the selected Group and become disabled.
Step 5: Click Add.
Create a Reader under a Group
Completing this action will create the Groups tab on the main panel if this is the first Group that has been created in the current session.
![]() If there is already a reader existing on the selected topic, then the
new reader must have a unique name assigned to it, else the new reader will not
be created and assigned to the Group.
If there is already a reader existing on the selected topic, then the
new reader must have a unique name assigned to it, else the new reader will not
be created and assigned to the Group.
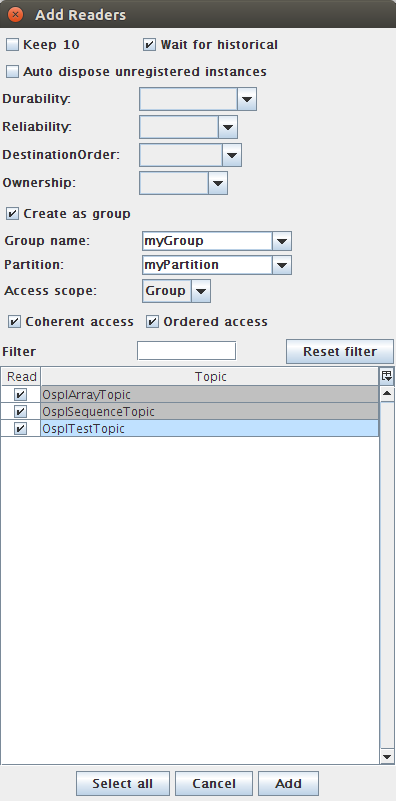
4.7.3. To Add multiple Readers under a Group
Step 1: Choose File > Add Readers.
Step 2: Select OsplTestTopic, OsplArrayTopic, and OsplSequenceTopic from table.
Step 3: Check the box labeled Create as group.
Step 4a: Choose a name for the Group (Group name must be unique and non empty).
Step 4b: Fill in desired Partition, and Presentation policy settings (Access scope, Coherent access and Ordered access).
OR
Step 4c: Select an already existing Group from the drop-down Groups list. Partition and Presentation form elements will populate to existing values for the selected Group and become disabled.
Step 5: Click Add.
Create multiple Readers under a Group
Completing this action will create the Groups tab on the main panel if this is the first Group that has been created in the current session.
![]() If there is already a reader existing on a selected topic, then the
new reader must have a unique name assigned to it, else the new reader will not
be created and assigned to the Group. In this case, one should use the method in
To Add a Reader under a Group.
If there is already a reader existing on a selected topic, then the
new reader must have a unique name assigned to it, else the new reader will not
be created and assigned to the Group. In this case, one should use the method in
To Add a Reader under a Group.
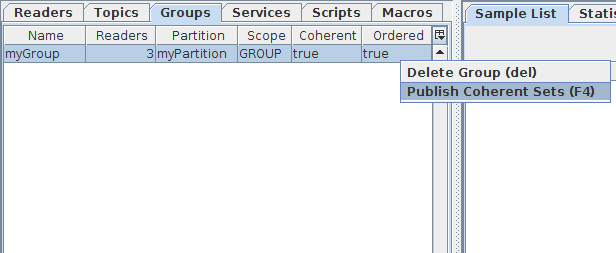
4.7.4. To Publish coherent sets
Once at least one Group has been created, the Groups tab will become visible. It contains a list of currently active groups, their QoS policies, and current number of Tester readers (readers under the subscriber, writers under the publisher).
There are two actions available to rows of this table: Delete Group, and Publish Coherent Data.
Deleting a Group will also delete the readers that it owns.
If Publish Coherent Data is selected, then a new window will appear.
Coherent Publisher Window
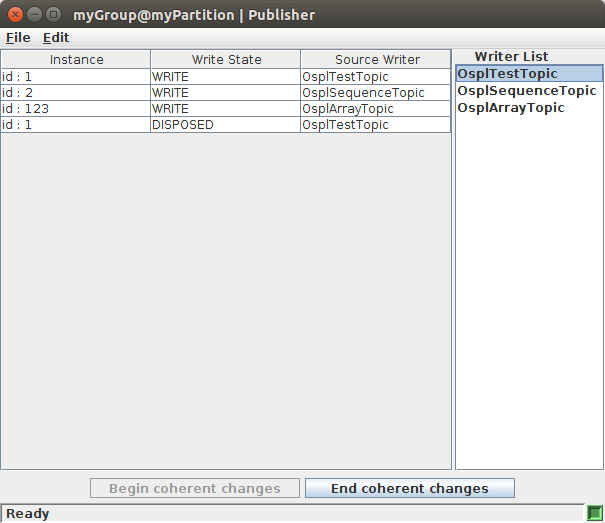
This new view contains two parts: the list of writers currently under this Publisher, and the user data table containing data about the outgoing samples in a coherent set.
The actions available to the user in this view are:
Begin coherent changes
End coherent changes
Refresh writer list
Begin coherent changes will set the publisher in coherent mode. In this state, samples written by this publisher’s writers will not be made visible to remote readers (under a subscriber with matching Presentation policy) until the End coherent changes action is made. Otherwise, samples written while the publisher is not in coherent mode are published normally.
Samples can be constructed and written from this view by either double clicking or right clicking on a writer in the writers list and selecting Write data. This brings up a writer window identical to the one in Writing and Editing Samples, only this one will update the Coherent publish window with written data.
When a sample is constructed in the writer window and then written, disposed, or any other writer action made, and if the publisher is in coherent mode, then the sample will appear in the Coherent publish window’s data table.
The data table displays the written sample’s instance key, the outgoing instance state, and the originating writer’s name. Samples in the data table can be double clicked to bring up a view of the sample edit window populated with the selected sample’s fields and field values.
![]() Once a sample has been written from the writer window, regardless if the publisher
is in coherent mode or not, it is live in the system and cannot be edited.
Once a sample has been written from the writer window, regardless if the publisher
is in coherent mode or not, it is live in the system and cannot be edited.
Once editing a set of coherent data is complete, clicking End coherent changes button will notify the publisher that the set is complete, and remote coherent subscribers will allow access to the published data.
The Refresh writer list action (accessible from the Edit menu or F5 keystroke) refreshes the current list writers that the publisher owns, if any writers were created or deleted since the creation of the window.
4.7.5. To Subscribe coherent sets
The Group’s readers behave in the same way that normal Tester readers behave. All readers are periodically polled for available data and added to the Sample list. A Group’s reader is polled in such a way that it maintains coherent and ordered access.
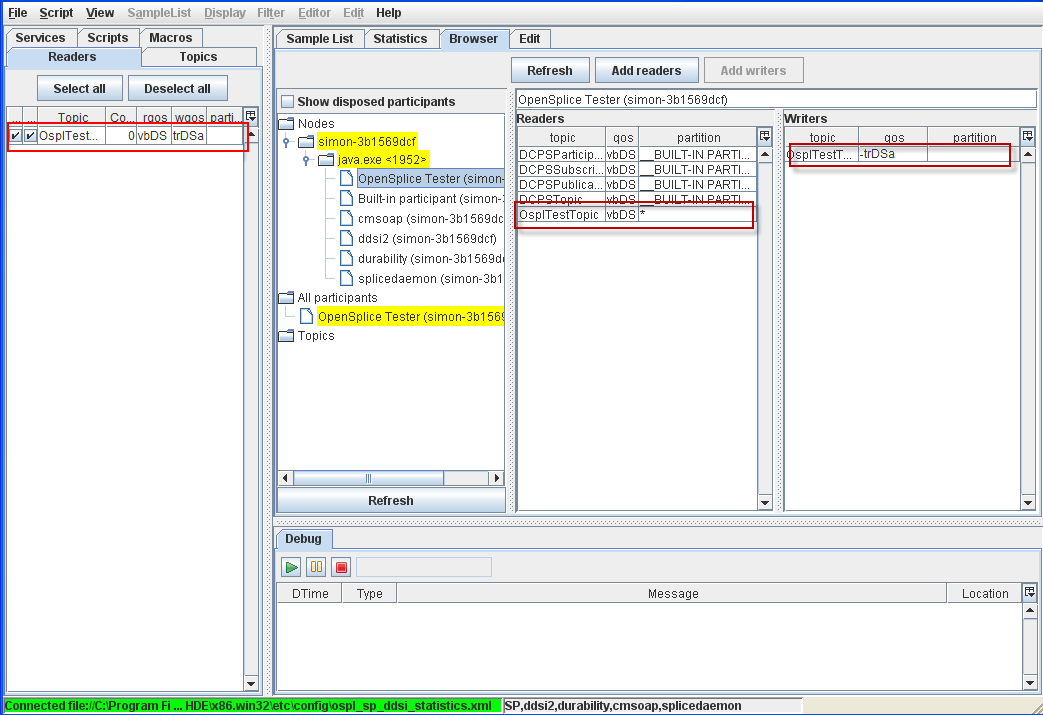
4.8. System Browser (Browser window)
4.8.1. Browse tree
The System Browser is used to examine the Nodes, Participants, and Topics in your system using a tree paradigm.
Step 1: Choose View > Browser or click the Browser tab of the main window.
Step 2: Expand the all tree.
Step 3: Select Tester participant from the Browser tree. Note that your own Tester is highlighted in yellow in the tree.
All participants
- OpenSplice Tester
Step 4: Select Built-in participant from
Nodes
  + <your machine name>
    + java.exe
      - Built-in participant
Step 5: Select Build-in participant from
Nodes
  + <your machine name>
    + java.exe
      - ddsi2
Step 6: View readers and writers of durability service. Select Build-in participant from
Nodes
  + <your machine name>
    + java.exe
      - durability
Step 7: View readers and writers of splicedaemon. Select
Build-in participant from
Nodes
  + <your machine name>
    + java.exe
      - splicedaemon
Browser window
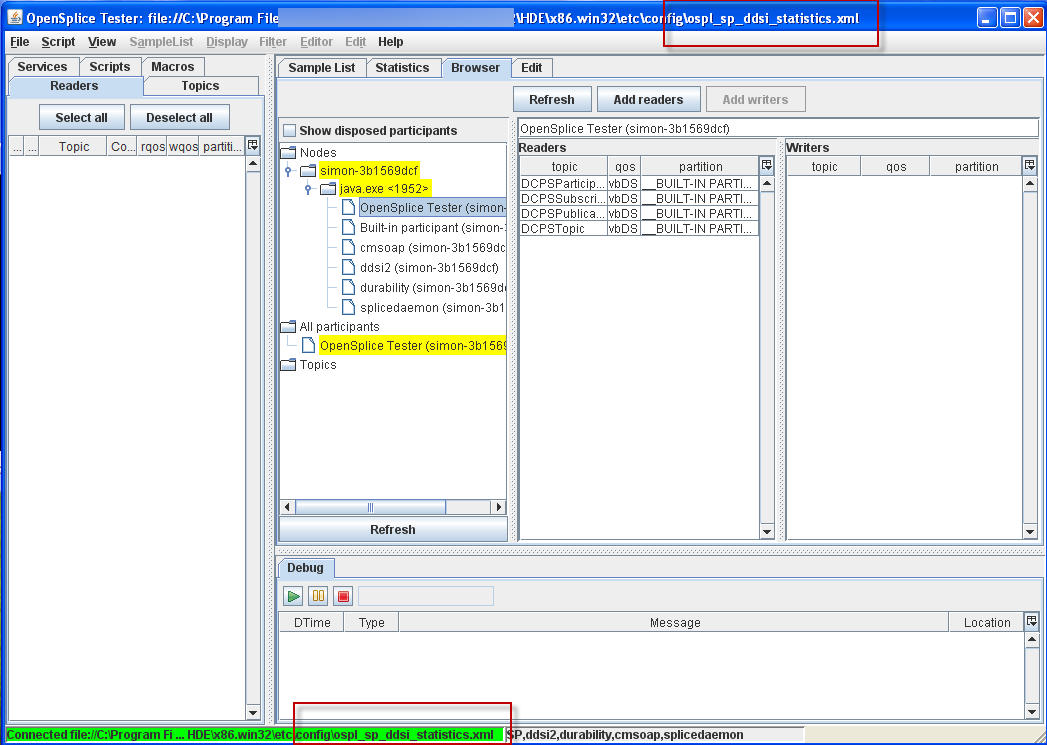
(The red boxes in the illustration indicate the current Open Connection.)
4.8.2. Readers and Writers tables are updated when a new Reader is created
Step 1: Open the Browser window.
Step 2: Select OpenSplice Tester participant from the All participants tree.
Step 3: Create a new OsplTestTopic reader (see
To Add a Reader from the Topic list for instructions).
Step 4: The Readers and Writers table will be updated.
Readers and Writers table updated
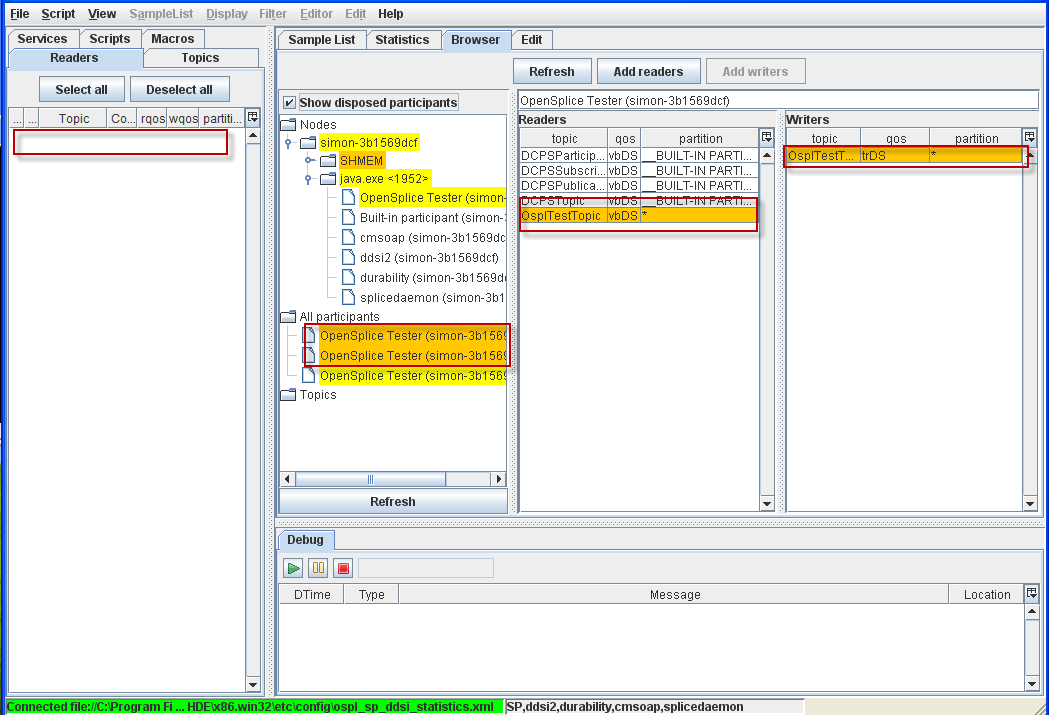
4.8.3. Readers and Writers tables are updated when a new Reader is deleted
Step 1: Open the Browser window.
Step 2: Select the OpenSplice Tester participant from the All participants tree.
Step 3: Delete the existing OsplTestTopic reader.
Step 4: The deleted reader will be highlighted with orange to indicate that the reader is disposed.
Reader deleted
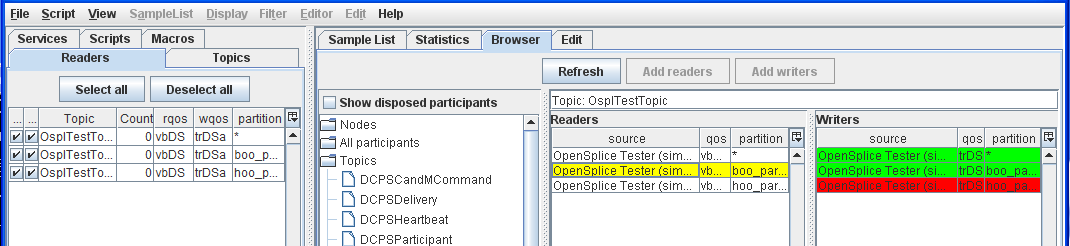
4.8.4. To Check Reader and Writer compatibility
Step 1: Choose Create Reader from the pop-up menu from OsplTestTopic.
Step 2: Enter boo for the name and boo_partition for the partition.
Step 3: Create another reader with hoo for the name and hoo_partition
for the partition.
Step 4: Choose Create Default Reader to create a default reader.
Step 5: Open the Browser window and select Topics/OsplTestTopic from the browser tree.
Step 6: Select a Reader with * partition from the Readers table.
Reader with ‘*’ partition selected

Step 7: Select a Reader with boo partition from the Readers table.
Reader with ‘boo’ partition selected
Step 8: Select a Reader with hoo partition from the Readers table.
Reader with ‘hoo’ partition selected
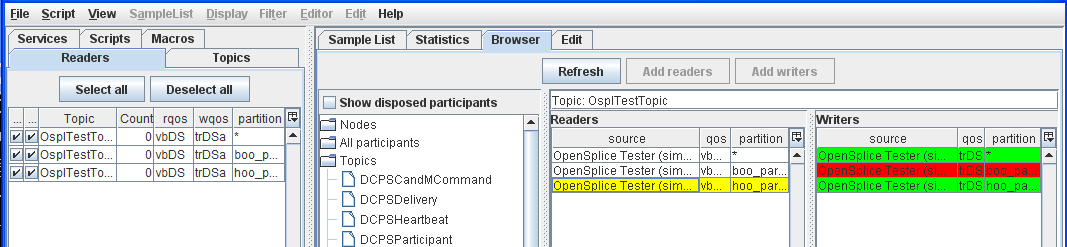
In the Browser window, Readers/Writers are highlighted with red to indicate incompatibility with the selected Writer/Reader (yellow).
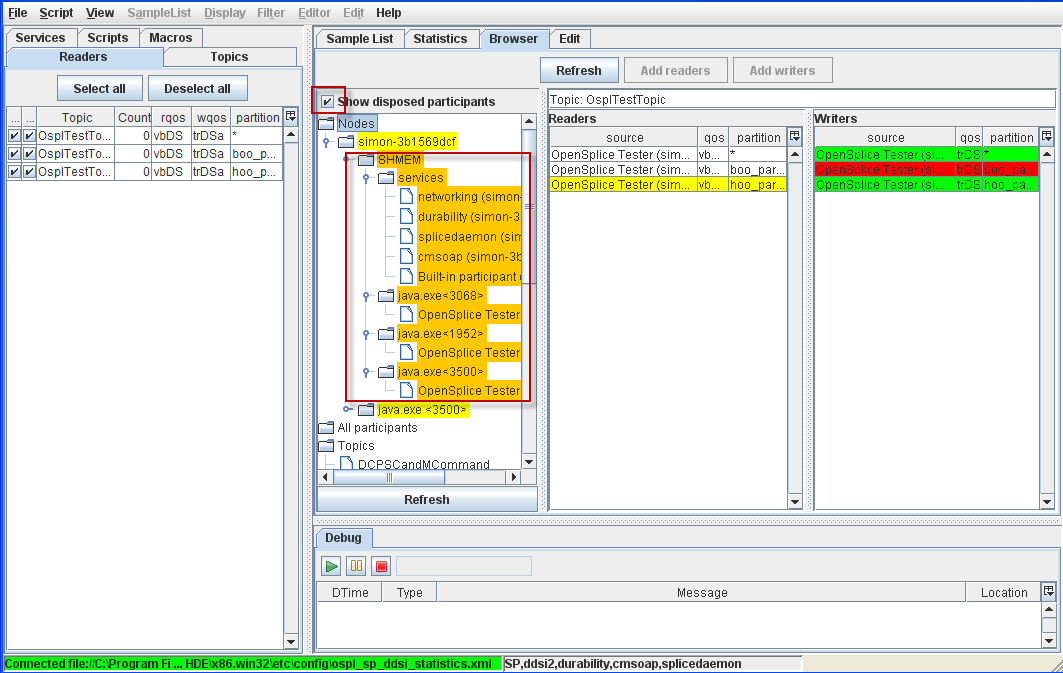
4.8.5. To Show Disposed Participants from the Browser tree
Step 1: Open the Browser window.
Step 2: Select (check) Show disposed participants.
Step 3: Expand the Nodes tree.
Step 4: Expand the All participants tree.
Step 5: De-select (un-check) Show disposed participants.
Disposed participants
4.8.6. To Spawn a Tuner from the System Browser
Any domain participant that is part of a configuration that includes a SOAP service should have the Start Tuner pop-up menu.
Step 1: Connect Tester using the ospl_sp_ddsi_statistics.xml configuration
file in the etc/config directory.
Step 2: Open the Browser window.
Step 3: Expand the Nodes tree.
Step 4: Right-click on the OpenSplice Tester participant.
Step 5: Choose Start Tuner from the pop-up menu.
4.8.7. Statistics
First, connect Tester using the ospl_sp_ddsi_statistics.xml configuration
file in the etc/config directory.
![]() Note that statistics can only be gathered from the Tester process.
Note that statistics can only be gathered from the Tester process.
The Statistics window
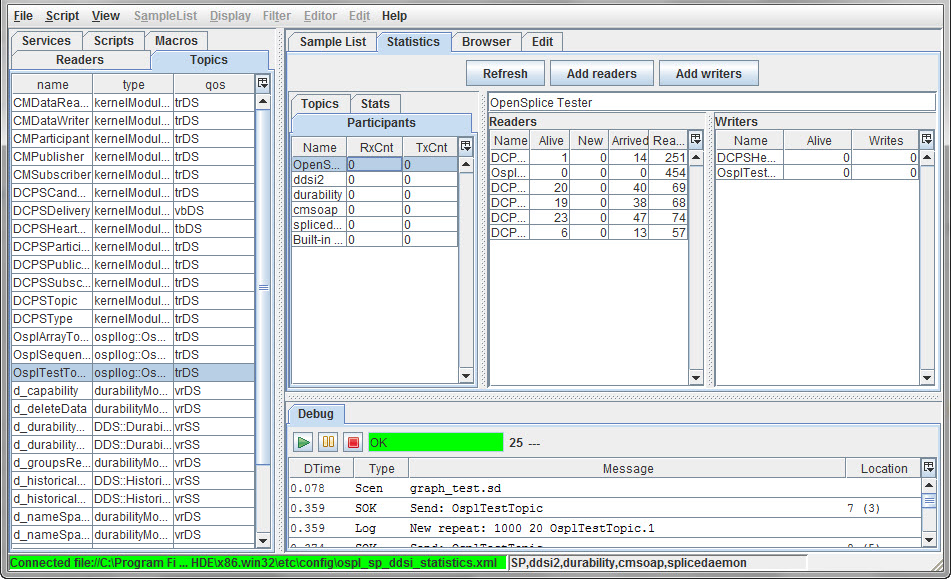
4.8.7.1. Statistics - participants
4.8.7.1.1. Write sample topics and check statistics window content
Step 1: Create a default reader for OsplTestTopic.
Step 2: Write four samples.
Step 3: Open the Participant tab of the Statistics window.
Step 4: Select the OpenSplice Tester participant from the list.
4.9. Scripting
4.9.1. To Create a New Scenario
Note that you can only have one scenario open at a time. To avoid losing changes in the current scenario you must save it before creating a new scenario or selecting a different one from the drop-down list of recently-used scenarios (next to the Clear and Execute button).
Step 1: Choose Editor > New Scenario to create a new scenario and open it in the editor, or if the Editor window is already open, press [Ctrl+N] to create and open a new scenario. A warning is displayed if there are unsaved changes in the current scenario.
Step 2: In the File Save dialog that appears, specify the location of the new scenario and give it a name.
4.9.2. To Create a New Macro
Step 1: Choose Editor > New Macro to create a new macro and open it in the editor, or if the Editor window is already open, press [Ctrl+M] to create and open a new macro.
You can have multiple macros open at the same time. Use the drop-down list next to the Clear and Execute button to see or select them.
Step 2: In the File Save dialog that appears, specify the location of the new macro and give it a name.
4.9.3. To Edit an Existing Scenario or Macro
Step 1: Choose Editor > Open from the top menu.
Step 2: In the dialog that appears, type in or browse to the location of the macro or scenario you wish to open, then click Open.
4.9.4. To Save an open Scenario or Macro
Save the current scenario or macro.
Step 1: Choose File > Save from the top menu or press [Ctrl+S].
Step 2: If the scenario or macro has been saved before, then it is immediately saved, over-writing the previous version.
Step 3: If the scenario or macro has not been saved before, a Save As… dialog appears; type in or browse to an appropriate location and enter a name for the scenario or macro, then click Save.
4.9.5. To Complete and Compile a Scenario
This function ‘wraps’ the current text in the Edit window with "scenario"
and "end scenario".
Complete is only used when a new scenario is created without a template, from DiffScript or the Write button in a sample editor. Compile is only needed when you do not want to execute, but just check the syntax.
Step 1: Choose Edit > Complete from the top menu.
Step 2: Click the Compile button.
Step 3: Click the Execute button.
Step 4: Click the Clear and Execute button.
4.9.6. Script selection
Step 1: Expand the Script Selection drop-down list of recently-used scripts near the Clear and Execute button.
4.9.7. Code completion
The Tester has a ‘code completion’ function which reduces the amount of typing that you have to do and reduces the chances of errors. For example, you can press the [Ctrl+Space] keys after you have typed the first few characters of a reader name and the Tester will display a list of the names of the readers which start with the same characters and you can choose the one you want.
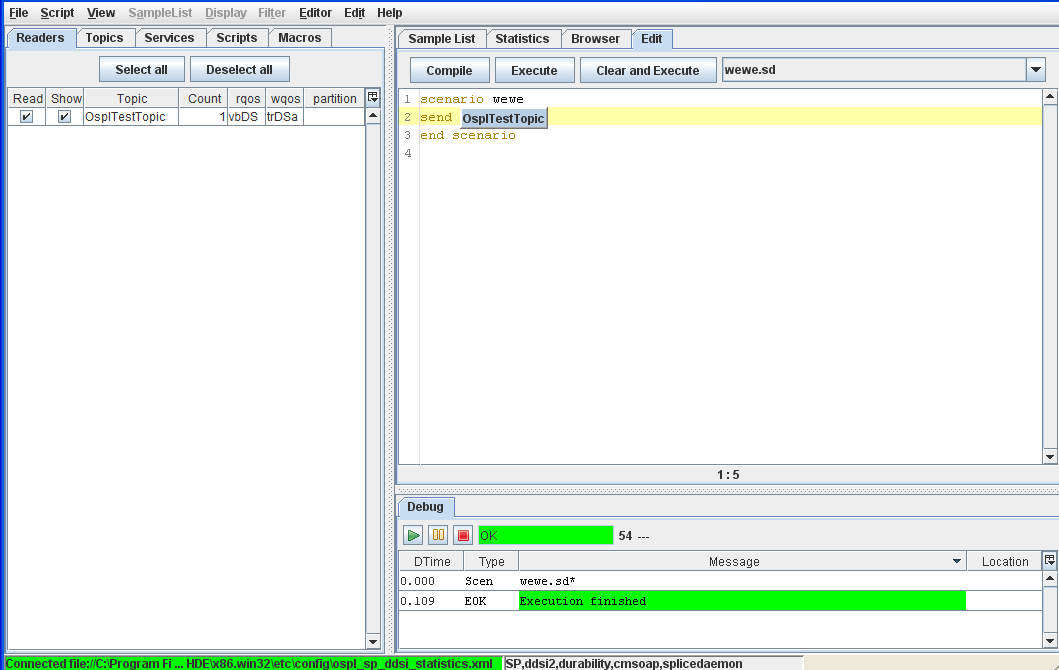
Assuming that the OsplTestTopic reader already exists, and that a new script is open in the Edit tab:
Step 1: Complete the current scenario by choosing Editor > Complete from the top menu. (Note that it is generally preferable to start from a template.)
Step 2: Type send Ospl then press [Ctrl+Space].
Step 3: ‘OsplTestTopic’ appears; press [Enter] to accept it, and the instruction is completed.
This also pops up the sample editor, enabling you to set the arguments. The sample editor can also be activated by [Ctrl+Space] when the cursor is in the instruction, or [Ctrl+left-click] on the instruction.
Code completion (send)
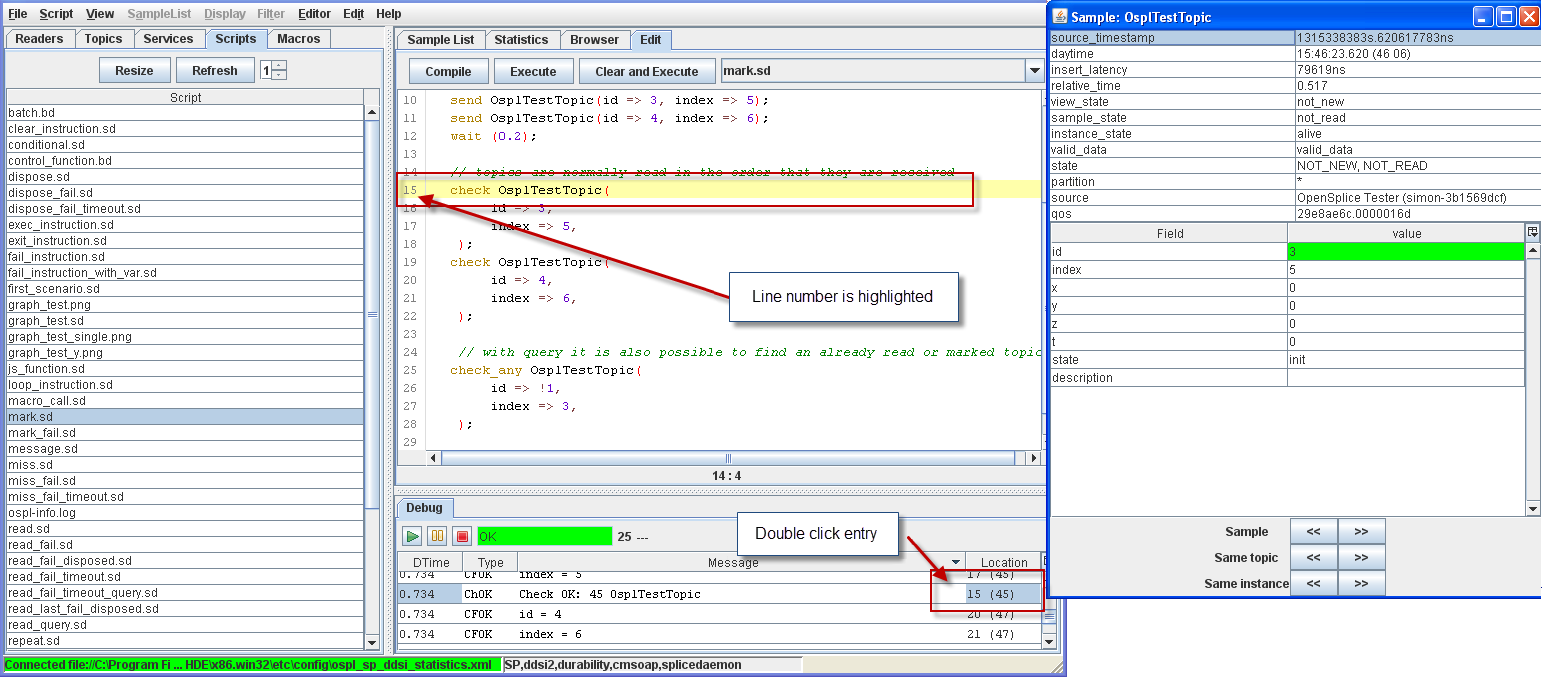
Step 4: Type check Ospl then press [Ctrl+Space].
Step 5: ‘OsplTestTopic’ appears; press [Enter] to accept it, and the instruction is completed.
Code completion (check)

4.10. Execute and Debug
4.10.1. To Run the Current Script
Step 1: Click the Execute (‘Play’ ![]() ) button in the Debug window to
run the current script.
) button in the Debug window to
run the current script.
Step 2: While the script is still executing, click the ‘Pause’ ![]() button
in the Debug window.
button
in the Debug window.
Step 3: While the script is still executing, click the ‘Stop’ ![]() button
in the Debug window.
button
in the Debug window.
Step 4: In the Debug window, double-click the entry where the column Location
has a value of 6. Double-clicking on an entry in the Debug window highlights
the relevant line in the Editor window.
Debugging a script
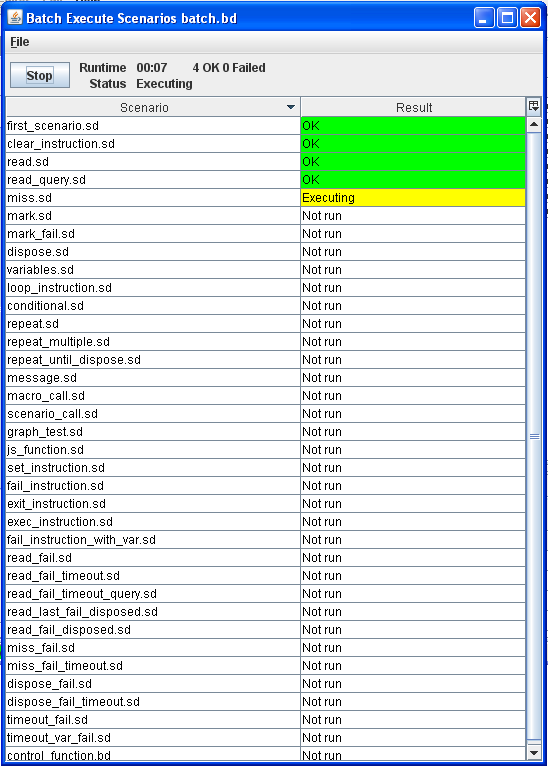
4.10.2. Batch execution (Batch window)
Load and run batch scenario.
Step 1: Choose Script > Batch from the top menu.
Step 2: In the Batch window, choose File > Load batch.
Step 3: Select batch.bd in the example script directory.
Step 4: Click the Start button.
Batch execution
4.10.3. To Run a Batch Script from the Command Line
Step 1: Change directory to the example scripts directory where the
batch.bd is found (<OSPL_HOME>/examples/ ...).
Step 2: Run ospltest -e -b batch.bd.
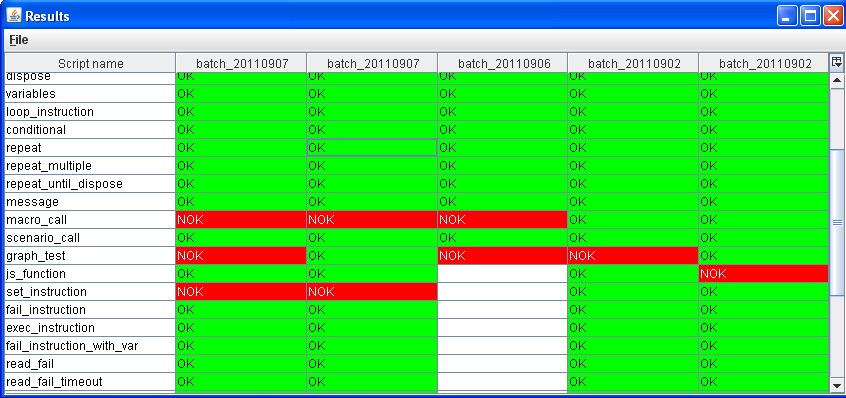
4.10.4. Batch results
4.10.4.1. Load batch result
Step 1: Choose Scripts > Batch results from the top menu.
Step 2: With the Batch results window open, choose File > Load result from the top menu.
Step 3: Select the batch result file from the batch run.
Batch results
4.10.4.2. Scan regression folder for batch results
Step 1: Choose File > Scan Regression from the top menu.
Step 2: Double-click the test result column of any test.
The results displayed will appear similar to the example in Figure 56.
4.10.4.3. Scan regression for specified directory
Step 1: Choose File > Scan Regression dir from the top menu.
Step 2: Select the directory (folder) that contains batch results.
The results displayed will appear similar to the example in Figure 56.
4.11. Adding virtual fields
‘Virtual fields’ are fields with calculated values. For example, a translation from radians to degrees, or from cartesian to polar coordinates. The virtual field can be provided in Java (inside a plugin, see Plugins later in this section) or a script language (see the section on scripting, as well as the following example).
4.11.1. Add virtual fields to the topic
Step 1: Choose File > Add fields from the top menu.
Step 2: Browse to the example directory and select fields.txt.
Step 3: Open the SampleList window.
Step 4: Select the OsplTestTopic sample.
Step 5: Add extra fields from the pop-up menu.
Adding extra fields to a sample
4.12. Plugins
Plugins can extend the functionality of Tester by providing virtual fields (see Adding virtual fields), or additional interfaces. Plugins are automatically loaded upon startup from the specified plugin directory. Two sample plugins are provided with Tester: SimplePlugin adds virtual fields, and TestInterface adds a UDP/IP message interface (see Message Interfaces).
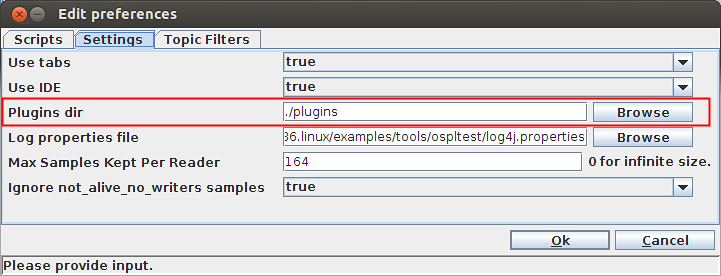
4.12.1. Install / Uninstall plugins
Step 1: Go to the examples/tools/ospltest/SimplePlugin directory.
Step 2: Run ant from the command console to build the SimplePlugin example.
Step 3: Run Tester and choose File > Preference from the top menu.
Step 4: In the Settings tab, set the correct value for Plugins dir and click OK.
Setting the path to the Plugins directory
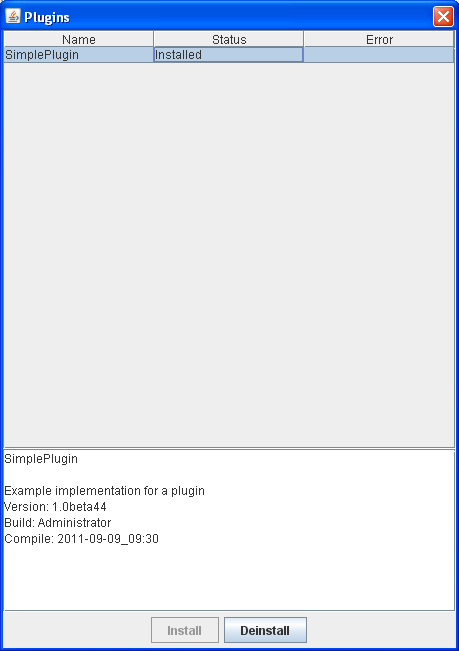
Step 5: Choose File > Plugins from the top menu.
Step 6: Click SimplePlugin to select it.
The SimplePlugin example
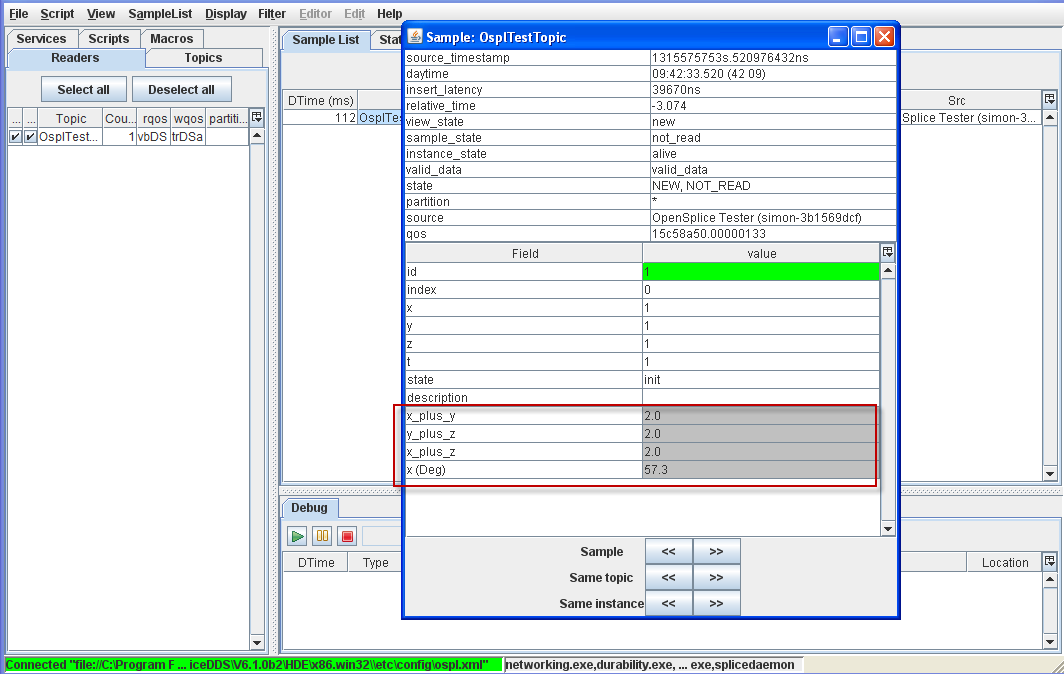
Step 7: Double-click any OsplTestTopic data in the SampleList window. New fields are added.
Fields added to OsplTestTopic sample
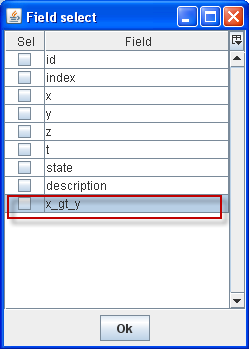
Step 8: In the Select extra field dialog ([F9]), one more field is added.
Extra field added
4.13. More on Virtual fields
Additional virtual fields can be provided via a plugin or via a script.
4.13.1. Adding Virtual Fields via plugin
Override the class:
ExtraTopicField
Compile this class in a plugin and in the ‘install’ function register the extra fields with:
connection.registerExtraField(<instance of extra topic field class>);
An example of a plugin with an extra field is provided in examples:
<OSPL_HOME>/examples/tools/ospltest/plugins/SimplePlugin
4.13.2. Adding Virtual Fields via script
A script file can be loaded using the top menu: File > Add Fields.
The script file has the following syntax:
[#!<language>]
<name of the field>
<name of the applicable topic>
<script which returns a value and can have multiple lines>
next_field
<name of the field>
<name of the applicable topic>
<script which returns a value and can have multiple lines>
The language description is optional. 1 to n fields can be described in a single file.
The data of the sample is available in an object variable which is pushed to the script engine before the execution of the script. The object sample provides the following functions:
String getDayTime();
long getTime();
long getId();
String getMsgName();
String getKey();
String getInstanceState();
boolean isALive();
String getSource();
String getFieldValue(String fieldname);
These functions can be used to retrieve data from the current sample
and determine the value for the extra field. An example of a script
file is provided in examples/tools/ospltest/fields.txt.