5. Command Reference
This section lists all of the Tester’s commands and describes their operation.
5.1. Introduction
The commands are described below in the order in which they appear in the menus (starting at the top left).
Where a menu option also has a keyboard shortcut, it is shown in [italics in square brackets] (for example, [Ctrl+C]).
Some menu options can also be invoked by clicking on buttons in appropriate tabs or windows.
5.2. Menus

5.2.1. File
- File > Connect, [Ctrl+Shift+C]
Open a connection to a Domain.
- File > Disconnect, [Ctrl+Shift+D]
Disconnect from a Domain.
- File > Remove All Readers
Remove all previously-added Readers.
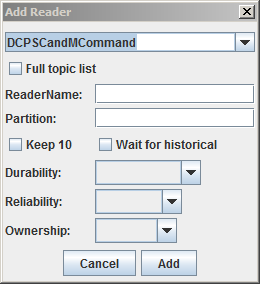
- File > Add Reader
Add a single topic Reader.
Add Reader dialog
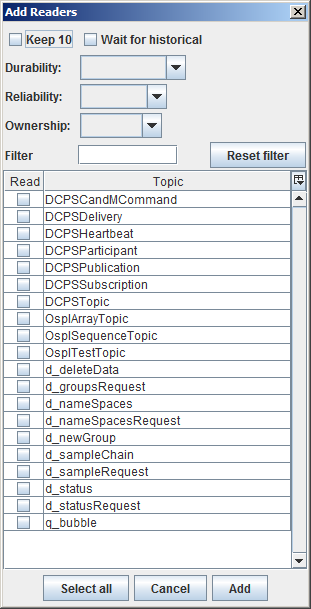
- File > Add Readers
Add multiple Readers by selecting from the Topic List.
Add Readers from Topic list
- File > Save Readers List
Save the current list of topics to a file. The keys, QoS, wait for historical info will be preserved.
The format of the readers list file (and the add reader specification) is:
<!>[#QOS#]topic_name[|readername][\[partitionname\]]<optional_key> <optional_foreign_key1> <optional_foreign_key2><optional_foreign_key3>- File > Load Readers List
Load a topics file. Topics already in the list will not be recreated.
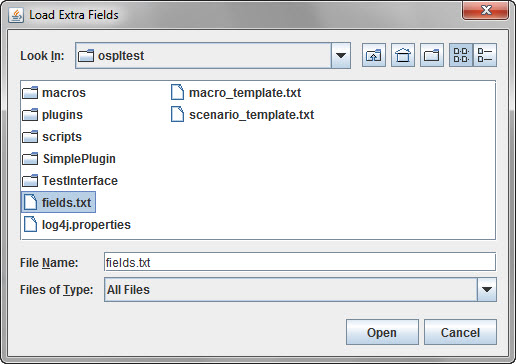
- File > Add Fields
Load new fields. Example
field.txtis located in theexampledirectory.
Load Extra Fields dialog
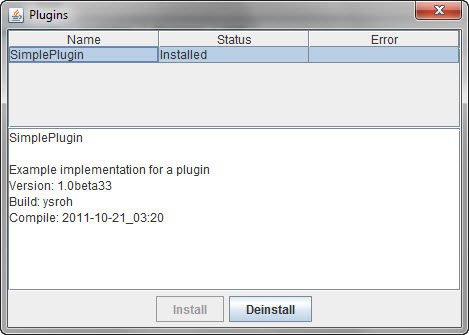
- File > Plugins
Install/Uninstall Plugins. The example
SimplePluginplugin is located in theexampledirectory. It must be compiled and put in to thepluginsdirectory specified in Preference page.
Plugins dialog
- File > Save Layout
Save the current layout of the windows in a file; this can later be used to organize the windows in the same way. Save Layout is only applicable to non-IDE mode.
- File > Load Layout
Load a specific layout of the windows as previously saved (select by file on the disk) with Save Layout. Load Layout is only applicable to non-IDE mode.
- File > Preferences
Can be used to change the locations of the macros and scripts directories. (See also the instructions for starting and stopping Tester).
- File > Exit
Quit the application.
5.2.2. Script
- Script > Script Editor, [Alt+Shift+S]
Open the script Edit window.
- Script > Debug Window
Open the script Debug window.
- Script > Scripts
Open the scripts window which allows for quick access to scripts found on the script path (as defined in the ospltest.properties). (See also File > Preferences and Starting and Stopping Tester.)
- Script > Macros
Open the macros window which allows for quick access to the macros found in the macro path (as defined in the
ospltest.properties). (See also File > Preferences and Starting and Stopping Tester.)- Script > Batch, [Alt+Shift+B]
Open the Batch Execute window for the batch execution of several scripts.
- Script > Batch Results
Display the results of the batch run.
5.2.3. View
- View > Samples, [Alt+1]
Open the Sample List window.
- View > Statistics, [Alt+2]
Open the Statistics window.
- View > Browser, [Alt+3]
Open the Browser window.
5.2.4. SampleList
The Sample List displays the current list of read samples. The list is sorted on source time (timestamp) of the topic samples. Topics Samples are only displayed when the Show checkbox in the Reader list is checked (note that un-checking Show does not delete the topics Samples). A double-click in the list results in the topic being displayed in the Sample window.
The state displayed with the topic is the Sample state of the sample.
When the state of the topic is alive then if this is the last Sample
with that key it is displayed as ALIVE_AND_KICKING for received samples
and ALIVE_AND_SEND for samples sent by Tester. This makes it very easy
to spot topics which are not disposed.
When exactly two topics are selected, the difference between the source timestamps is displayed.
The following menus are only active when the Sample List tab is selected showing samples. (If you are in the Browser tab, for example, then the menus will not be active (they will be ‘greyed out’)).
- SampleList > Clear, Clear button
Clear the Sample List.
- SampleList > Dump
Dump the contents of the current (filtered) Sample List to a file.
- SampleList > Dump Selection, [P] (also [Ctrl+P] and [Alt+P])
Write the current selection content to a file.
- SampleList > Dump to CSV
Write the contents in CSV format.
- SampleList > Dispose Alive
Dispose all topics in the Sample list with a state
alive and kicking(i.e. all last Samples of a topic with a given key which are still alive), this function can be used to clean up (dispose left alive samples) a list after a test.- SampleList > Diff Script
Create a list of instructions in the current scenario which reproduces the list of samples in the Sample list. The diff means that only fields which do not have the default value or are a key/switch field are used in the script.
- SampleList > Diff Script Selection
Create a diff script for the current selection of samples.
- SampleList > Show Chart, [Alt+Shift+C]
Display the chart window. To fill the chart with data select a column with numeric values and press [Y]. This will add a trace with the values of the column, using the time received on the X axis. Multiple traces can be added. Select a filter to limit to the appropriate values. To display a scatter plot, clear the traces and select the column to use on the x-axis, then press [X]. After this select the column with values for the Y axis and press [Y]. It is also possible to automatically create multiple traces based on a key value. First select the column to be used as key and press [K] before the Y column is selected.
- [F2]
Compare two topic Samples. Select the first topic Sample in the Sample window (by double-clicking), then select the second topic Sample and press [F2]. The samples will be displayed side by side with the differences marked in the window of the second topic (normally the left window). A field marked in red is different, a field marked in orange was not found in the first topic Sample. If not different then (foreign) key fields will be marked in green and yellow. (See also Topic Instance Window.)
- [F3]
Display a topic Sample in a separate Sample window.
- [F4]
Open the topic edit window with the values of the selected topic.
- [F9]
Fields of the current selected topic sample can be added for display in the Sample list. Fields are displayed based on name. Any topic Sample with a field of that name will provide the value of the field. A field column can be deleted by selecting a cell in the column and then pressing [Delete].
5.2.5. Display
When the Sample List is open these commands allow the user to adjust the window display attributes to their needs.
- Display > Font Smaller, [Ctrl+minus]
Decreases the font size of the Sample List window.
- Display > Font Larger, [Ctrl+plus]
Increases the font size of the Sample List window.
- Display > Day Time
Toggles the Dtime column format between number of milliseconds (ms) and time-of-day (hh:mm:ss.ms).
- Display > Colors
Toggles the display of colors (on or off).
- Display > Refresh
Refreshes the Sample List window.
- Display > Only Show Alive
Filters the samples to display samples in the ‘alive’ state.
5.2.6. Filter
When the Sample List is open these commands enable you to filter the displayed samples based on the Topic and Key attributes of the current sample.
The filter can also be applied by typing the key directly in the filter window. Add a + (plus) sign in front of the key value to filter including foreign key relations (it is not possible to filter on key and topic name when entering the key manually). The filter can also be reset by clicking the Reset button.
- Filter > Topic, [Ctrl+F5]
Filter on topic name.
- Filter > Topic and Key, [F5]
Filter on key and topic name.
- Filter > Key, [F6]
Filter on key only (so all topics with the same value for key are displayed).
- Filter > Resets, [F7]
Clears the filter.
- [F8]
Filter on the key value and also allow forward foreign key relations (i.e. find topics which have a key which matches a foreign key of an already-displayed topic.
- [F12]
Filter all messages with the same sample state.
- [F]
Filter based on text in a column, the column is listed in the filter box (i.e.
[<column>]) add the text on which to filter and then press [Enter].
5.2.7. Editor
When the Edit window is open these commands allow the user to create and manage Scenarios and Macros.
- Editor > New Scenario, [Ctrl+N]
Create a new scenario. A File Save dialog will be displayed to provide the filename of the scenario. The initial scenario will be created using the template
scenario_template.txtwhich is found in the installation directory.- Editor > New Macro, [Ctrl+M]
Create a new macro. A File Save dialog will be displayed to provide the filename of the macro. The initial macro will be created using the template
macro_template.txtwhich is found in the installation directory.- Editor > Open, [Ctrl+O]
Opens the File Open dialog, the selected Script or Macro file will be loaded in the editor.
- Editor > Save, [Ctrl+S]
Save the current script to disk (to the same file as it was loaded/created).
- Editor > Save As, [Ctrl+Shift+S]
Opens the Save dialog for entering a filename to which the current script will be saved.
- Editor > Complete, [Ctrl+Shift+C], [Ctrl+T]
Completes the Scenario by inserting
"start scenario"and"end scenario"text at the beginning and end of the current file.
5.2.8. Edit
When the Edit window is open these commands provide basic text editing capabilities.
- Edit > Cut, Edit > Copy, Edit > Paste, Edit > Find/Replace
Traditional text editing commands. The standard key combinations (such as [Ctrl+X] and [Ctrl+C]) are also recognized.
- Edit > Format, [Ctrl+Shift+F], [Ctrl+I]
Automatically formats the text in the current edit window. Formatting removes extra blank lines and normalizes the indentation.
5.2.8.1. Keyboard-only commands
Some functions are not accessible from the menu bar; these are mostly common editing commands that are invoked with standard (‘traditional’) key combinations (‘shortcuts’).
- [Crl+A]
Select all text in the current field or editor window.
- [Ctrl+E]
Execute the current scenario.
- [Ctrl+Space]
Complete the scenario at the current location. If the cursor is on an empty line, the list of possible commands is shown; on a complete command, the appropriate editor for that command is opened (if available).
- [Ctrl+Z]
Undo the last command.
5.2.8.2. Macro Recorder
The Tester has a simple macro recorder, intended for ad hoc use, controlled by keyboard commands only. It can record and store a single un-named macro which is only retained for the current session (until the Tester is closed).
- [Ctrl+Shift+R]
Start recording a new macro. Any previously-recorded macro is deleted.
- [Ctrl+Shift+S]
Stop recording.
- [Ctrl+Shift+M]
Play the recorded macro.
5.3. Lists
5.3.1. Services
Displays a list of the Services running on this node. A display-only window.
5.3.2. Scripts
Displays a list of the installed Scripts (.sd files) and Batch Scripts
(.bd files).
- Refresh
Refreshes the list.
- <select> a Script
Displays the Script in the Edit window
5.3.3. Macros
Displays a list of the installed Macros (.md files).
- Refresh
Refreshes the list.
- Scen
Checking this option displays Scripts as well as Macros.
- <select> a Macro
Displays the Macro in the Edit window
5.3.4. Readers
For each reader the count of received samples is displayed as well as the QoS and partition. A check box is provided for changing the read state or the show state. When Read is unchecked the reader stops reading samples. When Show is unchecked the topic samples of that topic will not be displayed in the sample list.
- Select all
Checks the show state for all topic samples.
- Deselect all
Unchecks the show state for all topic samples.
- <select> a Topic Instance
Enables you to check/uncheck the Read and Show state.
- <right-click> Delete Reader, [Delete]
Deletes the selected reader.
- <right-click> Recreate Reader, [Ctrl+R]
Recreates the selected reader and as such re-reads any persistent/transient data available.
- <right-click> Show First Sample, [F3], or double-click on the reader
Shows the first sample for the selected reader.
- <right-click> Edit Sample, [F4]
Opens an Edit Sample window for the selected topic.
- [F9]
Opens the field selection window for the display of fields of the selected topic.
5.3.4.1. Edit Sample Window
The Edit Sample window is used for editing field values of a topic and then writing the sample or dispose the instance. It is also used to insert the topic values as a ‘send’ or ‘check’ entry in the current script (at the cursor position in the script window).
The Edit Sample window can be filled with a topic from both the Topics window and the Sample List window with the [F4] key. If the topic write window is filled with a topic from the topics list window then the values are all empty (except for union discriminators, which get a default value). If the window is filled from the sample list window then the fields get the values of the selected topic sample in the sample list. The key fields are marked in green and the foreign keys are marked in yellow.
Fields can be edited by selecting the edit field (right-most column). If the field is of an enumerated type then a combo box is displayed which provides all possible values. The topmost value is empty for reset to the default value (not set).
The keyboard can be used to navigate the edit fields. The cursor [Up] and [Down] (arrow) keys move between fields; any other key starts editing the value in the current field.
Edit sample window
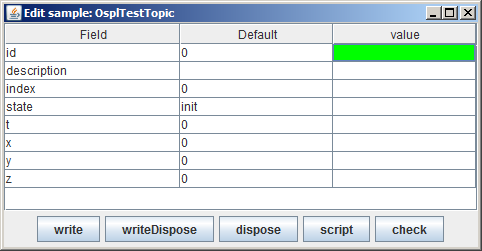
(There is a second form of this window, used when opened from the script with [Ctrl+Space], [Ctrl+Left-click], or as part of completion. It only has two buttons: OK and Cancel. Pressing [Ctrl+Enter] or [Ctrl+Return] is the same as clicking OK.)
- write
Write the sample.
- writeDispose
Write the sample and Dispose the instance.
- dispose
Dispose the instance.
- script
Instead of writing the sample this creates the script commands to write the sample. These commands are inserted into the scenario currently being edited and the user will be taken to this text.
- check
Similar to script but creates the script command to check the sample values.
- [F4]
Copy the current selected field from the topic in the instance window.
- [F5]
Copy all fields based on an equal name from the topic in the instance window.
- [F6]
Fill all fields with
.secin the name with the current time seconds and fields with.nanosecin the name with the current time in nanoseconds.- [Ctrl+T]
Fills a field of type
intwith the seconds part of the current time.- [Ctrl+U]
Fills a field of type
longwith a unique key.- [Ctrl+V]
Paste a value.
- [Alt+Down]
Opens the enum editor.
- [Enter], [Return]
Commits the current edited value.
- [Esc]
Discards the current edited value.
Once the desired values have been entered the topic can be written by clicking the Write button, disposed by clicking the Dispose button, or write disposed by clicking the WriteDispose button.
5.3.5. Topics
The topics list displays the list of topics as known in the system.
- <select> a Topic
Selects a Topic.
- <right-click> Create Reader
Create a Reader for the selected Topic.
- <right-click> Create Default Reader
Makes the selected Reader the default reader to be displayed in the Samples List.
- [F2]
The key list definition window will open which allows to change the (foreign) keys. The syntax is the same as in the add topic window or topic file. To support the selection of the keys the primary fields of the topic are displayed and will be inserted at the cursor position in the edit field when clicked.
5.3.6. Groups
The Groups list displays the list of groups created Tester and currently active. The Groups tab is only visible in the main window when at least one Group has been created in the current Tester session.
- <select> a Group
Selects a Group.
- <right-click> Delete Group, [Delete]
Delete the selected Group.
- <right-click> Publish Coherent Sets, [F4]
Create a Coherent publisher window from which coherent sets of data can be created and written.
5.4. Windows
5.4.1. Sample List Window
The Sample List window is used to display samples. By default the delta time, topic name, state, key, and source are displayed. Additional columns can be added and filters defined.
Sample List window
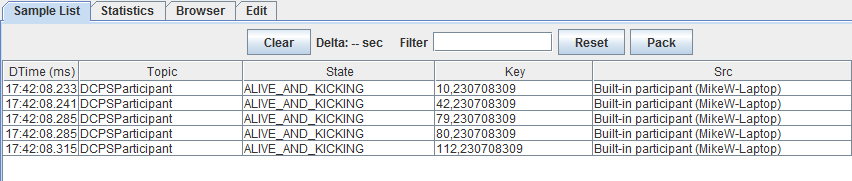
- Clear
Clears the list.
- Filter <value>
The current filter value.
- Reset
Resets the filter value.
- Pack
Adjusts the displayed column widths.
- <select> a Sample
Selects a sample to use with <right-click> commands. [Ctrl+Left-click] selects another sample. If exactly two samples are selected, the difference in source time will be displayed in the top bar of the Sample List window.
- <right-click>Select Extra Fields, [F9]
Opens a dialog box allowing selection of extra fields to display.
- <right-click> Display Sample, <double-click>
Displays sample details.
- <right-click> Display Sample New Window, [F3]
Displays sample details in new window.
- <right-click> Compare Sample, [F2]
Compares two samples with each other and shows differences in red color.
- <right-click> Edit Sample, [F4]
Allows Tester to edit the selected sample values.
- <right-click> Filter on topic, [Ctrl+F5]
Filters on the selected topic value.
- <right-click> Filter on topic and key, [F5]
Filters on both the selected topic and key values.
- <right-click> Filter on State, [F12]
Filters on the State of the selected sample.
- <right-click> Filter of Key, [F6]
Filters on the Key value of the selected sample.
- <right-click> Filter on Column Text, [F]
Sets the filter to be the value of the current column.
- <right-click> Filter Reset, [F7]
Resets the filter value.
- <right-click> Delete extra column, [Del]
Removes the selected extra column from the list.
- <right-click> Add Column as Key to Chart, [K]
Assigns the selected column as the key field for the chart.
- <right-click> Add Column as X to Chart, [X]
Assigns the selected column as the x-axis for the chart.
- <right-click> Add Column as Y to Chart, [Y]
Assigns the selected column as the y-axis for the chart.
- [Ctrl+F]
Finds the next sample containing the search text in any column.
5.4.2. Statistics Window
The Statistics window provides statistics for the topics in use, such as write count, number of alive topics, etc.. The following values are displayed for each topic:
- Count
The number of samples currently in the OpenSplice database
- Arrived
The number of arrived samples
- Takes
The number of takes by the reader
- Reads
The number of reads by the reader
- Alive
The number of alive topics (instances not disposed)
- Writes
The number of written samples
The left table shows either the participants, the topics, or the statistics of the currently-selected reader/writer as indicated by the selected tab.
When the list of participants is shown, a participant can be selected. The second table shows the list of readers with their statistics, the third table show the list of writers with their statistics.
When the list of topics is shown, a topic can be selected. The second table shows the list of participants reading the topics with their statistics, the third table shows the list of participants writing the topic with their statistics.
If a value of -1 or -2 is shown then an error occurred during the
retrieval of the statistics for the reader/writer.
By selecting a row in the reader or writer list all statistics for that reader or writer will be shown in Stats tab of the left window.
- Refresh
Will refresh the content.
- Add readers
Will add the topics in the reader list to the list of monitored topics.
- Add writers
Will add the topics in the writer list to the list of monitored topics.
- [CTRL+F]
Finds the next reader/writer containing the search text in any column.
5.4.3. Browser Window
The Browser window enables you to view the Readers and Writers in the system. You may browse by Node, Participant, or Topic.
Browser window
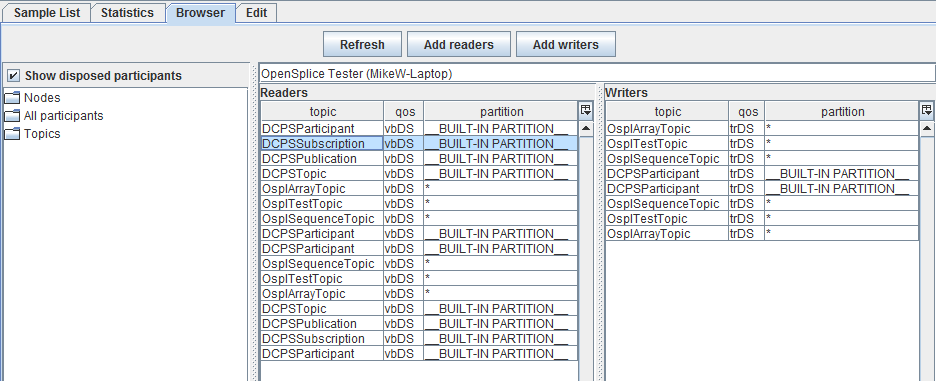
- Refresh
Will refresh the browser content.
- Add readers
Will create a Tester reader from the list of readers for the selected read-topic. The QoS of the discovered reader will be used to ensure that data read by that reader will be captured in the timeline.
- Add writers
Will create a Tester reader from the list of writers for the selected written-topic. The QoS of the discovered writer will be used to ensure that data written by that writer will be captured in the timeline.
- Show disposed participants
Used to toggle the display of disposed participants.
- [CTRL+F]
Finds the next reader/writer containing the search text in any column.
5.4.4. Edit Window
The Edit window is used to create and modify Scripts and Macros. Please refer to Chapter 5, Scripting, on page 73, for more details.
Edit window
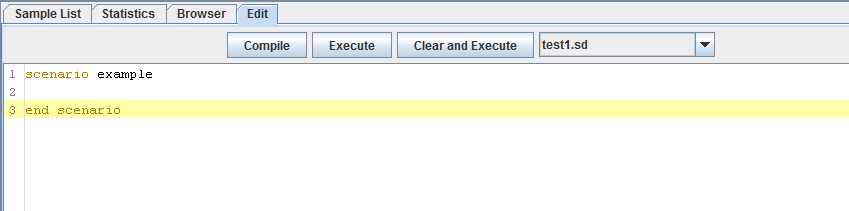
Traditional text editing commands and standard key combinations (such as [Ctrl+X] and [Ctrl+C]) are recognized. Menu commands and keyboard shortcuts for editing scripts and macros are described in sections 4.2.7, Editor, 4.2.8, Edit, 4.3.2, Scripts, and 4.3.3, Macros.
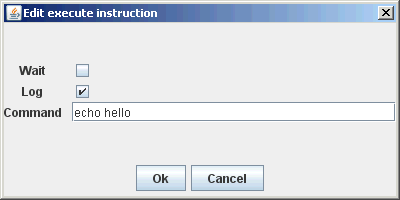
When editing macros, instruction-specific editing dialogs may open; for example,
the send, check and execute macro instructions have their own
editing dialogs which help to make your entries conform to their syntax.
Editor for execute instruction
- Compile
Compile the current content.
- Execute
Run the current script or macro without clearing the sample list.
- Clear and Execute
Clears the sample list and then runs the current script/macro and returns the user to the Sample List window.
- <drop down>
Allows for quick selection of recently-edited scripts/macros.
5.4.5. Debug Window
The Debug window is used for tracing/debugging Script compilation and execution. For each step, the day/time, type of message, and message text is displayed along with the location (line number) in the scenario.
Debug window
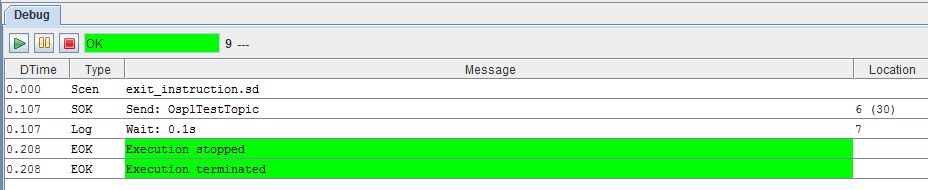
Control execution of the scenario with the buttons at the top left of the window:
Start (Play)
Start or resume execution
Pause
Pause execution
Stop
Stop (halt) execution
- [CTRL+F]
Finds the next message containing the search text in any column.