7. Boundary Security
7.1. The Concept
Applying security mechanisms (authentication, cryptography, access-control) end-to-end between each single participant in the system may be very complex and not necessarily useful.
“Boundary Security” allows to apply such security mechanisms at key points in the system: at the edge (the boundary) of each subsystem and between subsystems. The communications inside each subsystem will be unsecured but data flowing out and in each subsystem will be controled and communications between subsystems will be secured. Security mechanisms will also apply on each device deployed in the WAN (outside any subsystem) and connected directly to the cloud.
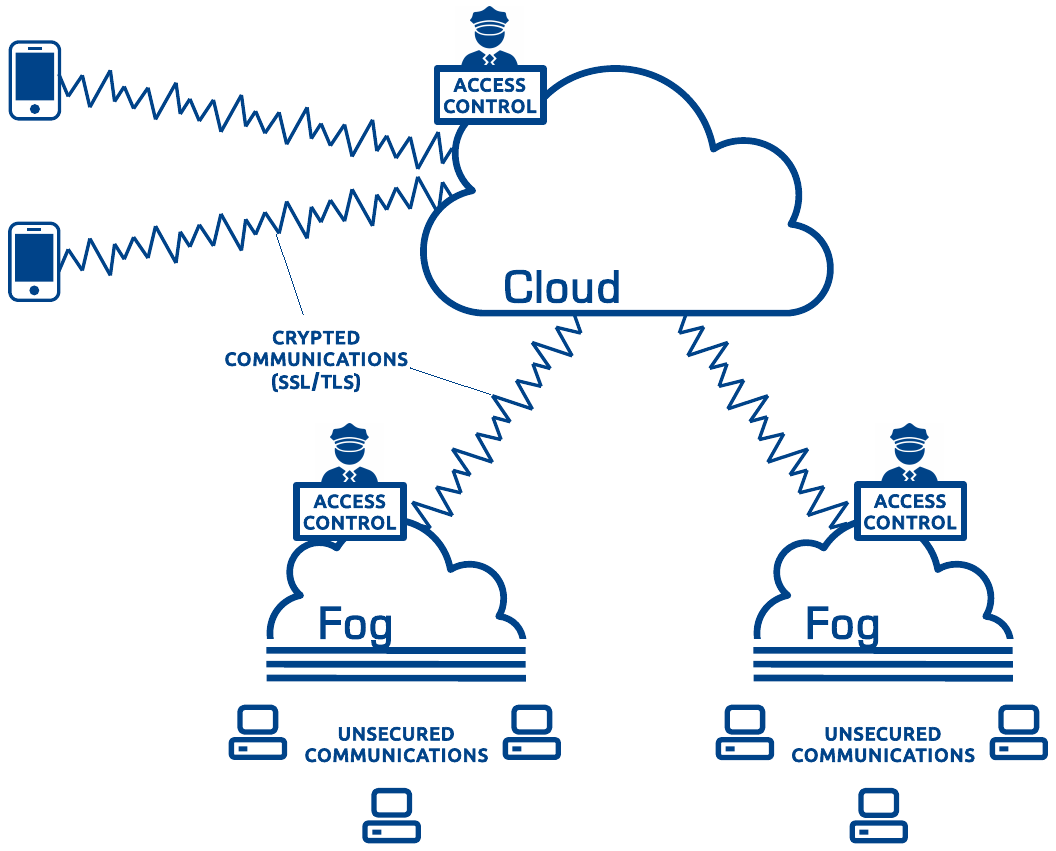
Boundary Security
“Boundary Security” can be used with any kind of deployments (Device to Device, Lan to Lan, etc.) described in this documentation.
Authentication : Even if communications are unsecured inside each subsystem, each subsystem should authenticate itself to participate to the whole system. Each device using TCP transport should also authenticate. This authentication will be performed with the help of SSL/TLS and X.509 certificates.
Cryptography : Communications between each subsystems, between subsystems and cloud and between external devices and cloud/subsystems should by crypted. This encryption will also be performed with the help of SSL/TLS.
Access-Control : Access-control rules, defined in a XML file, will be applied by each Vortex Link services and rely on identifiers provided by the SSL/TLS authentication so that different permissions are granted to each subsystem and device. For example, you may forbid a subsystem to access some particular topics or partitions from the rest of the system, or forbid data from some particular topics or partitions to get outside a particular subsystem.
7.2. Authentication and Cryptography Configuration
Authentication and cryptography are both provided by SSL/TLS over TCP connections. Thus, to configure authentication and cryptography you will have to generate some pairs of public/private keys and some X.509 certificates and to configure Vortex Link services and devices with those keys and certificates. The keys and certificates will be packaged into keystore files.
Vortex Link support the following KeyStore types:
- jceks The proprietary keystore implementation provided by the SunJCE provider.
- jks The proprietary keystore implementation provided by the SUN provider.
All the Vortex products use a mutual authentication to establish a TCP connection with SSL/TLS. This means that each DDS device and Vortex Link service must also have a list of trusted certificates (a truststore) that are accepted for TCP connection establishments.
As a truststore is actually a keystore containing only certificates, Vortex Link support the same types than keystore for truststore files.
PKIX is used as default algorithm for both keymanager and trustmanager.
To configure your devices to use TCP with SSL/TLS, please refer to the User Guide of the DDS product used by your device application.
7.2.1. Certificates and public/private keys organization
There are several ways to generate and manage certificates :
- You may generate all certificates for services and devices by yourself (using the java ‘keytool’ for example), or using your own Public Key Infrastructure (PKI) tool.
- You may use the provided “KeyManagers” tool (see Managing a CA hierarchy with the KeysManager tool) to generate all certificates for services and devices.
- You may use the provided “KeyManagers” tool to generate services certificates and use your own certificates for devices updating the generated services keystores with the devices public keys (or devices certificate authority public key).
Whatever solution is used, the following requirements must be answered :
- Each process (application or service) using the TCP transport must be deployed with a certificate (public and private key pair). The same certificate can be used in several process, but a process (using TCP) cannot be deployed with no certificate.
- All the services certificates must be signed (directly or indirectly) by a certificate authority (let’s name it Services CA). The public key of this Services CA must be found in the services truststores under the alias ‘vortex-services-ca‘. Note that :
- The Services CA must be kept secret. If a malicious application is able to sign it’s certificate with the services certificate authority, then the security is compromised.
- The Services CA must not be used to sign any device certificate. Otherwise, a DDS application using such certificate could bypass the security.
- Each device must be deployed with :
- the public key of the Services CA in it’s truststore.
- Each service must be deployed with :
- the public key of the Services CA in it’s truststore with the alias ‘vortex-services-ca‘.
- the public key of all devices certificates or the public key of the certificate authority that signed the devices certificates if a certificate authority is used for devices.
The advised way to generate certificates is to generate a distinct public/private keys pair and certificate for each DDS device and each Vortex Link services.
- This allows granting of different access-control rights to each individual device and subsytem.
- It is also possible to grant the same access-control rights to a set of devices or a set of subsystems with the help of certificate subject names matching (see Access-Control Configuration).
- If a certificate is compromised, there is no need to re-deploy the new certificate to a bunch of devices/subsystems.
- It may become very difficult to manage all the certificates when the system gets bigger.
Another approach that minimizes the number of certificates to manage is to generate a distinct public/private keys pair and certificate for each level of permissions you want to apply in the system. (For example if 1000 devices in the system should be granted with the same access-control rights, then a single public/private keys pair and certificate can be used by those 1000 devices).
- If a certificate is compromised, a new certificate needs to be deployed on all the devices using it.
All the Vortex products accept self-signed certificates. However, using a certificate authority (CA) to sign devices certificates is advised in order to simplify the configuration of the truststores. They would not need to contain the certificates of all the devices that are trusted, but only a root CA or some intermediate CA certificates.
7.2.2. Managing a CA hierarchy with the KeysManager tool
The main disadvantage of self-signed certificates is that each time a new certificate is added to the system, it has to be added to one or more truststores. Using certificates signed by a CA allows to only have the CA certificate in the truststores. Each new certificate signed with this CA will be accepted as soon as the CA is in the truststore.
The KeysManager tool is a java graphical tool delivered with Vortex Link that helps to create a Certificate Authority hierarchy for a Vortex Link system. It can be used to generate keystore files that can directly be used by services and devices:
a keystore for the Vortex Link service
a keystore for each device (i.e. a DDS application using TCP/SSL); each device can be:
- either restricted in its connections to 1 Link service
- either unrestricted (i.e. it can establish TCP/SSL connection to any Link service)
Note that KeysManager requires OpenSSL 1.0.1 to revoke certificates or export them to pem format (for Vortex OpenSplice or Vortex Lite).
7.2.2.1. The CA hierarchy
The KeysManager creates a CA hierarchy that aims to simplify the management of truststores. For this purpose, we consider 2 classes of process with different authorization of connection to the system:
- the devices: user DDS applications using TCP/SSL.
- the services: the Vortex Link services.
For instance, in case of such system:
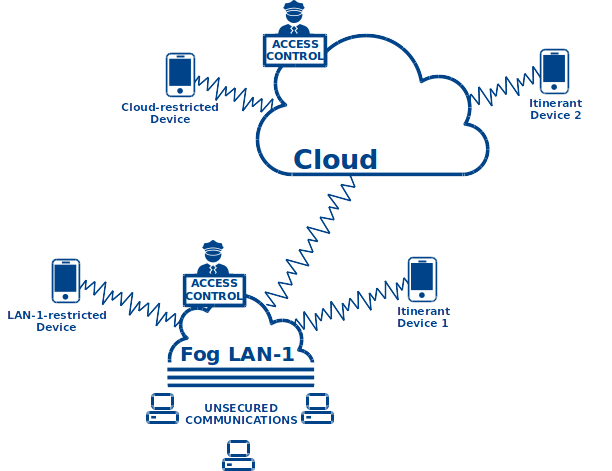
the CA hierarchy will look like this:
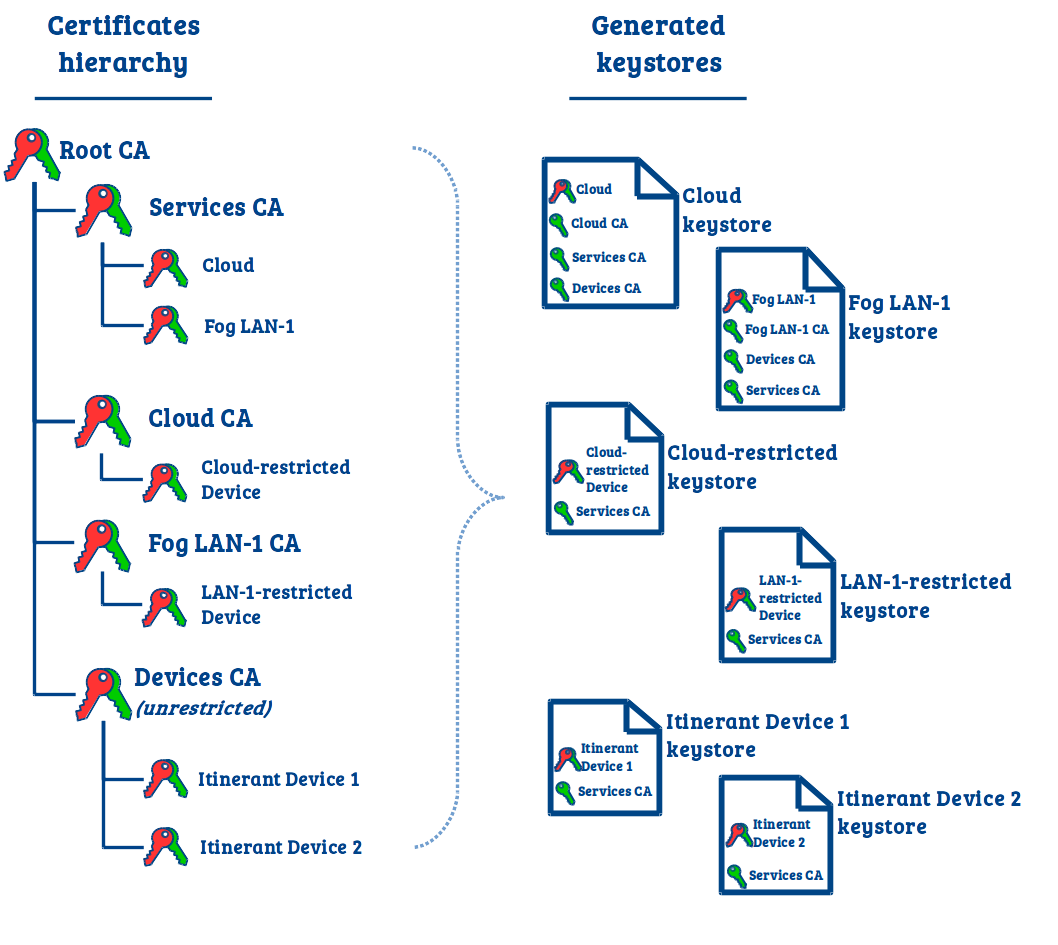
CA Hierarchy
- For each service and device, the tool will generate a single keystore file (JKS or PEM). Each keystore file contains:
- The private/public key pair and associated certificate the service/device should use to authenticate.
- The certificates the service/device should trust.
With this hierarchy, once a service trusts the servicesCA, it will trust all other services, and once a service trusts the devicesCA, it will trust all unrestricted devices.
For a restricted device, as its private key is signed by the CA of its authorized service (Link), it can only connect to this service. The other services will refuse its TCP connection.
7.2.2.2. KeysManager tool usage
7.2.2.2.1. Running the KeysManager tool
The tool is delivered as a single executable jar file named keys-manager.jar. You can simply run it by double-clicking on it
(on most OS) or by running the following command:
java -jar keys-manager.jar
7.2.2.2.2. Creating a new certificates hierarchy
First, you need to create a new certificate hierarchy. To do so open the File menu and select Create new hierarchy. You will then have to enter a set of informations and select a new file to save the hierarchy.

The keysmanager File menu
After a few seconds, the newly created hierarchy will be displayed.
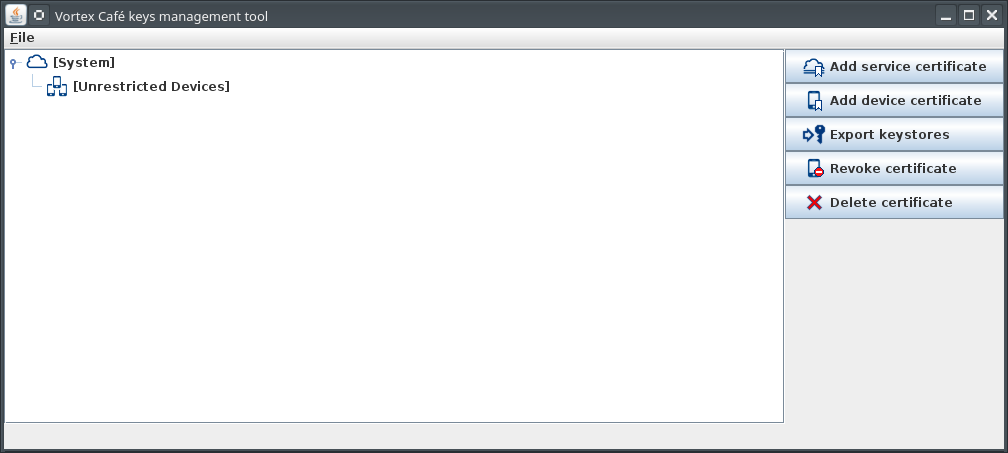
The keysmanager main window after creation of the CA hierarchy
You can reload and update any hierarchy later using the File > Open existing hierarchy menu.
7.2.2.2.3. Creating a new certificate
Then you can add to this herarchy:
- A new service certificate
- A new device certificate (for a single device or a set of devices with the same rights)
To do so, click the Add service certificate or the Add device certificate button.
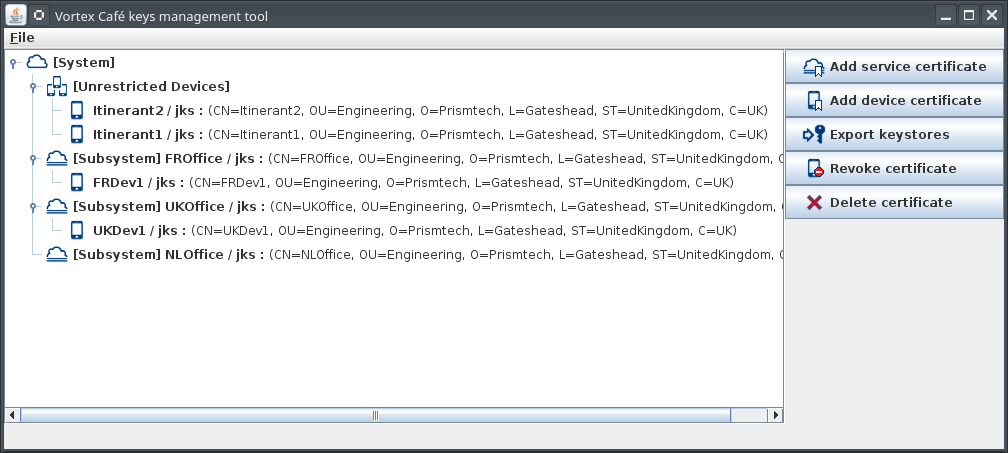
The keysmanager main window after addition of some certificates
When creating a device certificate you can choose the export format. It can be jks format for Vortex Café product or pem format for Vortex OpenSplice and Vortex Lite products.
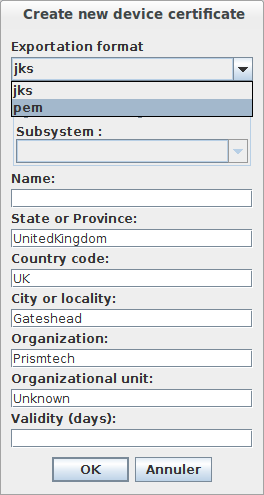
Exportation format option in the certificate creation window
- You can create two kinds of devices:
- Unrestricted: which can be used within any subsystem.
- Restricted: which is restricted to a specific subsystem. When choosing this kind of devices you have to select one of the existing subsystems.
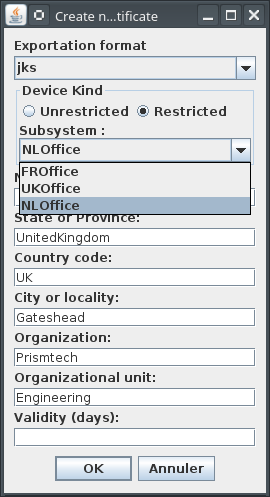
Kind of the new device
7.2.2.2.4. Certificates revocation
You can choose a certificate to revoke and click on Revoke certificate.
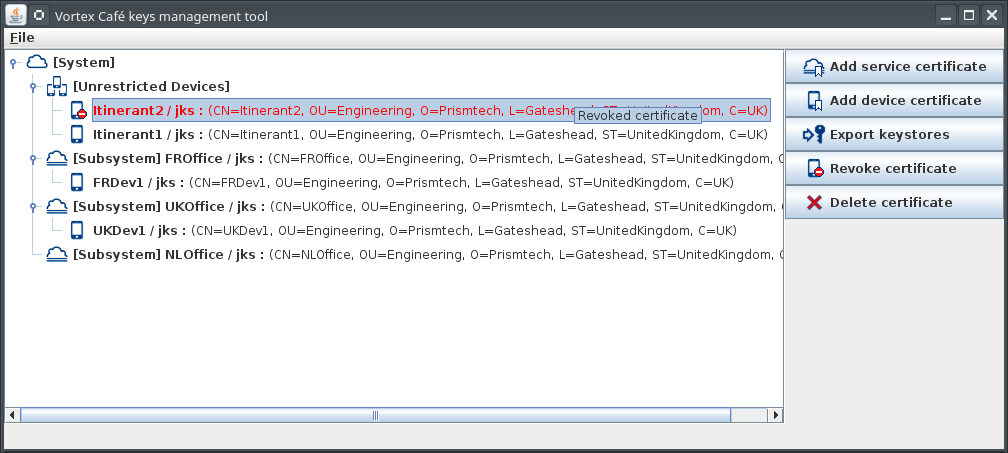
A CRL (certificate revocation list) file will be generated crl.pem and exported to the folder that you will choose in the next section.
7.2.2.2.5. Exporting keystores and CRL
Finally, you can export Java KeyStores and CRL using the Export keystores button. This will create the following files in the folder of your choice:
- a JKS store for each service
- a JKS store for each device
- CRL: crl.pem if you have revoked any certificate.
For an easier configuration of the Vortex services and devices, the tool creates a single keystore file for each service/device. This single store contains the pair of public/private keys and certificate to be used by the service or device to authenticate, but also the trusted intermediate CA certificate. Therefore, it can be used as both keystore and truststore in the configuration of a service or device.
7.2.2.3. Configuring Link services
First, you need to activate SSL :
link.ssl=true
You also need to configure Vortex Link with the keystore generated by the tool for this subsystem or this level of permissions (When the same file is used as both keystore and truststore, only the keystore options need to be defined. The file specified for keystore will also be used as truststore):
link.ssl.keystore.file="mysubsystem.jks"
link.ssl.keystore.password="password"
7.2.2.4. Configuring Devices
You need to activate SSL and configure it with the keystore generated by the tool for this device or this level of permissions.
For a device using Vortex Café, the configuration properties would be:
ddsi.security.ssl=true
ddsi.security.ssl.keystore.file="/mydevice.jks"
ddsi.security.ssl.keystore.password="password"
To configure a device using another DDS product, please refer to this product’s documentation.
7.3. Access-Control Configuration
Access-control rules are defined in an XML file that should respect the
boundary_security_permissions.xsd schema file.
A typical permissions file will contain a permissions section itself containing several grant sections. Each grant section will contain:
a subject_name or a cluster_subject_name section identifying the DomainParticipant(s) or the cluster(s) on which the grant should apply.
- when subject_name is used, the grant will apply to all DomainParticipants configured with a certificate with a subject_name that matches the one specified in the subject_name section.
- when cluster_subject_name is used, the grant will apply to all DomainParticipants deployed in a subsystem where the Vortex Link service is configured with a certificate with a subject_name that matches the one specified in the cluster_subject_name section.
A single grant may apply to several devices/subsystems by providing an partial subject name that will match several certificate subject names.
For example:
,O=ADLINKWill match all the certificates defined above:
CN=Unknown,OU=Sales,O=ADLINK,L=Unknown,ST=Unknown,C=Unknown
CN=Unknown,OU=Engineers,O=ADLINK,L=Unknown,ST=Unknown,C=Unknown
CN=Unknown,OU=UKoffice,O=ADLINK,L=Gateshead,ST=UnitedKingdom,C=UK
CN=Unknown,OU=FRoffice,O=ADLINK,L=Orsay,ST=France,C=FR
CN=Unknown,OU=LinkUser,O=ADLINK,L=Unknown,ST=Unknown,C=Unknown
Note that wildcards (the * character) may also be used:
,O=ADLINK,C=*,CN=Abc*
- If a DomainParticipant has both a subject_name and a cluster_subject_name (TCP DomainParticipant deployed in a subsystem), and the permissions file contains both a grant that matches the subject_name and a grant that matches the cluster_subject_name, the grant that matches the subject_name will apply.
- If a DomainParticipant matches several cluster_subject_name grants or several subject_name grants, then the first matching grant will be used. A warning trace will be logged by the Vortex Service.
an optional validity section containing the validity time range of the grant.
some allow_rule and/or deny_rule section(s). Each rule containing:
- a domains section containing the domain id or set of domain ids on which the rule should apply.
- some publish sections containing the list of topics and partitions on whish publication should be allowed or denied.
- some subscribe sections containing the list of topics and partitions on whish subscription should be allowed or denied.
a default section containing either ALLOW or DENY which specifies the default action to perform regarding partitions and topics that do not match any specified rules.
Example:
<permissions>

  <!-- Rules for all services or devices with OU=OrgUnit in their certificate -->
  <grant name="Grant1">
    <subject_name>,OU=OrgUnit</subject_name>
    <validity>
      <!--  Format is YYYY-MM-DDThh:mm::ss in GMT  -->
      <not_before>2014-03-01T13:00:00</not_before>
      <not_after>2500-03-01T13:00:00</not_after>
    </validity>
    <allow_rule>
      <!-- on domain 0 -->
      <domains>
        <id>0</id>
      </domains>
      <!-- allow subscription on all topics prefixed with "TopicName1" and all partitions -->
      <subscribe>
        <topics>
          <topic>TopicName1*</topic>
        </topics>
        <partitions>
          <partition>*</partition>
        </partitions>
      </subscribe>
      <!-- allow publication on topic "TopicName2" on default partition -->
      <publish>
        <topics>
          <topic>TopicName2</topic>
        </topics>
      </publish>
    </allow_rule>
    <!-- by default deny all other domains and topics -->
    <default>DENY</default>
  </grant>

  <!-- Rules for all sub systems with OU=OrgUnit in their Vortex Link certificate -->
  <grant name="Grant2">
    <cluster_subject_name>,OU=AnotherOrgUnit</cluster_subject_name>
    <validity>
      <!--  Format is YYYY-MM-DDThh:mm::ss in GMT  -->
      <not_before>2014-03-01T13:00:00</not_before>
      <not_after>2500-03-01T13:00:00</not_after>
    </validity>
    <deny_rule>
      <!-- on domain 0 -->
      <domains>
        <id>0</id>
      </domains>
      <!-- deny publication on all topics prefixed with "TopicName3" and all partitions -->
      <publish>
        <topics>
          <topic>TopicName3*</topic>
        </topics>
        <partitions>
          <partition>*</partition>
        </partitions>
      </publish>
    </deny_rule>
    <!-- by default allow all other domains and topics -->
    <default>ALLOW</default>
  </grant>

</permissions>
To avoid security breaches, all Vortex Link services in the system must be configured with the same permissions xml file.
Vortex Link services should be configured with this file:
link.accesscontrol.file="permissions.xml"
Note that a URL to the permissions file can be specified (e.g. http, ftp, etc.).
7.4. Limitations
All Vortex Link services are communicating with each other to exchange discovery information and to perform routes management. By consequence each service must trust all other services in the system.
The implication of this is that the key material used by the services is very sensitive. If a malicious person get such key material, he could run a malicious service that could :
- Access any data flowing through it
- Publish some data on unauthorized topics
- Publish some fake discovery informations
In summary, all keys and certificates generated for services should only be given to trusted people so each Link service in the system can only be deployed by trusted people.
Note: such limitation does not apply on devices.
7.5. Example
- In this example, we want to build a system for a company (ADLINK) with:
- subsystems (offices) with different permissions:
- UK office
- FR office
- Employees connecting from outside with different level of permissions:
- Sales
- Engineers
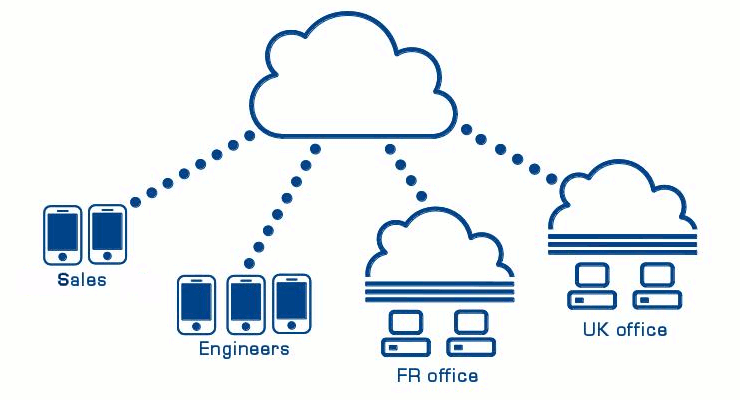
Boundary Security examples scenario
Note that we may create a more granular system by giving to each individual employee connecting from outside a single certificate and different permissions but we keep the system simple for the examples.
7.5.1. Create a new certificates hierarchy
- Using the KeysManager tool:
- Create a new hierarchy
- Add a new service certificate for the cloud service (Name=Link)
- Add a new service certificate with an identifyable subject name for UKOffice subsystem (ex: Name=UKOffice)
- Add a new service certificate with an identifyable subject name for FROffice subsystem (ex: Name=FROffice)
- Add a new device certificate with an identifyable subject name for sales (ex: Name=Sales)
- Add a new device certificate with an identifyable subject name for engineers (ex: Name=Engineers)
- Export certificates
- This should generate 6 jks stores:
- link.jks to be used by the Vortex Link service deployed in the cloud
- ukoffice.jks to be used by the Vortex Link service deployed in UK office
- froffice.jks to be used by the Vortex Link service deployed in FR office
- sales.jks to be used by all Sales’ devices
- engineers.jks to be used by all Engineer’ devices
7.5.2. Configure Link services with the generated keystores
Link service (deployed in cloud) configuration
link.ssl=true
link.ssl.keystore.file=/link.jks
link.ssl.keystore.password=secret
link.accesscontrol.file=permissions.xml
UK office service configuration
link.ssl=true
link.ssl.keystore.file=/ukoffice.jks
link.ssl.keystore.password=secret
link.accesscontrol.file=permissions.xml
FR office service configuration
link.ssl=true
link.ssl.keystore.file=/froffice.jks
link.ssl.keystore.password=secret
link.accesscontrol.file=permissions.xml
Sales devices configuration (for Vortex Café)
ddsi.security.ssl=true
ddsi.security.ssl.keystore.file=/sales.jks
ddsi.security.ssl.keystore.password=secret
Engineers devices configuration (for Vortex Café)
ddsi.security.ssl=true
ddsi.security.ssl.keystore.file=/engineers.jks
ddsi.security.ssl.keystore.password=secret
7.5.3. Access-Control rules example
Here is an example of an Access-Control rules xml file that could be applied to this example:
<permissions>
    <grant name="UK office rules">
        <cluster_subject_name>CN=UKoffice</cluster_subject_name>
        <default>ALLOW</default>
    </grant>
    <grant name="FR office rules">
        <cluster_subject_name>CN=FRoffice</cluster_subject_name>
        <deny_rule>
            <domains>
                <id>0</id>
            </domains>
            <publish>
                <topics>
                    <topic>UkAccounting*</topic>
                </topics>
                <partitions>
                    <partition>*</partition>
                </partitions>
            </publish>
        </deny_rule>
        <default>ALLOW</default>
    </grant>
    <grant name="Sales rules">
        <subject_name>CN=Sales</subject_name>
        <allow_rule>
            <domains>
                <id>0</id>
            </domains>
            <publish>
                <topics>
                    <topic>Com*</topic>
                </topics>
            </publish>
            <subscribe>
                <topics>
                    <topic>Com*</topic>
                </topics>
            </subscribe>
        </allow_rule>
        <default>DENY</default>
    </grant>
    <grant name="Engineers rules">
        <subject_name>CN=Engineers</subject_name>
        <allow_rule>
            <domains>
                <id>0</id>
            </domains>
            <subscribe>
                <topics>
                    <topic>Repository</topic>
                </topics>
            </subscribe>
            <subscribe>
                <topics>
                    <topic>Jira</topic>
                </topics>
            </subscribe>
        </allow_rule>
        <default>DENY</default>
    </grant>
</permissions>
