3. Using the OpenSplice Tuner
This section describes how to use the OpenSplice Tuner, including how to start, stop, perform connection management, manage entities and data, and perform other related tasks.
3.1. Starting and Stopping the Tuner
OpenSplice Tuner has been implemented in the Java language. The supported platforms for the Tuner are listed in the Release Notes in the section ‘Supported Platforms’. The Tuner will work on all platforms that support JAVA (SAJ) SDK.
3.1.1. Starting Tuner Using Launcher
The OpenSplice Launcher application provides easy access to the OpenSplice tools, configurations, documentation and examples.
OpenSplice Tuner can be quickly started using the OpenSplice Launcher application.
Instructions for starting Launcher can be found in the ‘Launcher’ section of the OpenSplice_GettingStartedGuide.pdf document.
In Launcher, select the Tools tab, and select the Tuner button. This will open the Tuner application.
3.1.2. Starting Tuner Using Command Line
The OpenSplice Tuner provides a command line instruction for specifying the domain config file that the tuner needs to connect to.
The option is
-uri=<URI>
An example command:
% ospltun -uri=$OSPL_URI
The following subsections provide the startup procedures for the verified operating systems.
3.1.2.1. Solaris and Linux
Before starting OpenSplice Tuner, the OpenSplice environment
must be set correctly. This can be realized by starting a shell and
executing the release.com application located in the root directory
of the OpenSplice installation (from now on referred to by
<OSPL_HOME>):
% . <OSPL_HOME>/release.com
Once the environment has been initialized correctly, the OpenSplice Tuner can be started by typing the following command in the shell:
% ospltun
When OpenSplice Tuner is started, the main window is presented to the user. (See the illustration The Main Tuner Window.)
3.1.2.2. Windows
The OpenSplice environment must be set correctly before starting
the OpenSplice Tuner. This is done by opening a command prompt
and executing the release.bat file which is located in the root
directory of the OpenSplice installation (herein referred to by
<OSPL_HOME>).
% . <OSPL_HOME>/release.bat
The OpenSplice Tuner can be started by typing the following command in the command prompt after the environment has been initialized correctly:
% ospltun
The tuner’s main window is displayed when the OpenSplice Tuner is started (see The Main Tuner Window).
3.1.3. Graphical User Interface Conventions
Some conventions are used for all graphical components of the OpenSplice Tuner. Each window of OpenSplice Tuner provides a menu bar. Each menu bar has three menus:
- File -
The File menu always provides an option to close the window (File > Close).
- Edit -
The Edit menu provides facilities to interact with the OpenSplice system.
- View -
The View menu provides options to modify the view on data in the window.
The View menu also provides an option to look up the main window. This can be achieved by choosing View > Show main window in the menu bar. This results in the displaying and focusing of the main window.
All windows are also equipped with a status bar. This status bar is used by OpenSplice Tuner to provide the user with information about the status or to report feedback about actions taken by the user. The status bar is colored yellow when a warning message is displayed and colored red when an error message is displayed.
Sometimes a status bar also contains a ‘light’, which is located in the right corner of the status bar. This light provides information about the availability of the entities where the window depends on. If these entities are available, the light is colored green. If not, then it is colored red.
A lot of menu items in the menus of several windows of OpenSplice Tuner can also be triggered using a combination of keyboard keys (short-cut). If such a keyboard shortcut is available for a specific menu item, it is displayed at the right side of the menu item in blue. The specific keyboard shortcuts are not discussed in this manual.
3.1.4. Main Window
When OpenSplice Tuner is started the main window appears.
The Main Tuner Window
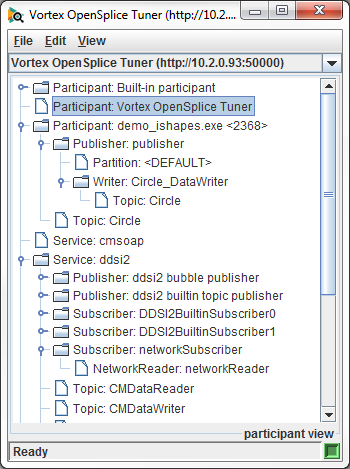
The title bar displays OpenSplice Tuner (<connected_domain_uri>).
The entity tree in the main window displays the entities in OpenSplice as well as their relationships. The selected view determines which relationships are displayed (see Entity Relationships). The current view name is displayed in the bottom right corner of the entity tree.
The status bar provides information about the status of the window or about the action that is currently being executed. The status bar of the main window is equipped with a ‘light’ (located at the right corner of the status bar). This ‘light’ provides information about the connection. If OpenSplice Tuner is currently connected to a OpenSplice domain, it is colored green (as in the illustration above). If not, it is colored red.
The Window List
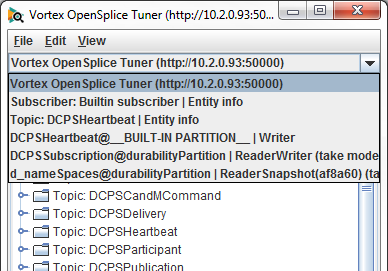
The window list of the main window is a pull-down menu, which contains all OpenSplice Tuner windows. The values in the window list match the titles of the windows. If an entry in the list is selected, the associated window is opened and it receives the focus. When a new window is opened, it is added to the window list; it is removed from this list when the window is closed again.
3.1.5. Shutdown
OpenSplice Tuner can be exited at any time by choosing File > Exit in the menu bar of the main window or by clicking the ‘close’ (X) icon at the top-right corner of the main window.
When OpenSplice Tuner is currently connected to a specific OpenSplice domain (see Connection Management), it asks for confirmation to close that connection.
The Confirm Exit Dialog

3.2. Connection Management
To be able to monitor and control the OpenSplice system, OpenSplice Tuner needs access to a specific domain. This section describes the various connection types that are supported by OpenSplice Tuner, including how a connection to a specific OpenSplice domain and node can be opened and how a connection can be closed.
3.2.1. Connection Types
OpenSplice Tuner offers the possibility to connect to a specific domain on a specific node in two different ways:
- Local -
OpenSplice Tuner connects to a specific domain that is available on the same node as where it is started. For local connections, OpenSplice Tuner connects to an OpenSplice domain using the Java Native Interface (JNI). This is the default connection type.
- Remote -
OpenSplice connects to a specific domain that is available on a node in the same network as the node where it started. For remote connections, OpenSplice Tuner connects to a OpenSplice domain using the Simple Object Access Protocol (SOAP).
The Tuner determines the connection type based on the given domain URI/URL in the connection dialog (see Open a Connection).
![]() A local connection is preferred over a remote connection
because communication with OpenSplice is faster and does not cause any
network traffic. It is therefore less intrusive than a remote
connection and it improves the performance of OpenSplice Tuner.
A local connection is preferred over a remote connection
because communication with OpenSplice is faster and does not cause any
network traffic. It is therefore less intrusive than a remote
connection and it improves the performance of OpenSplice Tuner.
![]() By using a remote connection, OpenSplice Tuner also supports
monitoring and controlling OpenSplice on embedded platforms that do
not provide a graphical user interface (VxWorks for example)
By using a remote connection, OpenSplice Tuner also supports
monitoring and controlling OpenSplice on embedded platforms that do
not provide a graphical user interface (VxWorks for example)
3.2.2. Open a Connection
OpenSplice Tuner can only open a connection when it is not currently connected.
To open a connection, choose File > Connect in the menu bar. This action opens a dialog that asks the user to provide a domain URI.
This domain URI can represent any of the following values:
a: Integer Domain ID (e.g.
1)b: Domain URI (e.g.
file:///home/ADLINK/ospl.xml)c: SOAP service URL (e.g.
http://192.168.1.20:8000)
Value b can be selected from a file chooser. Click the Browse button to open a file chooser.
Values a and b imply a local connection type.
Value c implies a remote connection type.
When value c is used, make sure that the OpenSplice Control & Monitoring SOAP (CMSOAP) service is running at the supplied SOAP service URL.
When the OK button is clicked, OpenSplice Tuner tries to open a connection to the domain that is associated with the supplied domain URI. If the domain exists, OpenSplice Tuner connects to that domain. If it does not exist, the message ‘Supplied URI not available’ appears in the status bar of the dialog window.
When domain URI value c is used and the CMSOAP service and/or OpenSplice is not running at the specified node URL, the message ‘IOException: Connection refused’ appears in the status bar of the dialog window.
The Connect operation can be cancelled by clicking the Cancel button. This makes the dialog window close. OpenSplice Tuner is still disconnected afterwards.
3.2.2.1. Connection History
OpenSplice Tuner keeps a history of connections. It remembers four connections per connection at most. The connection history is located in the File menu between the Disconnect and Exit menu items.
Connection History
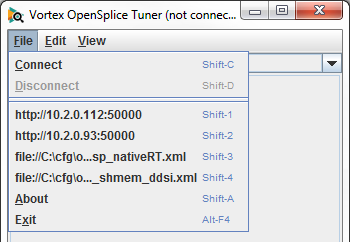
When a specific connection is displayed in the history in the File menu it does NOT mean that it is currently connectable.
A connection in the history list can be opened by clicking File > <connection> in the menu bar. If the connection is available, it is opened. The result of the action is displayed in the status bar of the main window.
3.2.3. Close a Connection
Once a connection is opened, it can be closed again. This can be achieved by clicking File > Disconnect in the menu bar. The result of the disconnect action is displayed in the status bar of the main window.
3.3. Entity Information
To be able to use the OpenSplice system for the distribution of data, applications need to create all kinds of entities. Entities are, for instance: domain participants, subscribers and publishers. The OpenSplice system administers these entities. Each entity type has its own characteristics (attributes, status, QoS policies, data type) and relations to other entities. OpenSplice Tuner provides facilities to observe entities in the OpenSplice system and browse over their (mutual) relationships using different views (see Entity Relationships).
OpenSplice Tuner displays internal OpenSplice entities. Most entities map on a DCPS entity, but some entities do not. The table below provides an overview of OpenSplice entities that can be shown by OpenSplice Tuner as well as how they map on DCPS entities.
Mapping of OpenSplice Entities on DCPS Entities
DCPS Entity |
OpenSplice Entity |
Description |
|---|---|---|
DomainParticipant |
Participant |
A DCPS DomainParticipant is presented as a Participant in OpenSplice. |
Service |
Represents a service of OpenSplice. A service is a special OpenSplice application that adds functionality to OpenSplice. Services that are currently available are: Networking - Realizes the communication between separate OpenSplice nodes. DLite - Realizes the durable properties of data in a OpenSplice system. CMSOAP - service that allows a remote connection of OpenSplice Tuner to the current OpenSplice node. |
|
Topic |
Topic |
A DCPS Topic is also presented as a Topic in OpenSplice. |
Partition |
Partition |
DCPS does not specify a Partition as an Entity, but as a policy in the quality of service of a Publisher and a Subscriber. In OpenSplice, however, it is presented as a Partition entity. |
Subscriber |
Subscriber |
A DCPS Subscriber is also presented as a Subscriber in OpenSplice. |
Publisher |
Publisher |
A DCPS Publisher is also presented as a Publisher in OpenSplice. |
Reader |
OpenSplice specifies a Reader as an abstract base Entity for a DataReader and Query. |
|
DataReader |
DataReader |
A DCPS DataReader is also presented as a DataReader in OpenSplice. |
ReadCondition |
Query |
A DCPS ReadCondition is presented as a Query in OpenSplice. |
NetworkReader |
Internal Reader type for the networking service. |
|
DataWriter |
Writer |
A DCPS DataWriter is presented as a Writer in OpenSplice. |
ContentFilteredTopic |
View + Topic + Query |
A DCPS ContentFilteredTopic is presented as a combination of a View, Topic and a Query. |
MultiTopic |
View + Join + Topics (+ Query) |
A DCPS MultiTopic is presented as a combination of a View, Join, multiple Topics and possibly a Query. |
WaitSet |
Represents an internal WaitSet object |
To observe entity information, right-click on a specific entity in the entity tree of the main window. This will trigger a popup menu that displays the possible actions for that entity. Choose Display Entity to observe the selected entity.
Display Entity Information
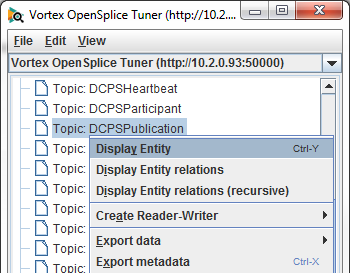
This action will create a new window with entity information. This new window consists of a menu bar and a certain number of tabs. These tabs will be explained in the following sections.
3.3.1. Attributes
This tab is available for all entities. Each entity type has its own attributes. Some of them are available for all entity types, others only for that specific entity type.
Entity Attributes
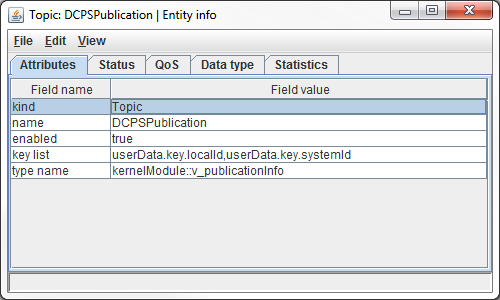
Attributes that are available for every entity type are:
Kind - the entity type
Name - the entity name
Handle index and serial - the internal identification of the entity
Address - the heap memory address of the entity
Enabled - shows the state of the entity
Both handle index and serial as well as address are considered as
internals and therefore are only displayed when the Display internals
configuration option in the OpenSplice Tuner preferences is set to
true (see Preferences).
The illustration above shows the attributes for a Topic entity. Besides the default attributes, a Topic entity contains two extra attributes:
Key list - represents the key list of the Topic (comma separated)
Type name - represents the type name of the Topic
3.3.2. Status
Some entity types have a status. As the name says, it provides information about the communication status of the entity. Entity types that have a communication status are:
Subscriber
Topic
DataReader
Writer
The status attributes depend on the type of the entity. The status of a specific entity can be resolved by clicking the Status tab in the entity information window. The illustration below shows the status attributes of a Topic entity.
Entity Status
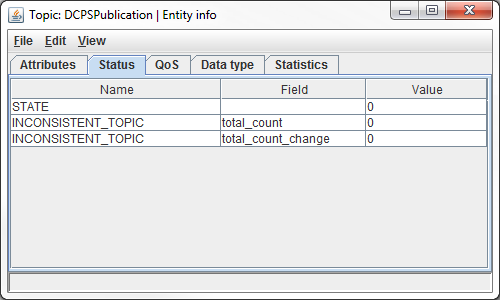
The status information can be updated automatically. This can be achieved by setting the Auto update entity information configuration option in the OpenSplice Tuner preferences.
3.3.3. QoS
OpenSplice relies on the use of Quality of Service (QoS). A QoS is a set of characteristics that controls some aspects of the behaviour of OpenSplice.
QoS is comprised of individual QoS policies and is associated with a specific entity. The QoS policies depend on the type of the entity. Entity types that are equipped with a QoS are:
Participant
Topic
Subscriber
Publisher
DataReader
Writer
The following subsections describe how the QoS of a specific entity can be inspected and how to modify a QoS.
3.3.3.1. Inspect QoS
The illustration below shows the Quality of Service (QoS) of a specific Topic in OpenSplice. The QoS of a specific entity is displayed in the QoS tab of the entity information window. The QoS of the entity can be inspected by clicking the QoS tab in the entity information window. To refresh the QoS of the entity, the Get button (located at the bottom-left corner of the QoS tab) can be clicked when the QoS tab is selected.
Entity QoS
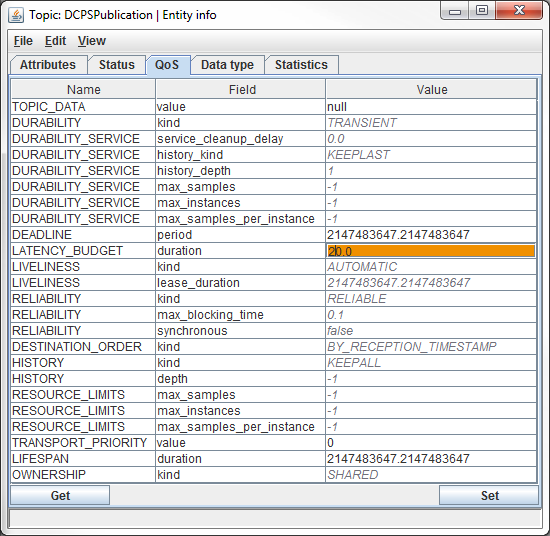
3.3.3.2. Modify QoS
It is possible to modify the Quality of Service (QoS) settings of a specific entity. OpenSplice Tuner allows modification of the QoS settings when the QoS tab of the entity information window is selected. Once an entity is enabled, not all QoS policies can be modified any more. The values of the QoS policies that are not editable are colored gray. When clicking on a value of a QoS policy that is currently editable (one of the cells located in the Value column), the contents of that cell can be edited. During the editing, the contents of the cell are constantly validated. If the current input is valid, the cell is colored orange and if not, it is colored red. To confirm the input, press Enter. The cell is then colored white again. If the current input is not valid, it cannot be confirmed. To cancel the editing of the cell, press the Esc key. The content of cell is reset to the value it had before the cell was edited and the cell is colored white again.
When all QoS policies have the desired value, the QoS can be applied to the entity by clicking the Set button (located at the bottom-right corner of the QoS tab. The result of the action is displayed in the status bar of the window.
![]() The modification of a specific Quality of Service influences the
behaviour of the entity it belongs to.
The modification of a specific Quality of Service influences the
behaviour of the entity it belongs to.
3.3.4. Data Type
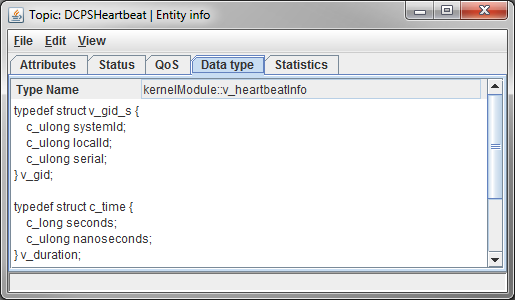
Some entity types have a data type or relate to one. The data type can be observed when the Data type tab is selected in the entity information window.
Entity Data Type
Entity types that provide a data type are:
Topic
Writer
DataReader
This tab displays the data type name, and the data type definition in plain text format. To make the text more readable, the data type representation can be changed to HTML text format. This can be achieved by choosing View > Data type representation > <Representation> in the Menu Bar.
Entity Data Type Representation
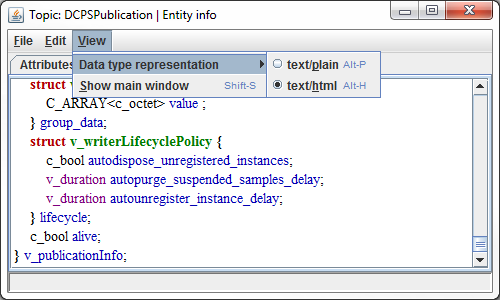
The default value of the data type representation can be modified. This can be achieved by setting the Datatype content type configuration option in the OpenSplice Tuner Preferences.
![]() Plain text takes less processing time than HTML, but
the HTML version is easier to read.
Plain text takes less processing time than HTML, but
the HTML version is easier to read.
3.3.5. Statistics
Some entity types keep track of statistical information. This information can be monitored in OpenSplice Tuner by selecting the Statistics tab in the entity information window. The statistical information can be updated automatically. This can be achieved by setting the Auto update entity information configuration option in the OpenSplice Tuner preferences.
The following entities have statistics:
Reader
Writer
Durability
Networking
CMSOAP
Entity Statistics
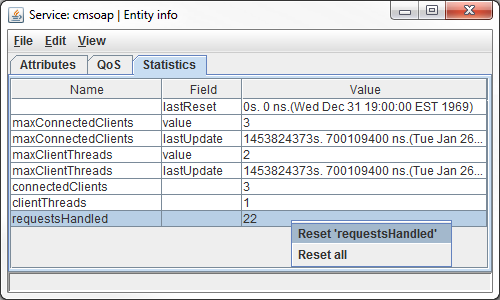
As well as monitoring statistical information, OpenSplice Tuner also provides facilities to reset (parts of) this information. When right-clicking on a specific row in the table of the Statistics tab, a popup menu with two options appears (see illustration above). The first option results in a reset of the selected counter. The second option results in a reset of all statistical information of the entity.
3.4. Entity Relationships
To be able to observe how entities work together, it is necessary to observe their (mutual) relationships. OpenSplice Tuner provides three different approaches to observe these relationships:
- Participant view -
Displays participant entities of the local node as top-level entities
- Topic view -
Displays topic entities as top-level entities
- Partition view -
Displays partition entities of the local node as top-level entities
Each view consists of a tree of entities. The layout of the entity tree in the main window is determined by the selected view and the available entities in OpenSplice.
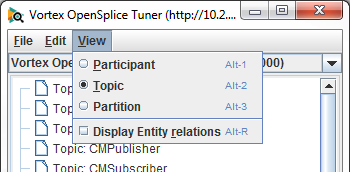
To change the view on entity relations, choose View > <View type> in the menu bar. The default view on startup is determined by the Default entity tree type configuration option in the OpenSplice Tuner Preferences.
Choose Entity View
3.4.1. Enable and Disable Displaying Relationships
By default, only top-level entities are displayed in a view. This means, for instance, that the topic view only displays topic entities. It is also possible to observe all relationships of the top-level entities to other entities. When all relationships need to be displayed, choose View > Display Entity relations in the menu bar (see Choose Entity View).
Besides enabling or disabling the displaying of all entity relations, it is also possible to enable or disable these relations on entity level. This can be done by right-clicking on an entity in the entity tree and then choosing Hide Entity relations to disable display and Display Entity relations to enable display.
Enable and Disable Entity Relations
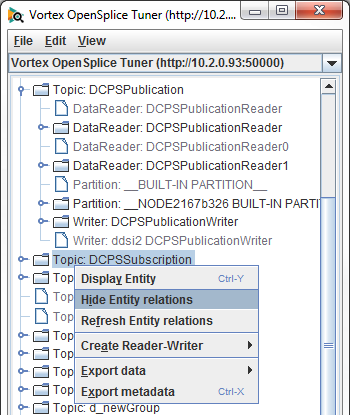
When the Display Entity relations check box is enabled in the View menu (see Choose Entity View), all entity relations are displayed. By selecting Hide Entity relations on a specific entity, the displaying of relations can be disabled for that specific entity. That will color the concerning entity gray in the entity tree.
The other way around is also possible. When the Display Entity relations check box is unchecked in the View menu, no entity relations are displayed. By selecting Display Entity relations on a specific entity, the displaying of the relations is enabled for that specific entity. That will color the concerning entity green in the entity tree.
![]() Disabling entity relations and only enabling the relations that need
to be observed makes OpenSplice Tuner less intrusive for OpenSplice.
Disabling entity relations and only enabling the relations that need
to be observed makes OpenSplice Tuner less intrusive for OpenSplice.
3.4.2. Refresh Relationships
Once the relationships have been resolved, by default they are not kept up to date.
Updates can be applied in two ways.
By choosing Edit > Refresh entity tree in the menu bar the entire tree is refreshed.
By right-clicking on an entity in the tree and choosing Refresh Entity relations the relations of that specific entity can be refreshed (Enable and Disable Entity Relations).
![]() Refreshing entity relations on entity level rather then a complete
refresh of the tree takes less processing time and is less intrusive
for OpenSplice.
Refreshing entity relations on entity level rather then a complete
refresh of the tree takes less processing time and is less intrusive
for OpenSplice.
Entity relations can also be updated automatically. This can be achieved by setting the Auto update entity tree configuration option in the OpenSplice Tuner Preferences.
3.5. Data Injection and Consumption
OpenSplice Tuner provides facilities for data injection and consumption. Data injection can be accomplished in several ways:
using an existing writer
using a self-created writer
using a self-created reader-writer
Creating a writer to inject data can be realized by creating a publisher followed by creating a writer or by creating a reader-writer (see Data Injection and Consumption).
For consuming data, the following options are available:
using an existing reader
using a self-created reader
using a self-created reader-writer
inspecting the data in an existing reader database (consume data by making a snapshot of an existing reader)
inspecting the history cache of an existing writer (consume data by making a snapshot of the history of an existing writer)
The following sections describe how to perform these tasks.
3.5.1. Creating a Publisher
One way to inject data in OpenSplice is to create a publisher and writer. A publisher can be attached to one or more partitions in the domain where OpenSplice Tuner is currently participating.
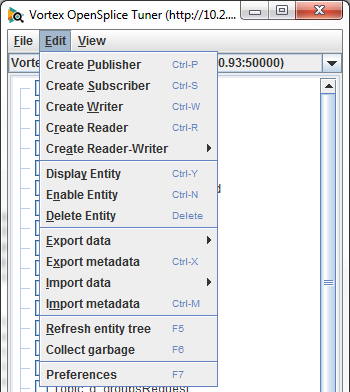
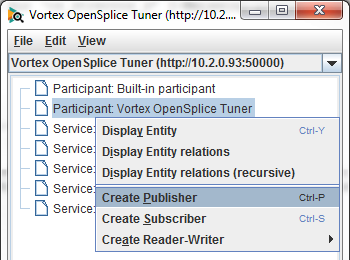
To create a publisher, choose Edit > Create Publisher in the menu bar of the main window (shown above), or right-click on the OpenSplice Tuner participant in the entity tree and then select the Create Publisher item (see illustration below).
OpenSplice Tuner Participant Actions
Both of these actions will result in the display of the Create Publisher dialog.
Create Publisher dialog
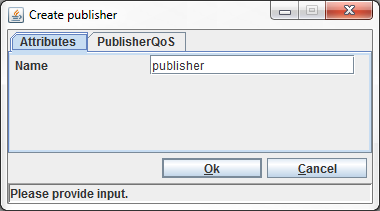
The value provided in the Name field becomes the name of the publisher (as displayed in the entity tree).
The Qos settings of the publisher can be set on the PublisherQos tab.
The Partition name field on the PublisherQos tab determines the publisher’s partition(s).
To attach the publisher to multiple partitions, the comma (,)
can be used as a separator and the asterisk (*) can be used
as a wild card. Partitions that do not already exist are created
in OpenSplice, except for parts of the expression that contain
a wild card.
For example, the name part*,abc makes the publisher publish in all
available partitions that start with part including part itself
and also in partition abc (the partition abc will be created if
it does not already exist in the connected OpenSplice domain).
The Presentation fields on the PublisherQos tab determines the publisher’s Presentation policy setting. This policy is also an RxO policy, thus it affects QoS compatibility matching for readers and writers.
Additionally, Tuner supports coherent and ordered access. So if coherent_access is true, and the access_scope is TOPIC or GROUP, then the option to publish coherent sets will be available when selecting the publisher. See Publishing Coherent Sets.
When the OK button is clicked, the input is validated. If the input is correct, the publisher is created. The newly-created publisher will appear in the entity tree (when entity relations are enabled; see Enable and Disable Displaying Relationships). If the input is not correct, an error message will appear in the status bar of the dialog box.
The Create publisher action can be cancelled by clicking the Cancel button. In this case, no publisher will be created.
3.5.2. Creating a Writer
A writer can only be created if one or more publishers have already been created. A writer can be created by choosing Edit > Create Writer in the menu bar (see Main Window Edit Menu) or right-clicking on a created publisher entity in the tree then choosing the Create Writer item.
Both of these actions will result in the display of the dialog box shown below.
Create Writer dialog
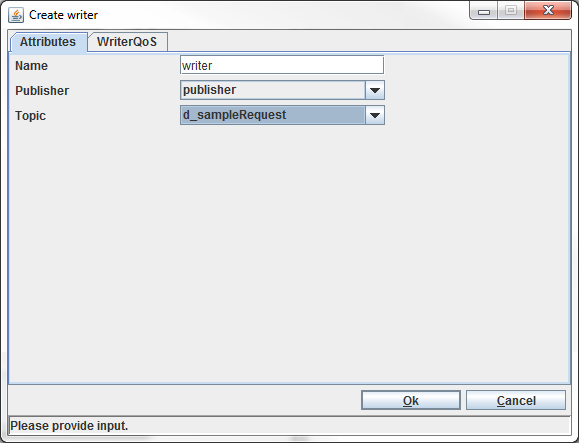
The Name field determines the name of the writer (as displayed in the entity tree). The Publisher field determines to which publisher the writer will be attached (determines the partition(s) the writer will write its data in). The Topic field determines which topic the writer will be able to write.
By default the QoS settings of the Writer are copied from the Topic it writes. However, it is also possible to override these settings by specifying its own QoS settings/profile (see QoS Profiles) in the WriterQoS tab.
When the OK button is clicked, the input is validated. If the input is correct, the writer is created. The newly-created writer will appear in the entity tree (when entity relations are enabled; see Enable and Disable Displaying Relationships).
If the input is not correct, an error message will appear in the status bar of the dialog window.
The Create writer action can be cancelled by clicking the Cancel button. In this case, no writer will be created.
3.5.3. Creating a subscriber
One way to consume data from OpenSplice is to create a subscriber and a data reader. A subscriber can be attached to one or more partitions in the domain where OpenSplice Tuner is currently participating.
To create a subscriber, choose Edit > Create Subscriber in the menu bar of the main window (see Main Window Edit Menu) or right-click the OpenSplice Tuner participant in the entity tree then choose the Create Subscriber item.
Both of these actions will result in the display of the dialog box shown below.
Create Subscriber dialog
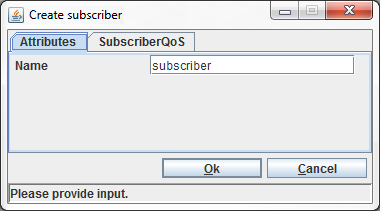
The value provided in the Name field becomes the name of the subscriber (as displayed in the entity tree). The Qos settings of the subscriber can be set on the SubscriberQos tab. The Partition name field in the SubscriberQos tab determines the subscriber’s partition(s).
To attach the subscriber to multiple partitions, the comma (,)
can be used as a separator and the asterisk (*) can be used as a
wild card. Partitions that do not already exist are created in
OpenSplice, except for parts of the expression that contain a wild
card.
The Presentation fields on the PublisherQos tab determines the publisher’s Presentation policy setting. This policy is also an RxO policy, thus it affects QoS compatibility matching for readers and writers.
Additionally, Tuner supports coherent and ordered access. So if coherent_access is true, and the access_scope is TOPIC or GROUP, then the option to read available data on all the subscriber’s readers will be available when selecting the subscriber. See Access Data On Readers.
When the OK button is clicked, the input is validated. If the input is correct, the subscriber is created. The newly-created subscriber will appear in the entity tree (when entity relations are enabled; see Enable and Disable Displaying Relationships).
If the input is not correct, an error message will appear in the status bar of the dialog box.
The Create subscriber action can be cancelled by clicking the Cancel button. In this case, no subscriber will be created.
![]() If the subscriber was created with coherent_access and GROUP
access_scope, then it will be created in the disabled state, regardless of
the value of the entity factory policy of the parent participant. For group
coherent subscribers, data readers can only be created while it is disabled.
When the subscriber is explicitly enabled, then the contained readers can begin
their access to the data. After the subscriber is enabled, no further data readers
can be created under it.
If the subscriber was created with coherent_access and GROUP
access_scope, then it will be created in the disabled state, regardless of
the value of the entity factory policy of the parent participant. For group
coherent subscribers, data readers can only be created while it is disabled.
When the subscriber is explicitly enabled, then the contained readers can begin
their access to the data. After the subscriber is enabled, no further data readers
can be created under it.
3.5.4. Creating a Reader
A reader can only be created if one or more subscribers have already been created.
A reader can be created by choosing Edit > Create Reader in the menu bar (see Main Window Edit Menu) or by right-clicking on a created subscriber entity in the tree then choosing the Create Reader item.
Both of these actions will result in the display of the dialog box shown below.
Create Reader Dialog
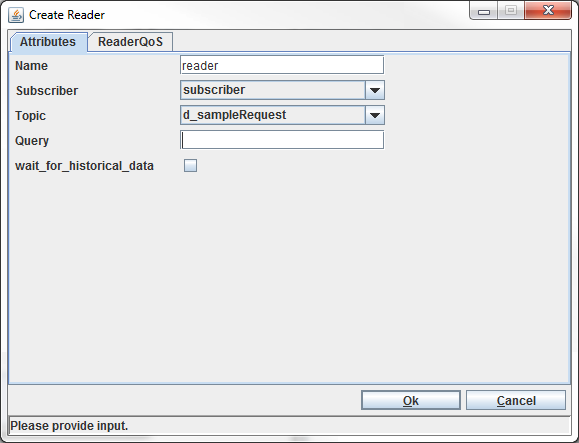
The Name field determines the name of the reader (as displayed in the entity tree).
The Subscriber field determines to which subscriber the reader will be attached (determines the partition(s) the reader will consume data from).
The Topic field determines which topic the reader will be able to consume.
The Query field can be used to specify a query for the reader so only data that matches the query will be consumed.
The WaitForHistoricalData field determines whether the Reader will wait for historical data to arrive during creation (maximum of 30 seconds). In this case the Reader will still receive historical data.
By default the QoS settings of the Reader are copied from the Topic it reads. However, it is also possible to override these settings by specifying its own QoS settings/profile (see QoS Profiles) in the ReaderQoS tab.
When the OK button is clicked, the input is validated. If the input is correct, the reader is created. The newly-created reader will appear in the entity tree (when entity relations are enabled; see Enable and Disable Displaying Relationships).
If the input is not correct, an error message will appear in the status bar of the dialog window.
The Create reader action can be cancelled by clicking the Cancel button. In this case, no reader will be created.
3.5.5. Creating a ReaderWriter
The creation of a publisher, writer, subscriber and reader can be simplified by directly creating a reader-writer. This action creates a publisher, writer, subscriber and reader in one action.
There are two possible ways of creating a reader-writer. The reader-writer can be created by using a partition expression or by using a single partition. In both cases a window will appear where the reader-writer attributes and Qos settings of the publisher, writer, subscriber and reader can be changed.
3.5.5.1. Partition Expression
The creation of a reader-writer by using a partition expression allows a reader-writer to inject and consume in multiple partitions.
To create such a reader-writer, choose Edit > Create Reader-Writer > Partition expression in the menu bar of the main window (see Main Window Edit Menu) or right-click on the OpenSplice Tuner participant in the entity tree then choose the Create Reader-Writer > Partition expression item.
Both of these actions will result in the display of the dialog box shown below.
Create Reader-Writer (Partition expression) dialog
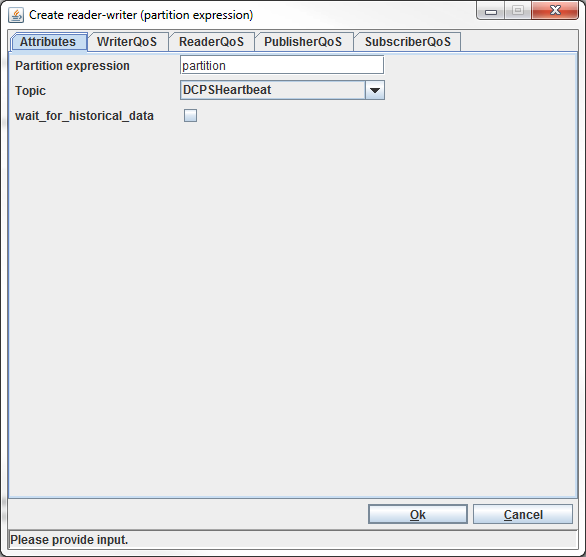
The value provided in the Partition expression field determines
the publisher and subscriber partition(s). To attach them to multiple
partitions, the comma (,) can be used as separation and the asterisk
(*) can be used as wild card. Partitions that do not exist are created
in OpenSplice, except for parts of the expression that contain a wild card.
The Topic field determines the topic the reader-writer will read and write.
The WaitForHistoricalData field determines whether the Reader will wait for historical data to arrive during creation (maximum of 30 seconds). In this case the Reader will still receive historical data.
By default the QoS settings of the Reader/Writer are copied from the Topic it reads/writes. However, it is also possible to override these settings by specifying its own QoS settings/profile (see QoS Profiles) in the WriterQoS and ReaderQoS tabs.
When the OK button is clicked, the input is validated. If the input is correct, the reader-writer is created. The newly-created publisher, writer, subscriber and reader will appear in the entity tree (when entity relations are enabled; see Enable and Disable Displaying Relationships).
The reader-writer window is also presented. If the input is not correct, an error message will appear in the status bar of the dialog window.
The Create action can be cancelled by clicking the Cancel button. In this case, no publisher, subscriber, reader and writer will be created.
See also Consuming Data Using a Reader-Writer.
The dialog window for creating a reader-writer using a partition expression can also be summoned by right-clicking a topic entity in the entity tree and choosing Create Reader-Writer > Partition expression). There is one difference between the two actions mentioned above: the Topic field will only contain the selected topic in the entity tree instead of all topics in the domain.
3.5.5.2. Existing Partition
The creation of a reader-writer by using a single partition allows a reader-writer to inject and consume in one already existing partition.
To create such a reader-writer, choose Edit > Create Reader-Writer > Existing Partition in the menu bar of the main window (Main Window Edit Menu) or right-click on the OpenSplice Tuner participant in the entity tree then choose the Create Reader-Writer > Existing Partition item.
Both of these actions will result in the display of the dialog box shown below.
Create Reader-Writer (existing partition) dialog
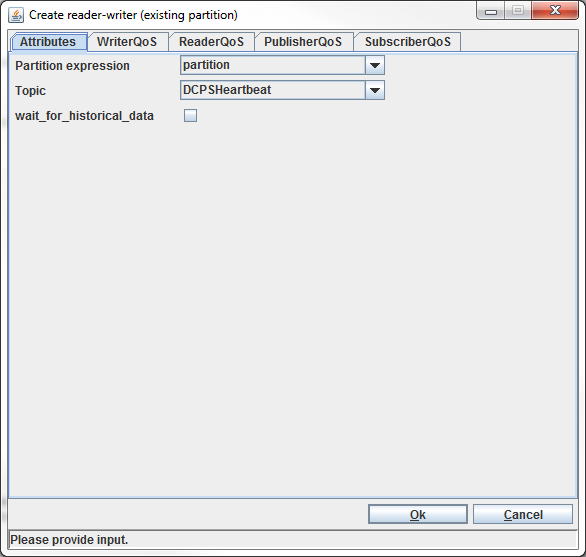
The value provided in the Partition field determines the publisher and subscriber partition.
The Topic field determines the topic the reader-writer will read and write.
The WaitForHistoricalData field determines whether the Reader will wait for historical data to arrive during creation (maximum of 30 seconds). In this case the Reader will still receive historical data.
By default the QoS settings of the Reader/Writer are copied from the Topic it reads/writes. However, it is also possible to override these settings by specifying its own QoS settings/profile (see QoS Profiles) in the WriterQoS and ReaderQoS tabs.
When the OK button is clicked, the input is validated. If the input is correct, the reader-writer is created. The newly-created publisher, writer, subscriber and reader will appear in the entity tree (when entity relations are enabled; see Enable and Disable Displaying Relationships). The reader-writer window is presented to the user. If the input is not correct, an error message will appear in the status bar of the dialog window.
The Create action can be cancelled by clicking the Cancel button. In this case, no publisher, subscriber, reader and writer will be created.
The dialog for creating a reader-writer for a single partition can also be summoned in two other ways.
The first one is right-clicking a topic entity in the entity tree and choosing Create Reader-Writer > Existing Partition. (Note that the Topic field will only contain the selected topic in the entity tree instead of all topics in the domain.)
The second one is right-clicking a partition entity in the entity tree and choosing Create Reader-Writer > Existing Partition. (Note that the Partition field in the dialog window will only contain the selected partition in the entity tree instead of all partitions in the domain.)
3.5.6. Creating a Snapshot of a Reader Database
OpenSplice Tuner also provides facilities to browse through data in an existing application reader database without influencing it. This can be achieved by making a ‘snapshot’ of that database. Create a snapshot by right-clicking on the reader that needs to be examined then choosing Make database snapshot.
Create Reader Snapshot
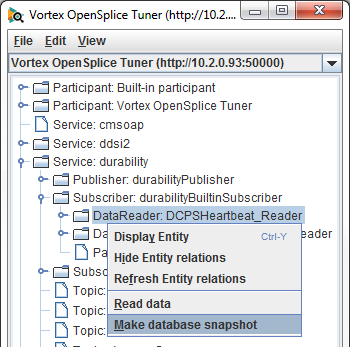
The Make database snapshot action makes OpenSplice Tuner create a snapshot of the contents of that specific database and open a reader snapshot window that allows browsing through the contents of the database.
3.5.7. Creating a Snapshot of Writer History Cache
OpenSplice Tuner also provides facilities to browse through data in the history cache of an existing application writer without influencing it. This can be achieved by making a ‘snapshot’ of the history of the writer. Create a snapshot by right-clicking on the writer that needs to be examined then choosing Make history snapshot.
Create Writer Snapshot
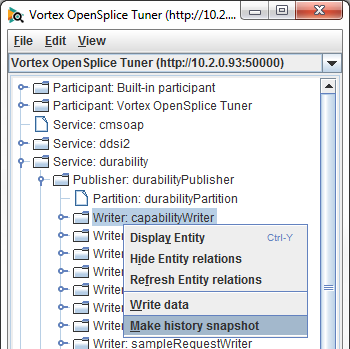
The Make history snapshot action makes OpenSplice Tuner create a snapshot of the history of that specific writer and open a writer snapshot window.
![]() Whether or not there is a history available for a specific writer
depends on the Quality of Service settings of that writer.
Whether or not there is a history available for a specific writer
depends on the Quality of Service settings of that writer.
3.5.8. Delete Entity
Self-created entities can also be deleted. This can be achieved by right-clicking the entity to delete in the entity tree followed by selecting the Delete Entity item in the popup menu that appears, or by choosing Edit > Delete Entity in the menu bar.
When the entity is deleted, it is also removed from the entity tree. If the entity could not be deleted, the reason is displayed in the status bar of the main window.
3.5.9. Injecting Data
If the correct entities are available, data can be injected into OpenSplice. The methods to do this are explained in the following subsections.
3.5.9.1. Injecting Data Using a Writer
Data can be injected using an existing application writer or a self-created writer. To create or modify and inject data, OpenSplice Tuner offers a writer window. Such a window can be opened by right-clicking a writer entity in the entity tree followed by choosing the Write data item.
The Writer Window
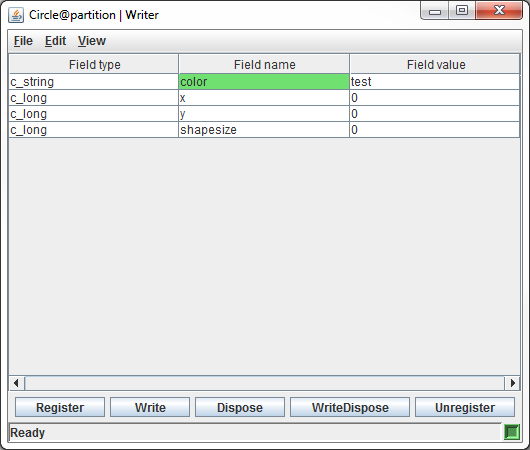
The window consists of:
- Title Bar -
Displays the title. Its format is: <topic_name>@<partition(s)> > Writer.
- Menu Bar -
Contains the File, Edit and View menus.
- User Data View -
View that consists of a table that displays the data the writer can write.
- Button Panel -
Contains buttons to register, unregister, write and dispose data in OpenSplice.
- Status Bar -
Displays the current action as well as the status of the writer.
The user data view displays all fields in the data, which depend on the data type of the topic that the writer is able to write. It consists of three columns.
The first column displays the type of a field in the data.
The second column displays the name of a field in the data. Nested fields in the data are separated by a dot. The fields that are part of the key of the topic are colored green.
The third column displays the current value of the field. When the window is opened, they have the default value (the default value depends on the type of the field).
![]() The field type names are not the same as how they have been
specified in IDL. They are displayed as internal OpenSplice types.
This means (in most cases) that a prefix
The field type names are not the same as how they have been
specified in IDL. They are displayed as internal OpenSplice types.
This means (in most cases) that a prefix c_ is added and unsigned
is transformed in u. For example: the type long in IDL becomes
c_long and unsigned long becomes c_ulong.
To edit the value of a field, click the Field value of that field.
The field is colored orange while editing (see illustration). The
writer window starts an editor when a specific field value is clicked.
The editor type depends on the Field type. For primitive types like long
and float as well as for strings, a simple text field is created. To
confirm the input in a text field, simply press the Enter key. For
enumeration and boolean types, a pull-down menu with the possible
options appears. The input in a pull-down menu does not have to be
confirmed.
Writer Window Edit Field Value
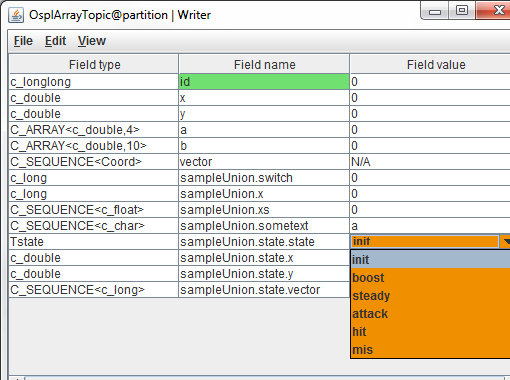
During the editing, the value is constantly validated. When the current value of the Field value is not valid, the field is colored red (see illustration) and the input cannot be confirmed. To cancel the editing, press the Esc key. The value of the field is reset to the value it had before the editing began.
Writer Window Input Error

When all fields are set to the desired value, the data can be injected into OpenSplice.
The Register button in the button panel (in The Writer Window) or Edit > Register instance in the menu bar will inform OpenSplice that the particular instance will be modified, meaning that OpenSplice will handle the instance more efficiently.
To undo this the Unregister button can be clicked or Edit > Unregister instance in the menu bar. This will inform OpenSplice that the particular instance will not be modified any more.
Data can be injected by clicking the Write button in the button panel or by choosing Edit > Write in the menu bar. When the current input is not valid as shown in Writer Window Input Error, the data cannot be written. A write action will result in the error message in the status bar of the writer window: ‘Data could not be written, because input is not valid’.
When a field value has not been confirmed, but the current input is valid, the write action will result in a confirmation of the input followed by a write action.
If data was successfully written, the message ‘Data written’ appears in the status bar.
Besides writing data, it can also be disposed. Data in OpenSplice can be disposed by clicking the Dispose button in the button panel or by choosing Edit > Dispose in the menu bar. The mechanism of the dispose is the same as the one for the write action.
The write and dispose action can also be combined. This can be done by clicking the WriteDispose button or Edit > WriteDispose in the menu bar. This will first write the data and then dispose it.
![]() Data that is injected will also arrive at data readers of other
running OpenSplice applications that are subscribed to this data.
This also applies to disposing of data.
Data that is injected will also arrive at data readers of other
running OpenSplice applications that are subscribed to this data.
This also applies to disposing of data.
The Entity information of the Writer associated with the Writer window can be resolved by choosing File > Show Writer info.
3.5.9.2. Injecting Data Using a Reader-Writer
The creation of a reader-writer results in the popup of a reader-writer window. The reader-writer window is a combination of a reader window and a writer window.
The Reader-Writer Window
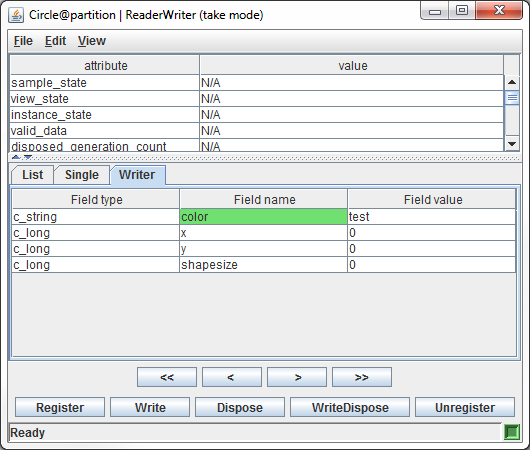
The reader-writer window provides facilities for both injecting and consuming data. It consists of:
- Title Bar -
Displays the title of the window. The format is <topic_name>@<partition(s)> | Reader-Writer (<mode>)
- Menu Bar -
The menu bar for the window.
- Sample information Table -
Displays sample information of a specific sample.
- Data Table -
Consists of three tabs. The reader and writer are combined using these three tabs. The List and Single tabs belong to the reader and the Writer tab belongs to the writer.
- Button Panel -
Contains a combination of reader and writer window buttons.
- Status Bar -
Displays information about the current action and the state of the reader-writer.
The Writer tab of the user data view is selected in The Reader-Writer Window. It looks the same as the user data view of the writer window in The Writer Window, but for collection types a right-click menu is available.
When you right-click on a field value cell which contains collection type data and then choose the Add Details, a new window will open (see Detailed Writer tab), which looks the same as the writer window (which is described in Injecting Data Using a Writer) except that the Write and Dispose buttons are replaced by a single Save button.
The illustration below shows a sample with five elements: id and
four sequence fields named text, iVector, fVector and
pVector.

It is only possible in the Writer tab to edit primitive elements.
For collection types use the right-click menu item Add Details.
In the illustration, only the field name id can be edited in this window;
for all other types use the Add Details item, which opens a new
window with the content of the selected field type.
The next illustration shows the detailed information from the
pVector element.
Detailed Writer tab
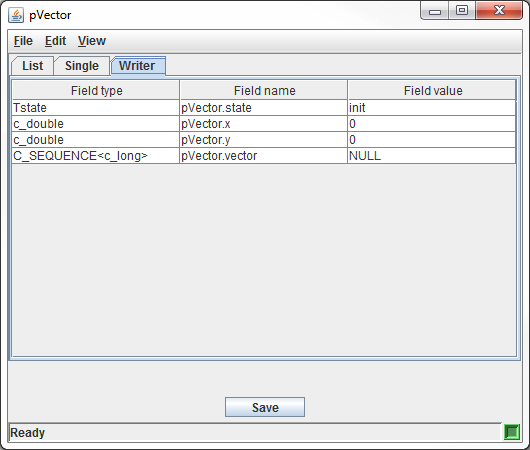
This element again has a collection type vector and thus the Add Details item is available to edit the content of this element. The rest of the types can be edited in the current window. When the Save button is clicked all filled-in data in the current window will be saved and in the main reader-writer window the field value of the edited field type will be updated.
For data types containing a two dimensional sequence, the process is similar. The next illustration shows the field seq2D, which is a sequence of a sequence of longs.
Detailed Writer tab
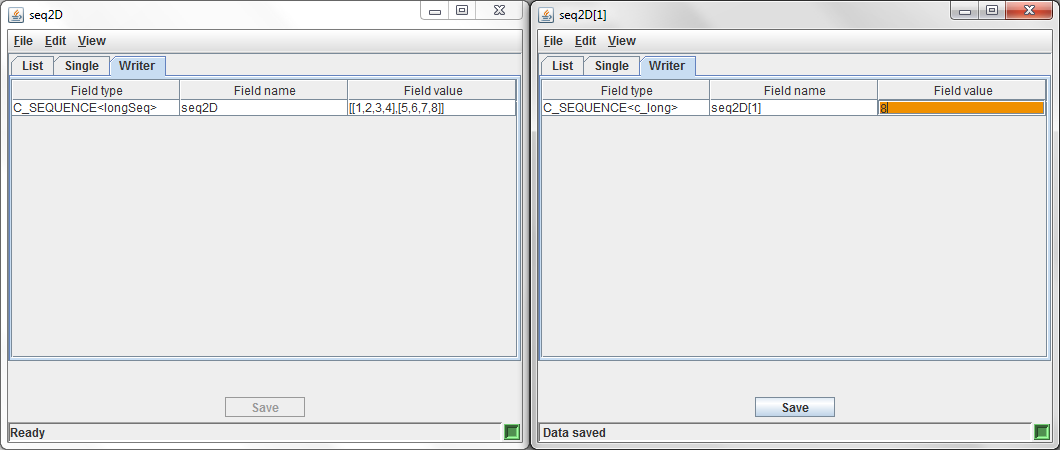
When editing two dimensional sequences such as this, Add details is first selected in the main reader-writer window and the detail view of the first order sequence is displayed. Add details must then be selected in this window’s writer tab to access the detail window of the second order sequence, of the first order’s first index.
This second order sequence, seq2D[0] can then be filled in by typing in a value in the editing cell on the writer tab, and clicking Save the value to an index of the second order sequence. Index selection is done by clicking on a row in the List tab. If no row is selected, Save will add a new index to the sequence.
When done editing the second order sequence, the window can be closed, and the next index of the first order collection can be edited by selecting Add details again. This will bring up the details window for seq2D[1].
Continuing in this fashion, the two dimensional sequence can be filled in. The current table row in the List tab can be deselected by clicking outside of the table or by pressing the Esc key.
To delete the contents of a collection, in the main reader-writer window, right click on the collection in the writer tab, and select Clear details.
NOTE: You must click the Write button in the parent reader-writer window for any changes made in the Writer tab to be written to the system.
The facilities of the List and Single tabs of the user data view and the Sample information view is the same as for the reader window.
The buttons in the button panel are a combination of the buttons in a reader window and a writer window.
The <<, <, > and >> buttons are described in Consuming Data Using a Reader-Writer.
Information about the Register, Write, WriteDispose and Unregister buttons can be found in Injecting Data Using a Writer.
In contrast to a reader window and writer window, the closing of a reader-writer window (this can be done by clicking the ‘close’ (X) icon in the top-right corner of the window or by choosing File > Close in the menu bar), will result in the automatic deletion of all entities that concern the reader-writer (a publisher, writer, subscriber and a reader).
![]() Data that is injected will also arrive at data readers of other
running OpenSplice applications that are subscribed to this data.
Data that is injected will also arrive at data readers of other
running OpenSplice applications that are subscribed to this data.
This also applies to disposing of data.
The Entity information of the Reader and Writer associated with the ReaderWriter window can be resolved by choosing respectively File > Show Reader info or File > Show Writer info.
3.5.9.3. Detailed Reader-Writer window
The detailed reader-writer window is combination of a reader window and a writer window.
Detailed Reader-Writer window
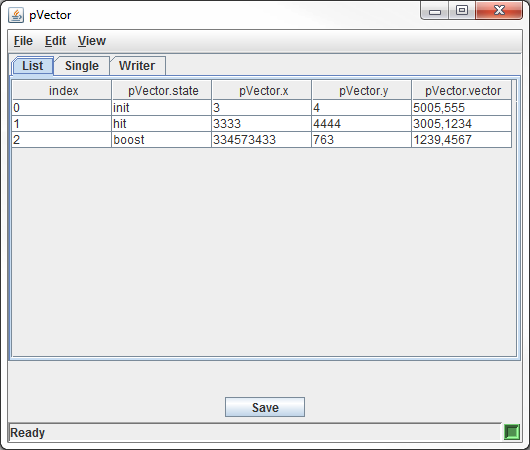
The detailed reader-writer window provides facilities for both injecting and consuming data. It consists of:
- Title Bar -
Displays the title of the window, which is the name of the column from which the right-click was done that created the window.
- Menu Bar -
The menu bar for the window.
- Data Table -
Consists of three tabs. The reader and writer are combined using these three tabs. The List and Single tabs belong to the reader and the Writer tab belongs to the writer.
- Button Panel -
Contains a Save button.
- Status Bar -
Displays information about the current action and the state of the reader-writer.
The List tab of the user data view is selected in the illustration.
It looks almost the same as the user data view from the reader-writer window
except that the List tab user data always starts with an index column
displaying the index of that element inside the collection. In this
case the pVector element consists of three sub-elements each having
state, x, y, and vector fields. The vector field is
again a collection type and can thus be viewed in detail.
The facilities of the List and Single tabs of the user data view are the same as for the reader-writer window.
3.5.10. Consuming Data
If the correct entities are available, data can be consumed from OpenSplice. The methods to do this are explained in the subsections below.
3.5.10.1. Consuming Data Using a Reader
Data can be consumed using an existing application reader or a self-created reader. To consume data, OpenSplice Tuner offers a reader window.
Such a window can be opened by right-clicking an entity in the entity tree in the main window followed by selecting the Read data item. If a reader has been created with a query specified, select the reader query entity in the Participant View.
A reader window is shown below.
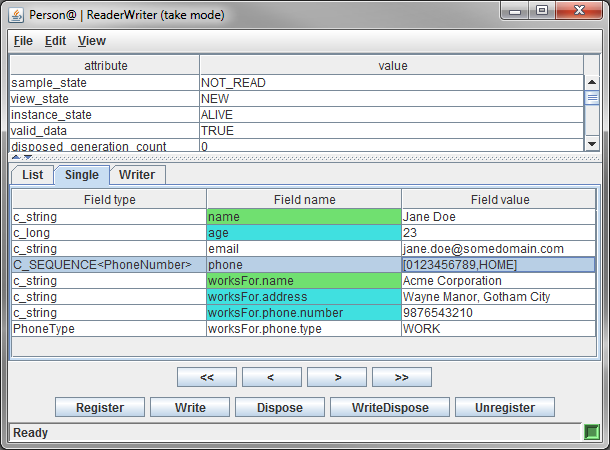
The Reader Window
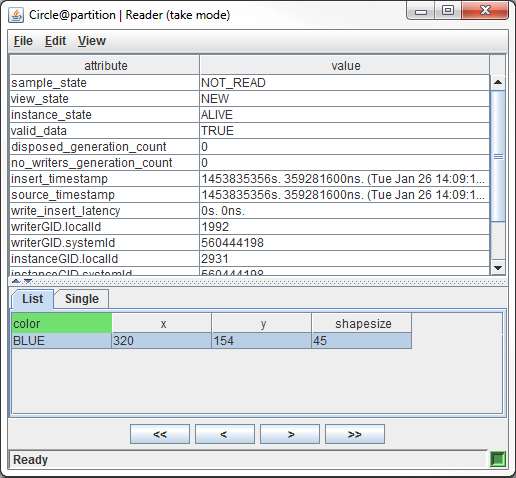
The window consists of:
- Title Bar -
Displays the title. Format is: <topic_name>@<partition(s)> | Reader (<mode>).
- Menu Bar -
Consists of File, Edit and View menus.
- Sample information View -
Displays the sample information of one specific sample.
- User Data View -
Displays the user data of the samples that have been consumed by OpenSplice Tuner.
- Button Panel -
Contains buttons to consume data from OpenSplice.
- Status Bar -
Displays the current action as well as the status of the reader.
Multiple views on consumed data are available in the window. Without interaction, no data is consumed by OpenSplice Tuner. The buttons on the button panel enable browsing through the data in the reader database.
The > button (or Edit > Next in the menu bar) selects the next sample that has been consumed in the List and Single tabs of the User data view as well as the Sample information view. If the last consumed sample is selected, a new sample is consumed from the reader database. If no more samples are available in the reader database, the notification ‘No more data available’ will appear in the status bar.
The < button (or Edit > Previous) selects the previous sample in the view. If the first one is selected, the notification ‘No more previous data’ is displayed in the status bar. This action does not trigger OpenSplice Tuner to consume data.
The >> button (or Edit > Next 50) selects the 50th sample counted from the currently-selected one. The samples are consumed from the reader database if fewer samples are available in the user data view. If no more samples are available, the notification ‘No more data available’ is displayed in the status bar.
The << button (or Edit > Previous 50) selects 50 samples back, counted from the currently-selected one. If the first one is currently selected, the notification ‘No more previous data available’ is displayed in the status bar. If there are some previous samples, but fewer than 50, the first sample is selected. This action does not trigger OpenSplice Tuner to consume data.
![]() Data that is consumed by OpenSplice Tuner from an application data
reader cannot be consumed any more by the application that created
that specific data reader.
Data that is consumed by OpenSplice Tuner from an application data
reader cannot be consumed any more by the application that created
that specific data reader.
The Entity information of the Reader associated with the Reader window can be resolved by choosing File > Show Reader info.
3.5.10.1.1. Sample Information View
The sample information view displays information about the currently selected sample in the user data view. When an application injects data, OpenSplice adds information to it. This information is called sample information in OpenSplice Tuner. It is displayed in the sample information view. This information consists of:
- sample_state -
Indicates whether or not the sample has already been read.
- view_state -
Indicates whether the DataReader has already seen samples for the most current generation of the related instance.
- instance_state -
Indicates whether the instance is currently in existence, or if it has been disposed, the reason why is was disposed.
- valid_data -
Indicates whether the read data is valid or not.
- disposed_generation_count -
Indicates the number of times the instances has become alive after it was disposed explicitly by a Writer, at the time the sample was received.
- no_writers_generation_count -
Indicates the number of times the instance has become alive after it was disposed because there were no writers, at the time the sample was received.
- insert_timestamp -
The time the sample was inserted in the reader database.
- source_timestamp -
The time the message was written.
- write_insert_latency -
The time between write and insert.
- writerGID -
Identification of the writer that wrote the message.
- instanceGID -
Identification of the instance of the sample.
- sampleSequenceNumber -
Sequence number of the sample.
- qos -
The Quality of Service of the message (not implemented yet).
The selection in the User data view determines the information in the Sample information view. OpenSplice Tuner automatically displays the sample information that is associated with the user data that is selected in User data view.
3.5.10.1.2. User Data View
The user data view contains two tables that both offer a different view: List table and Single table.
The Single table is capable of displaying one specific instance of
user data. This view displays all fields in the data, which depend on
the data type of the topic that the reader is able to consume. It
consists of three columns. The first column displays the type of a
field in the data. The second column displays the name of a field in
the data. Nested fields in the data are separated by a dot. The
fields that are part of the key of the topic are colored green. The
third column displays the current value of the field. When the window
is opened, they have the value N/A.
The List table is capable of displaying multiple samples in a table.
The list view is selected in The Reader Window. Each row represents one instance of user data from a sample that is consumed from OpenSplice. Each column represents a field in the data. Key fields are colored green.
3.5.10.1.3. Show details of data that contains a collection type
When you right-click on a cell which contains collection type data and then choose the Show Details item (see the illustration below), a new window will open, which is similar to the reader-writer window (described in Detailed Reader-Writer window); the new window shows the details of the chosen collection type.
Show Details item

3.5.10.1.4. Sorting Data
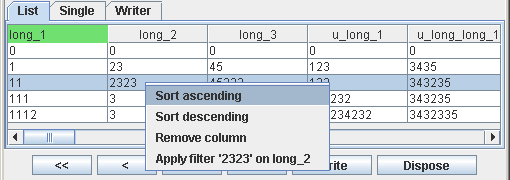
Data in the List table of the User data view can be sorted by column. This can be achieved by right-clicking any cell in the column that needs to be sorted followed by selecting the Sort ascending item to sort the column in ascending order or the Sort descending item to sort the column in descending order.
List View actions
3.5.10.1.5. Filters
It is possible to apply one or more filters on data in the List table of the user data view. Data in the table that does not match one or more of these filters is hidden.
To apply a filter, right-click on a specific cell in the table followed by selecting the Apply filter ‘<value>’ on <field_name> item.
The illustration List View actions above shows the application of
the filter "23" on the field "long_2". This means that data
that does not have the value 23 for the field long_2 will be
hidden. The illustration below shows the data in the table from after
the filter shown above is applied. Multiple filters can be applied altogether.
Remove a Filter
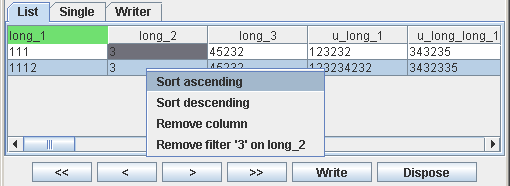
Once a filter has been applied, it can also be removed again. This will result in the display of the data that was hidden because it did not match that filter. Removing a filter can be achieved by right-clicking on a cell in the column where the filter was applied and selecting the Remove filter ‘<value>’ on <field_name> item or by selecting Edit > Remove filter > <field_name>:<value> in the menu bar.
3.5.10.1.6. Reordering Columns
A column in the List table of the User data view can be moved to another location by left-clicking the column header and dragging it to the new location in the view.
3.5.10.1.7. Removing Columns
Sometimes not all fields in the data are interesting. These fields can be removed from the List table in the User data view. This can be done by right-clicking the relevant column and choosing Remove column from the popup menu. The column will be removed from the List table, and it cannot be displayed again in that specific window.
3.5.10.1.8. Consumption Mode
The reader window supports two modes for data consumption. The first mode is the take mode. This is the default mode. In this mode, each consumed sample is removed from the database after it has been read.
The second mode is the read mode. In this mode, a consumed sample is only marked as read in the database after it is read, but not removed. The consumption mode can be changed by choosing Edit > Take mode in the menu bar to select the take mode or by choosing Edit > Read mode to select the read mode.
3.5.10.1.9. Monitoring
The reader window supports monitoring the reader database. This means it consumes samples from the database and displays them right after they become available. Monitoring is possible in both read mode and take mode. To enable monitoring, choose Edit > Start monitoring in the menu bar. This will disable all actions for the reader window until monitoring is stopped. Monitoring can be stopped by choosing Edit > Stop monitoring in the menu bar.
![]() Monitoring increases the intrusiveness of OpenSplice Tuner on
OpenSplice.
Monitoring increases the intrusiveness of OpenSplice Tuner on
OpenSplice.
3.5.10.1.10. Clear Data
The data in the List table of the User data view can be removed from the view. There are two ways to do it.
The first way is to remove only the selected sample. This can be done by choosing Edit > Clear selection in the menu bar.
The second way is to remove all data in the table. This can be done by choosing Edit > Clear list in the menu bar.
3.5.10.2. Inspecting Data in a Reader Database Snapshot
The creation of a snapshot of a reader database results in the popup of a reader snapshot window. Such a reader snapshot window is shown below.
Reader Snapshot Window
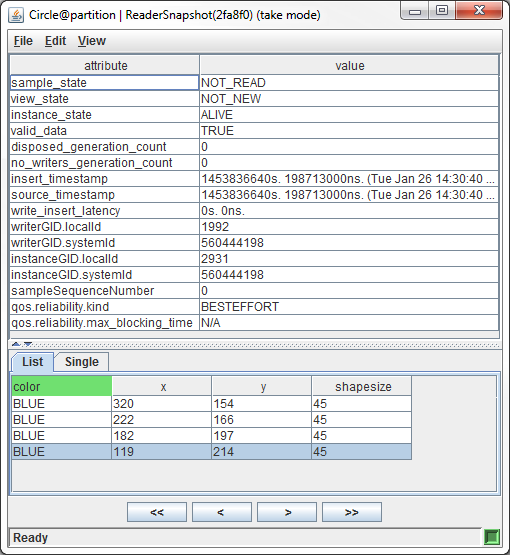
This window consists of:
- Title Bar -
Displays information about the snapshot. The format of the title is: <topic_name>@<partition(s)> | ReaderSnapshot (<heap address>)(<mode>).
- Menu Bar -
Contains three menus that provide several facilities for accessing and modifying the snapshot as well as the view on the data.
- Sample information View -
Displays the sample information of the sample that is associated with the currently selected instance of user data in the User data view.
- User Data View -
Provides different views for displaying the instances of user data in the snapshot.
- Button Panel -
Offers facilities to browse through the data in the snapshot.
- Status Bar -
Provides information about the status of the snapshot or actions that are currently being executed.
The facilities for browsing through the data in the snapshot and for modifying the view are equal to the facilities that are available for a writer snapshot window, reader window and a reader-writer window. See Consuming Data.
![]() When a reader snapshot window is closed, the reader snapshot is
deleted.
When a reader snapshot window is closed, the reader snapshot is
deleted.
3.5.10.3. Inspecting Data in a Writer History Snapshot
The creation of a snapshot of writer history cache results in the popup of a writer snapshot window. Such a window looks almost the same as a reader window and has the same capabilities. A writer snapshot window is shown below.
Writer Snapshot Window
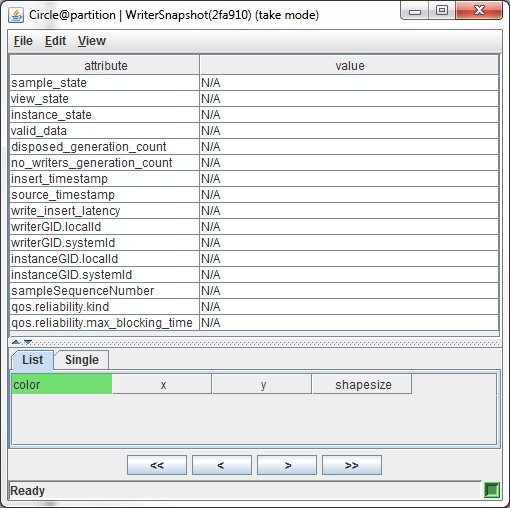
The window consists of:
- Title Bar -
Displays the title. Format is: <topic_name>@<partition(s)> | WriterSnapshot(<heap_address>)(<mode>).
- Menu Bar -
Consists of File, Edit and View menus.
- Sample information View -
Displays the sample information of one specific sample.
- User Data View -
Displays the user data that is consumed by OpenSplice Tuner.
- Button Panel -
Contains buttons to consume data from OpenSplice.
- Status Bar -
Displays the current action as well as the status of the snapshot.
![]() When a writer snapshot window is closed, the writer snapshot is
deleted.
When a writer snapshot window is closed, the writer snapshot is
deleted.
3.5.10.4. Consuming Data Using a Reader-Writer
The creation of a reader-writer results in the popup of a reader-writer window (The Reader-Writer Window). The reader-writer window is combination of a reader window and a writer window. It provides both the reader and writer window facilities.
3.5.10.5. Injecting and Consuming Data With Coherent and Ordered Access
OpenSplice supports setting of the Presentation policy of publishers and subscribers. As a result, Tuner can set these policies on its own created publishers and subscribers and be able to inject/consume coherent sets of data into/from the system.
3.5.10.5.1. Publishing Coherent Sets
Tuner is able to create and publish coherent sets of data for either existing publishers in the system or from its own created publishers. To create a coherent publisher in Tuner, see Creating a Publisher.
In the main window’s entity tree, in either participant or partition view mode, right click a publisher that has its access_scope set to either TOPIC or GROUP, and its coherent_access set to true. If these conditions are true, then the right click context menu will show a new item called Publish coherent sets. Selecting this menu option will bring up the coherent publish window.
Coherent Publisher Window
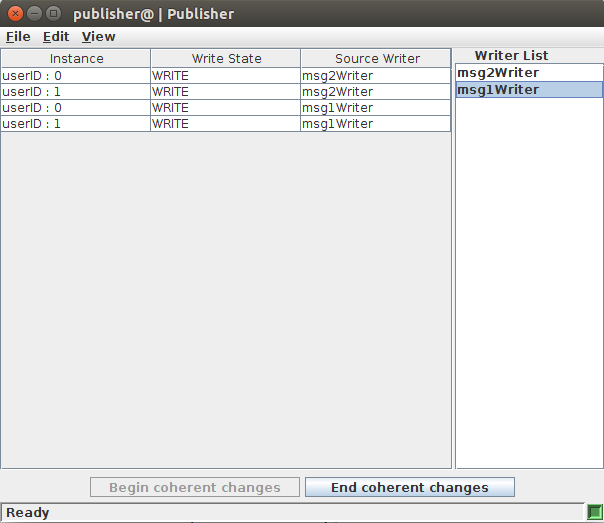
This view contains two parts: the list of writers currently under this Publisher, and the user data table containing data about the outgoing samples in a coherent set.
The actions available to the user in this view are:
Begin coherent changes
End coherent changes
Refresh writer list
Begin coherent changes will set the publisher in coherent mode. In this state, samples written by this publisher’s writers will not be made visible to remote readers (under a subscriber with matching Presentation policy) until the End coherent changes action is made. Otherwise, samples written while the publisher is not in coherent mode are published normally.
Samples can be constructed and written from this view by either double clicking or right clicking on a writer in the writers list and selecting Write data. This brings up a writer window identical to the one in Injecting Data Using a Writer, only this one will update the Coherent publish window with written data.
When a sample is constructed in the writer window and then written, disposed, or any other writer action made, and if the publisher is in coherent mode, then the sample will appear in the Coherent publish window’s data table.
The data table displays the written sample’s instance key, the outgoing instance state, and the originating writer’s name. Samples in the data table can be double clicked to bring up a read only view of the writer window to view the sample’s fields.
![]() Once a sample has been written from the writer window, regardless if the publisher
is in coherent mode or not, it is live in the system and cannot be edited.
Once a sample has been written from the writer window, regardless if the publisher
is in coherent mode or not, it is live in the system and cannot be edited.
Once editing a set of coherent data is complete, clicking End coherent changes button will notify the publisher that the set is complete, and remote coherent subscribers will allow access to the published data.
The Refresh writer list action (accessible from the Edit menu or F5 keystroke) refreshes the current list writers that the publisher owns, if any writers were created or deleted since the creation of the window.
3.5.10.5.2. Access Data On Readers
Tuner is able to access data from a subscriber scope, specifically for viewing coherent and/or ordered sets of data for either existing subscribers in the system or from its own created subscribers. To create a coherent subscriber in Tuner, see Creating a Subscriber.
In the main window’s entity tree, in either participant or partition view mode, right click a subscriber that has its access_scope set to either TOPIC or GROUP, and its coherent_access set to true. If these conditions are true, then the right click context menu will show a new item called Access data on readers. Selecting this menu option will bring up the subscriber access window.
Subscriber Access Window
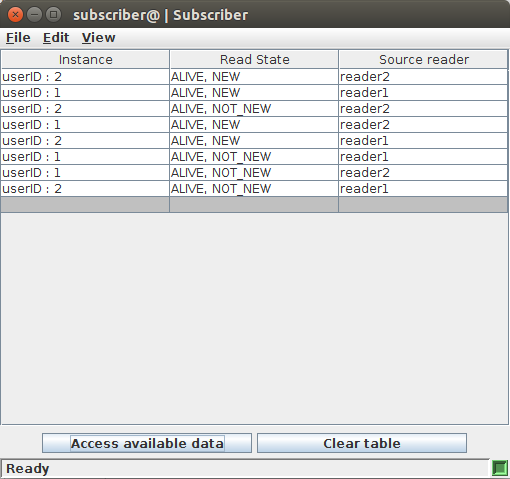
This view contains a single component, a table containing samples that are taken from the subscriber’s data readers in a coherent and ordered set (if the subscriber’s Presentation policy has those attributes set).
The actions available to the user in this view are:
Access available data
Clear table
Access available data Will access all owned data reader entities that have data available, in order, and will display all samples returned in the data table. The table displays the instance key and key value, the instance and view state of the sample, and the originating reader name that received the sample. A grayed out row also appears after the end of the table, to visually separate distinct accesses form each other.
Double clicking or right clicking on a table row and selecting the View data action will bring up a reader frame displaying the full sample info and user data of the selection. This particular reader frame is only for viewing the current selection of the subscriber’s data table, the read/take, import/export, and monitoring functions are disabled.
![]() Note that the Access available data action on a coherent subscriber will populate the data
table with completed coherent publications, it will also display any samples that were published
incoherently. That is to say, a writer under a coherent publisher is capable of writing data
outside of a coherent change block, in which case, the data is received by compatible data readers
normally.
Note that the Access available data action on a coherent subscriber will populate the data
table with completed coherent publications, it will also display any samples that were published
incoherently. That is to say, a writer under a coherent publisher is capable of writing data
outside of a coherent change block, in which case, the data is received by compatible data readers
normally.
![]() Access available data action only uses take on owned data readers.
Access available data action only uses take on owned data readers.
Clear table Clears all rows from the data table.
3.6. Exporting and Importing
Next to injecting and consuming data, OpenSplice Tuner also provides facilities to export information from OpenSplice to a file on disk, and to import information from a file on disk.
There are two kinds of information that can be exported/imported. It is possible to export/import a Topic and also samples for that Topic.
OpenSplice Tuner considers the Topic itself as metadata and the samples for a Topic as data. OpenSplice Tuner exports both metadata and data to disk in XML format. See the section Exporting and Importing.
3.6.1. Export Metadata
Topics in OpenSplice can be exported to a file on disk with OpenSplice Tuner. Once a Topic is exported, it can for instance be imported in another OpenSplice domain later on. It might also be useful to re-insert the Topic after a restart of OpenSplice.
Exported metadata consists of:
Topic Name
Topic Type Name
Topic Key List
Topic Data Type
Topic Quality of Service
Exporting metadata can be achieved by choosing Edit > Export metadata in the menu of the main window (Main Window Edit Menu) or by right-clicking a Topic entity in the entity tree of the main window followed by selecting Export metadata from the popup menu that appears (see Enable and Disable Entity Relations). Both of these actions will result in the display of the dialog window shown below.
Export Metadata dialog

The value provided in the Topic field determines the topic that needs to be exported to disk. The File field determines the location where OpenSplice Tuner will store the information. By clicking the Browse button it is possible to select the location to store the information using a file chooser.
When the OK button is clicked, the input is validated. If the input is correct, the metadata is exported. If the input is not correct, an error message will appear in the status bar of the dialog window. The export metadata action can be cancelled by clicking the Cancel button. In this case, no metadata will be exported.
3.6.2. Export Data
Next to topics, samples in OpenSplice can also be exported. Just as with the creation of a reader-writer, exporting data is available in two modes.
Exporting data from one existing partition.
Exporting data from partitions that match a user-defined expression.
It is also possible to export data from an existing reader using the list view of a reader window and reader-writer window.
It is not necessary to export the metadata prior to exporting the data, because OpenSplice Tuner exports the metadata of the data as well.
3.6.2.1. Existing Partition
Data from an existing partition can be exported by:
Choosing Edit > Export data > Existing Partition from the menu bar of the main window
Right-clicking a partition entity in the entity tree of the main window followed by choosing Export data from the popup menu that appears.
Right-clicking a topic entity in the entity tree of the main window followed by choosing Export data > Existing Partition from the popup menu that appears.
All of these actions result in the popup of the dialog window shown below.
Export Data (Existing Partition) dialog
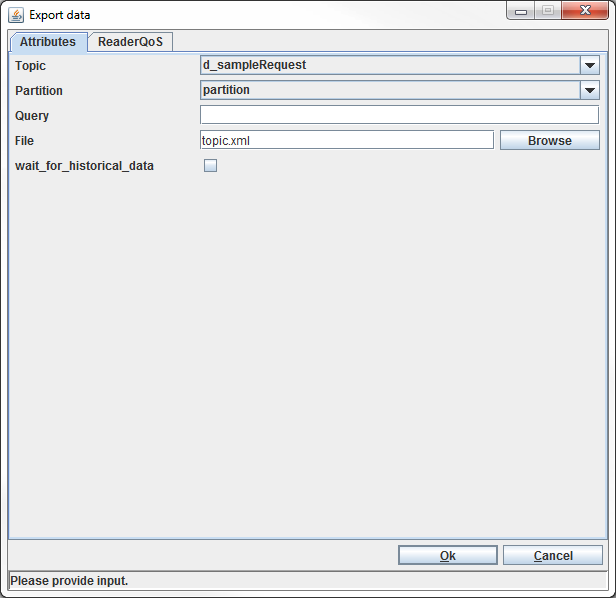
The Topic field specifies the topic whose data must be exported.
The Partition field determines from which partition the data must be exported.
The Query field can optionally be used to specify a query, so only data that matches the query will be exported.
The File field determines the location where to store the data. The Browse button can be used to select that location from within a file chooser.
The export functionality uses a reader to gain access to the data that needs to be exported.
The WaitForHistoricalData field determines whether the Reader will wait for historical data to arrive during creation (maximum of 30 seconds). In this case the Reader will still receive historical data.
By default the QoS settings of the Reader are copied from the Topic it reads. However, it is also possible to override these settings by specifying its own QoS settings/profile (see QoS Profiles) in the ReaderQoS tab. The QoS settings of the Reader influence the data that will be exported.
When the OK button is clicked, the input is validated. If the input is correct, all data that matches the topic, partition (and query) is exported to the specified file.
If the file already exists, it is overwritten.
If the input is not correct, an error message will appear in the status bar of the dialog window.
The Export data action can be cancelled by clicking the Cancel button. In this case, no data will be exported.
3.6.2.2. Partition Expression
Exporting data according to a partition expression looks a lot like exporting data from an existing partition. The only difference is that the data is exported from all partitions that match the supplied partition expression instead of only exporting data from one partition.
To export data according to a partition expression, choose Edit > Export data > Partition expression from the menu bar of the main window or right-click a Topic entity followed by choosing Export data > Partition expression from the popup menu that appears. Both of these actions result in the display of a dialog window as shown below.
Export Data (Partition Expression) dialog
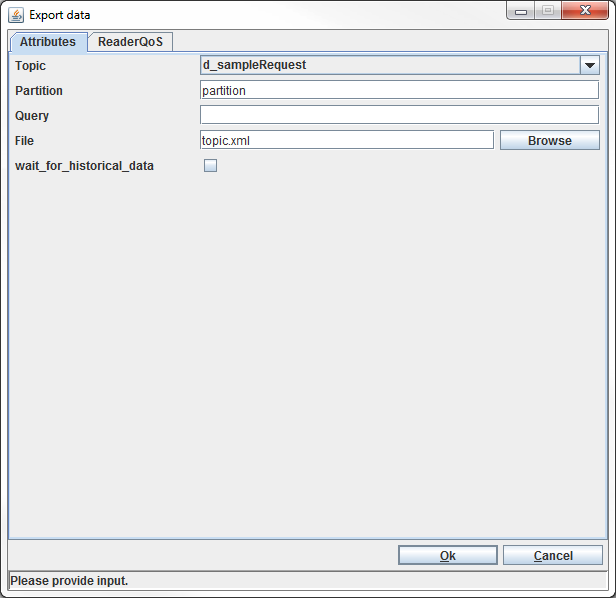
The Topic, Query and File input fields match the ones in the dialog window above.
The Partition field accepts a partition expression.
The export functionality uses a reader to gain access to the data that needs to be exported. The WaitForHistoricalData field determines whether the Reader will wait for historical data to arrive during creation (maximum of 30 seconds). In this case the Reader will still receive historical data.
By default the QoS settings of the Reader are copied from the Topic it reads. However, it is also possible to override these settings by specifying its own QoS settings/profile (see QoS Profiles) in the ReaderQoS tab. The QoS settings of the Reader influence the data that will be exported.
When the OK button is clicked, the input is validated.
If the input is correct, all data that matches the topic, partition expression (and query) is exported to the specified file. If the file already exists, it is overwritten. If the input is not correct, an error message appears in the status bar of the dialog window.
The Export data action can be cancelled by clicking the Cancel button. In this case, no data will be exported.
3.6.2.3. From Existing Reader
OpenSplice Tuner also provides facilities to export data from an existing reader. This can be achieved from within a reader window and reader-writer window. To export data from a reader window or reader-writer window, choose Edit > Export from the menu of that window. This action results in the display of the dialog window shown below.
Export Data (From Existing Reader) dialog

Because both Topic and Partition are already known, only the File has to be specified in the dialog window.
The Browse button allows the selection of a file in a file chooser.
When the OK button is clicked, the input is validated.
If the input is correct, all data in the list view of the window is exported to the specified file. If the file already exists, it is overwritten. If the input is not correct, an error message appears in the status bar of the dialog window.
The Export data action can be cancelled by clicking the Cancel button. In this case, no data will be exported.
3.6.3. Import Metadata
Exported metadata can be imported again. Successful importing of metadata in a specific OpenSplice domain results in the creation of a topic in that OpenSplice domain.
To import metadata choose Edit > Import metadata from the menu bar of the main window. This results in the display of the dialog window shown below.
Import Metadata dialog

The File input field must specify the location of the file that contains the exported metadata. A file chooser can be used to look up the file by clicking the Browse button and selecting the file there.
When the OK button is clicked, the input is validated.
If the input is correct, the metadata in the specified file is imported into the connected OpenSplice domain. If the topic already exists with exactly the same characteristics (name, type name, key list, data type and quality of service), importing is also allowed but has no use.
If the input is not correct or a topic with the same name but other characteristics already exists in the connected domain, an error message appears in the status bar of the dialog window.
The Import metadata action can be cancelled by clicking the Cancel button. In this case, no data will be imported.
3.6.4. Import Data
Just like exported metadata, exported data can also be imported into a specific OpenSplice domain. When importing data, OpenSplice Tuner also checks whether the metadata of the data that needs to be imported is already available. If so, it checks to see if the metadata matches the metadata of the data to import. If not, it also imports the metadata. This means it is not necessary to import the metadata prior to importing the data when the metadata is unknown in the OpenSplice domain.
![]() Data that is imported will arrive at all data readers of running
OpenSplice applications that are participating in that domain and are
subscribed to this data.
Data that is imported will arrive at all data readers of running
OpenSplice applications that are participating in that domain and are
subscribed to this data.
3.6.4.1. Original Partition(s)
Importing data in its original partition(s) means that the data will be imported into the partitions it was exported from.
Choosing Edit > Import data > Original Partition(s) from the menu bar of the main window results in the display of the dialog illustrated below.
Import Data (original Partition) dialog

The File input field must specify the location of the data on disk.
The Make selection allows importing a subset of the data in the file specified by the File input field.
The Import data action can be cancelled by clicking the Cancel button. In this case, no data will be imported.
When the OK button is clicked and the Make selection check box is unchecked, OpenSplice Tuner validates the specified file and if so imports all data in the file into the original partition(s).
If the Make selection check box is checked when the OK button is clicked, the Import window shown below is displayed.
The Import Window
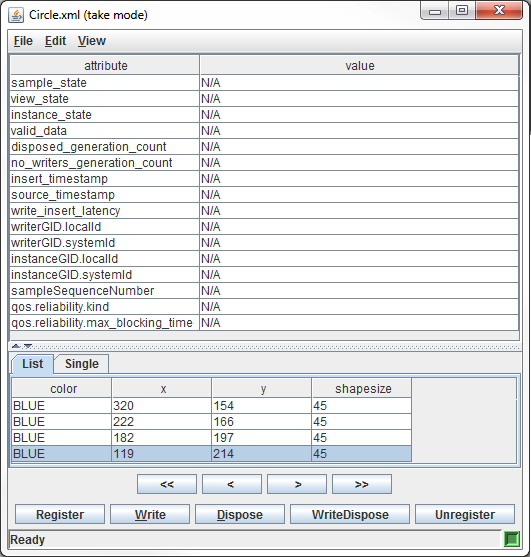
The import window consists of:
- Title Bar -
Displays the title. Format is: <file_name>(<mode>).
- Menu Bar -
Consists of File, Edit and View menus.
- Sample information View -
Displays the sample information of one specific sample.
- User Data View -
Displays the user data that is read by OpenSplice Tuner from the input file.
- Button Panel -
Contains buttons to consume data from the input file.
- Status Bar -
Displays the current action as well as the status of the snapshot.
Initially no data is displayed in the import window. By clicking the > and the >> buttons, the data in the file on disk is loaded and displayed in the window. Once data is displayed, it can be injected or disposed in the connected domain and partition.
Data can be injected by selecting the desired sample followed by choosing Edit > Write in the menu bar of the import window or by clicking the Write button at the bottom of the import window. To write all displayed data, choose Edit > Write all from the menu bar of the import window.
To dispose data, select the desired sample in the import window followed by choosing Edit > Dispose in the menu bar or by clicking the Dispose button at the bottom of the import window. To dispose all displayed data, choose Edit > Dispose all from the menu bar of the import window.
Samples that are injected or disposed are removed from the view in the import window.
Information about the Register, WriteDispose and Unregister buttons can be found in the section Injecting Data Using a Writer.
3.6.4.2. Existing Partition
Importing data in an existing partition almost works the same as importing it in its original partition. The only difference is that the partition to import the data in can be chosen now. To import data into an existing partition choose Edit > Import data > Existing Partition in the menu bar of the main window or right-click a partition entity in the entity tree of the main window followed by selecting Import data in the popup menu that appears. Both of these actions result in the display of the dialog window shown below.
Import Data (existing Partition) dialog

The File input field must specify the location of the data on disk.
The Partition field specifies the partition where the data must be imported in.
The Make selection allows importing a subset of the data in the file specified by the File input field.
The Import data action can be cancelled by clicking the Cancel button. In this case, no data will be imported.
When the OK button is clicked and the Make selection check box is unchecked, OpenSplice Tuner validates the specified file. If the specified file is valid, all data in the file is imported into the original partition(s). If the Make selection check box is checked when the OK button is clicked, the import window as illustrated earlier [44] is displayed.
By using the import window a subset of the data can be injected or disposed in the specified partition.
3.6.4.3. Partition Expression
Importing data in an existing partition almost works the same as importing it in its original partition and importing data in an existing partition. When using a partition expression, it is possible to import data into all partitions that match a specific expression.
To import data using a partition expression choose Edit > Import data > Partition expression in the menu bar of the main window. This action results in the display of the dialog window shown below.
Import Data (Partition expression) dialog

The File input field must specify the location of the data on disk.
The Partition field specifies a partition expression, which describes all partitions where the data must be imported in.
The Make selection allows importing a subset of the data in the file specified by the File input field.
The Import data action can be cancelled by clicking the Cancel button. In this case, no data will be imported.
When the OK button is clicked and the Make selection check box is unchecked, OpenSplice Tuner validates the specified file and if so imports all data in the file into the original partition(s). If the Make selection check box is checked when the OK button is clicked, the import window (The Import Window) is displayed. By using the import window a subset of the data can be injected or disposed in the specified partition.
3.7. Preferences
OpenSplice Tuner remembers user preferences. These preferences are
stored on disk in
<USER_HOME>/.ospl_tooling.properties.<OpenSplice Version>.
(The <USER_HOME> variable represents the home directory of the user).
The preferences can be modified by choosing Edit > Preferences in the
menu bar of the main window. This action results in the display of a
dialog to edit the preferences.
Edit Preferences
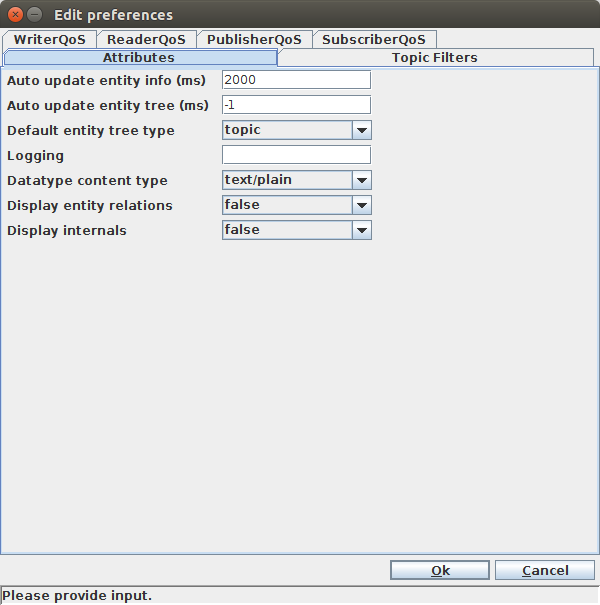
The Edit preferences dialog allows user to save preferences to disk, so they will be remembered when OpenSplice Tuner is exited.
Once the options are set to the desired value, they can be saved by clicking the OK button. This action triggers OpenSplice Tuner to save the preferences to disk. The dialog window is closed when the preferences have been saved successfully. If the input is not correct, an error message appears in the status bar of the dialog window.
The Edit preferences action can be cancelled by clicking the Cancel button. In this case, the preferences will not be saved.
The Edit preferences dialog has 6 tabs.
The Attributes tab has seven configuration options (see also Attributes Tab).
The Topic Filters tab provides filters to hide/show built-in topics in the different views (see also Topic Filters Tab).
There are four tabs for creating and editing Writer, Reader, Publisher and Subscriber QoS Profiles (see also QoS Profiles).
3.7.1. Attributes Tab
3.7.1.1. Auto Update Entity information
This option determines whether the information in an entity
information window is updated automatically and at what frequency.
This only applies to the status of the entity that is displayed in
the Status tab of that window (see Status). The value of
this setting must be expressed in milliseconds. The value of the
option must be >= 500 or -1. When -1 is supplied, no automatic
updates are performed. With a value >= 500, an update is performed
every value period. If the value approaches 500, the intrusiveness of
OpenSplice Tuner on OpenSplice increases.
The default value for this option is 2000.
3.7.1.2. Auto Update Entity Tree
This option determines whether the entity relations (see Entity Relationships) in the entity tree in the main window are updated automatically and at what frequency.
The value of this setting must be expressed in milliseconds.
The value of this option must be >= 500 or -1. When
-1 is supplied, no automatic updates are performed. With a value >=
500, an update is performed every value period. If the value
approaches 500, the intrusiveness of OpenSplice Tuner on OpenSplice
increases.
The default value for this option is "-1".
3.7.1.3. Default Entity Tree Type
This option determines the default view for the entity tree in the
main window. There are three options: "participant", "topic"
and "partition". The view can be changed during execution
(see Entity Relationships).
The default value for this option is "topic".
3.7.1.4. Logging
This option can be used to log internal OpenSplice Tuner information.
![]() This setting is intended for OpenSplice Tuner engineering purposes
only and should not be used.
This setting is intended for OpenSplice Tuner engineering purposes
only and should not be used.
The default value for this option is "".
3.7.1.5. Datatype Content Type
This option determines the default content type for the displaying of
entity data types in the Data type tab of an entity information
window. There are two options: "text/plain" and "text/html".
(See Data Type.)
The default value for this option is "text/plain".
3.7.1.6. Display Entity Relations
This option determines whether entity relations are visible by
default. There are two possibilities: "true" and "false".
The default value for this option is "false".
3.7.1.7. Display Internals
This option determines whether OpenSplice internals are visible in
the information that is shown by OpenSplice Tuner. There are two
possibilities for this option: "true" and "false".
When "true" is selected, internals are displayed; if "false"
is selected, they are not.
This option currently only has impact on which attributes of an entity are displayed.
The default value for this option is "false".
3.7.2. Topic Filters Tab
The topic filters allow the user to hide and show built-in topics in the different views (Participant, Topic and Partition).
By default the specification (DCPS) built-in topics are shown, and the other topic filters for internal built-in product topics are hidden. (CM, d_, q_, rr_)
3.8. QoS Profiles
The OpenSplice Tuner can store QoS Profiles for the following entities:
Writer
Reader
Publisher
Subscriber
A QoS profile is a pre-defined set of QoS settings identified by a name. This set can be used when creating a writer, reader, publisher or subscriber.
For each entity a seperate tab is available in all creation windows of the specified entities.
For the Writer and Reader a pre-defined QoS profile TopicQoS is
automatically added. This profile contains all QoS settings of the
chosen Topic.
For the Publisher and Subscriber a pre-defined QoS profile DefaultQoS
is automatically added. This profile is based on the default qos
settings as described in the DDS specification for the chosen entity.
When creating and editing QoS profiles through the Preferences window
these default QoS Profiles are not displayed.
3.8.1. QoS Profile window
A QoS profile window contains a drop-down list (Default Qos Profile) of defined QoS Profiles for that Entity.
The QoS Profile Window
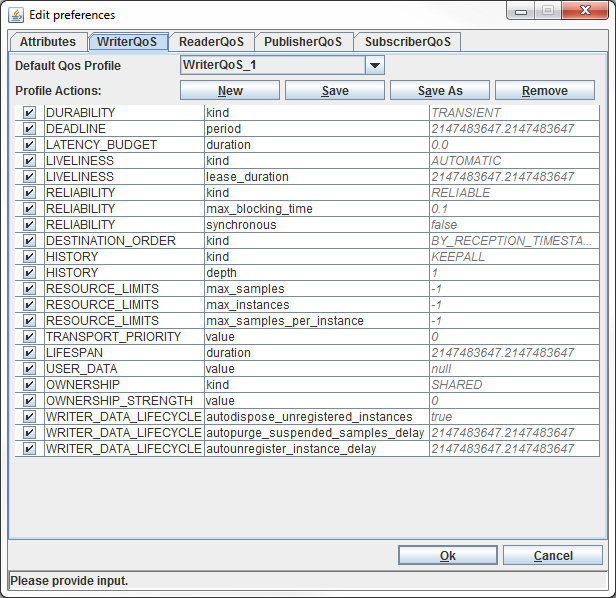
Below the drop-down list there is an action bar (Profile Actions) with four buttons. The rest of the window contains the QoS table where all QoS settings can be viewed and changed.
The New button creates a new QoS profile based on the default qos settings as described in the DDS specification for the chosen entity. When the New button is clicked, a dialog box appears for entering a name for the new profile.
![]() Two names are reserved for internal QoS settings:
Two names are reserved for internal QoS settings: DefaultQoS
and TopicQoS; these names cannot be used for user-created QoS profiles.
The Save button saves the QoS settings as shown in the QoS table to the currently-selected QoS Profile.
The Save As button saves the QoS settings as shown in the QoS table to a new QoS profile.
When the Save As button is clicked, a dialog box appears for entering a name for the new profile.
![]() Two names are reserved for internal QoS settings:
Two names are reserved for internal QoS settings: DefaultQoS
and TopicQoS; these names cannot be used for user-created QoS profiles.
The Remove button removes the currently-selected QoS profile from the QoS Profile list.
All QoS fields in the QoS table have a checkbox in front of them which determines whether the field is editable:
If the checkbox is checked the value cannot be edited and will automatically get the value as defined in the selected QoS profile.
If the checkbox is *un*checked the QoS field will get the value that is currently set in that field when the QoS profile is saved or the entity is created.
All QoS profiles are stored in the Tuner Preferences file in
<USER_HOME>/.ospl_tooling.properties.<OpenSplice Version>
where <USER_HOME> represents the home directory of the user.
3.9. Support for Google Protocol Buffers
3.9.1. About Google Protocol Buffers in Tuner
In versions of OpenSplice that support Google Protocol Buffers, Tuner is able to read from protocol buffer topics and display its samples as regular field name and value pairs, just as if it were from a regular IDL-defined topic.
The Tuner feature for Google Protocol Buffer topic reading is enabled only on OpenSplice middleware installs where Google Protocol Buffer support is included. For installations where it is not included, the feature is disabled in Tuner.
Tuner’s About dialog shows if the feature is available in the current build. It is accessible from the main window menu bar File -> About.
About Dialog
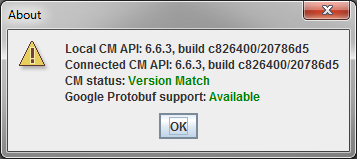
3.9.2. Viewing type evolutions
The main feature of using Google Protocol Buffers as the type definition for a topic is the ability to change, or ‘evolve’, a topic’s type. Tuner can become aware of changes to a protocol buffer topic’s type, and can display the topic type definition for each type evolution that is registered.
To view the type evolutions for a protocol buffer backed topic, right-click a topic, reader, or writer element in the entity tree, choose Display Entity, and navigate to the Data Type tab. For this case, the Data Type tab displays some additional information.
The Type Evolutions for the type are displayed in a drop-down combo box. It lists the known evolutions for the type according to the time it was registered in the DDS system. The most recent evolution is at the top of the list and is selected by default.
The Type Hash is a non-editable text field that displays the 128-bit hash that uniquely identifies the selected type evolution for the topic type.
The main text area now displays a description for all fields and nested types defined in the protocol buffer message for the currently-selected evolution, in a text format emulating the original
.protofile format. Message type fields found in the typedef that are not defined as nested messages inside the main DDS message type are defined under a separate section,External Definitions. These messages have their fully- qualified type name to indicate where they were defined. Please note that this typedef reconstruction is only meant to give the user an idea as to what type of data is found in the topic type. It is not guaranteed to be a 100% reconstruction of the original.protofile as it was written, or to be compilable by theprotoccompiler.
Protocol Buffer Type Definition
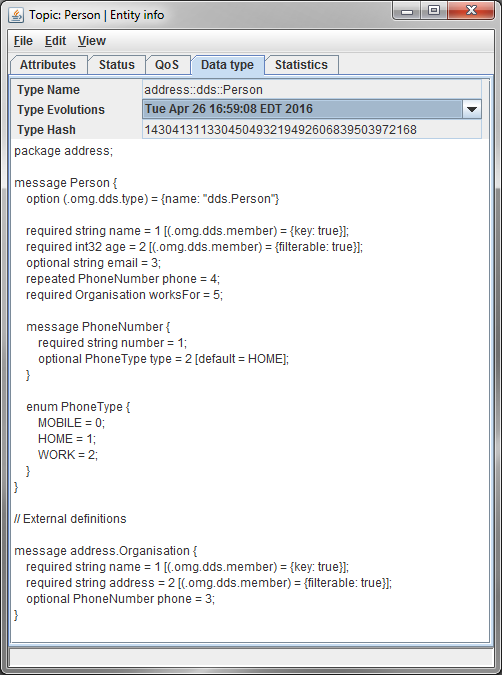
![]() HTML data type representation is not available for Protocol Buffer topics.
HTML data type representation is not available for Protocol Buffer topics.
3.9.3. Reading protocol buffer topics
Tuner reads protocol buffer data by reading in the byte sequence data contained in the user data, and then replacing all fields with regular field name and value pairs just as if it were data from a regular topic. The process for creating readers for protocol buffer topics is almost identical to the process described in Section 3.5.5, Creating a ReaderWriter.
If creating a reader-writer on a protocol buffer backed topic, the Create Reader-Writer Dialog will have an extra combo box input, allowing the user to select which type evolution to view the user data as. The default selection is the most recently registered version of the type in the DDS system.
Create ReaderWriter Dialog With Type Evolution Chooser
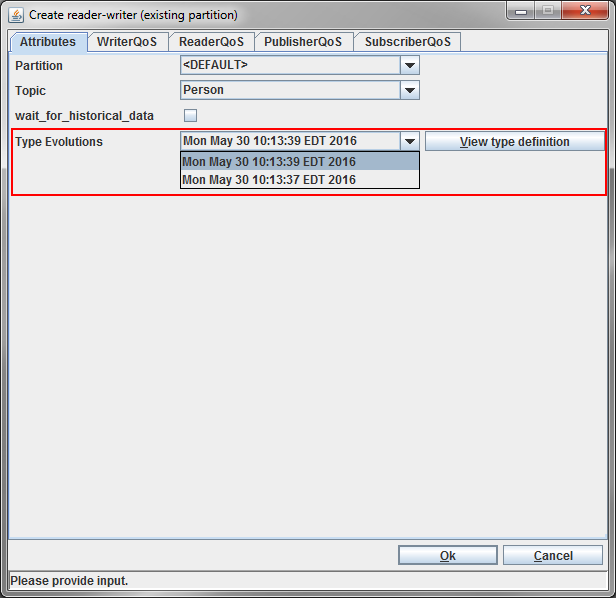
If selecting to read or write data on an existing reader or writer by choosing Read data or Make database snapshot for a reader, or Write data or Make history snapshot for a writer, a choice must be made as to what type evolution to view the data as, if the associated topic type is a protocol buffer defined type.
Read Data As Type Evolution Chooser

There is also a View Type Definition button in both dialogs that when clicked, brings up a new window showing the type definition text for the currently selected type evolution, as well as the registration time and type hash in the status bar. The window remains if the dialog is closed, and is reused with the contents updated if a different topic or type evolution is chosen for view.
View Type Evolution Type Definiton
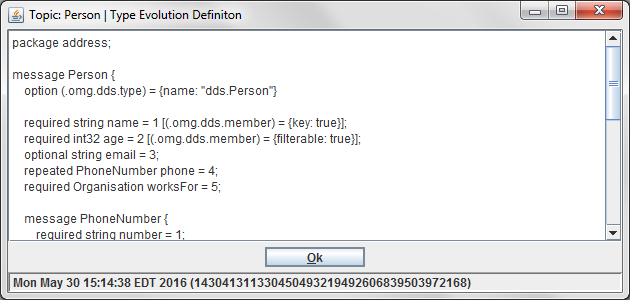
Once selections are complete and the reader or writer window appears, the user data model is populated with type fields and values that are decoded according to the type evolution that was chosen. An additional table highlight colour is shown in cyan where fields are defined as required in the protobuf type definiton. Topic key fields are still coloured green and are implied to be requried. All other unhighlighted fields are optional fields.
Aside from the above table changes, all interaction with the user data is the same as if it were being read or written from a regular topic.
A Reader-Writer Window for a Protocol Buffer backed Topic
